 Portalis
Portalis / Documentation / v1.1.0
Portalis documentation
Everything below is written against the shipping product. Where something is not built yet, it says so rather than describing what it ought to do.
What Portalis is
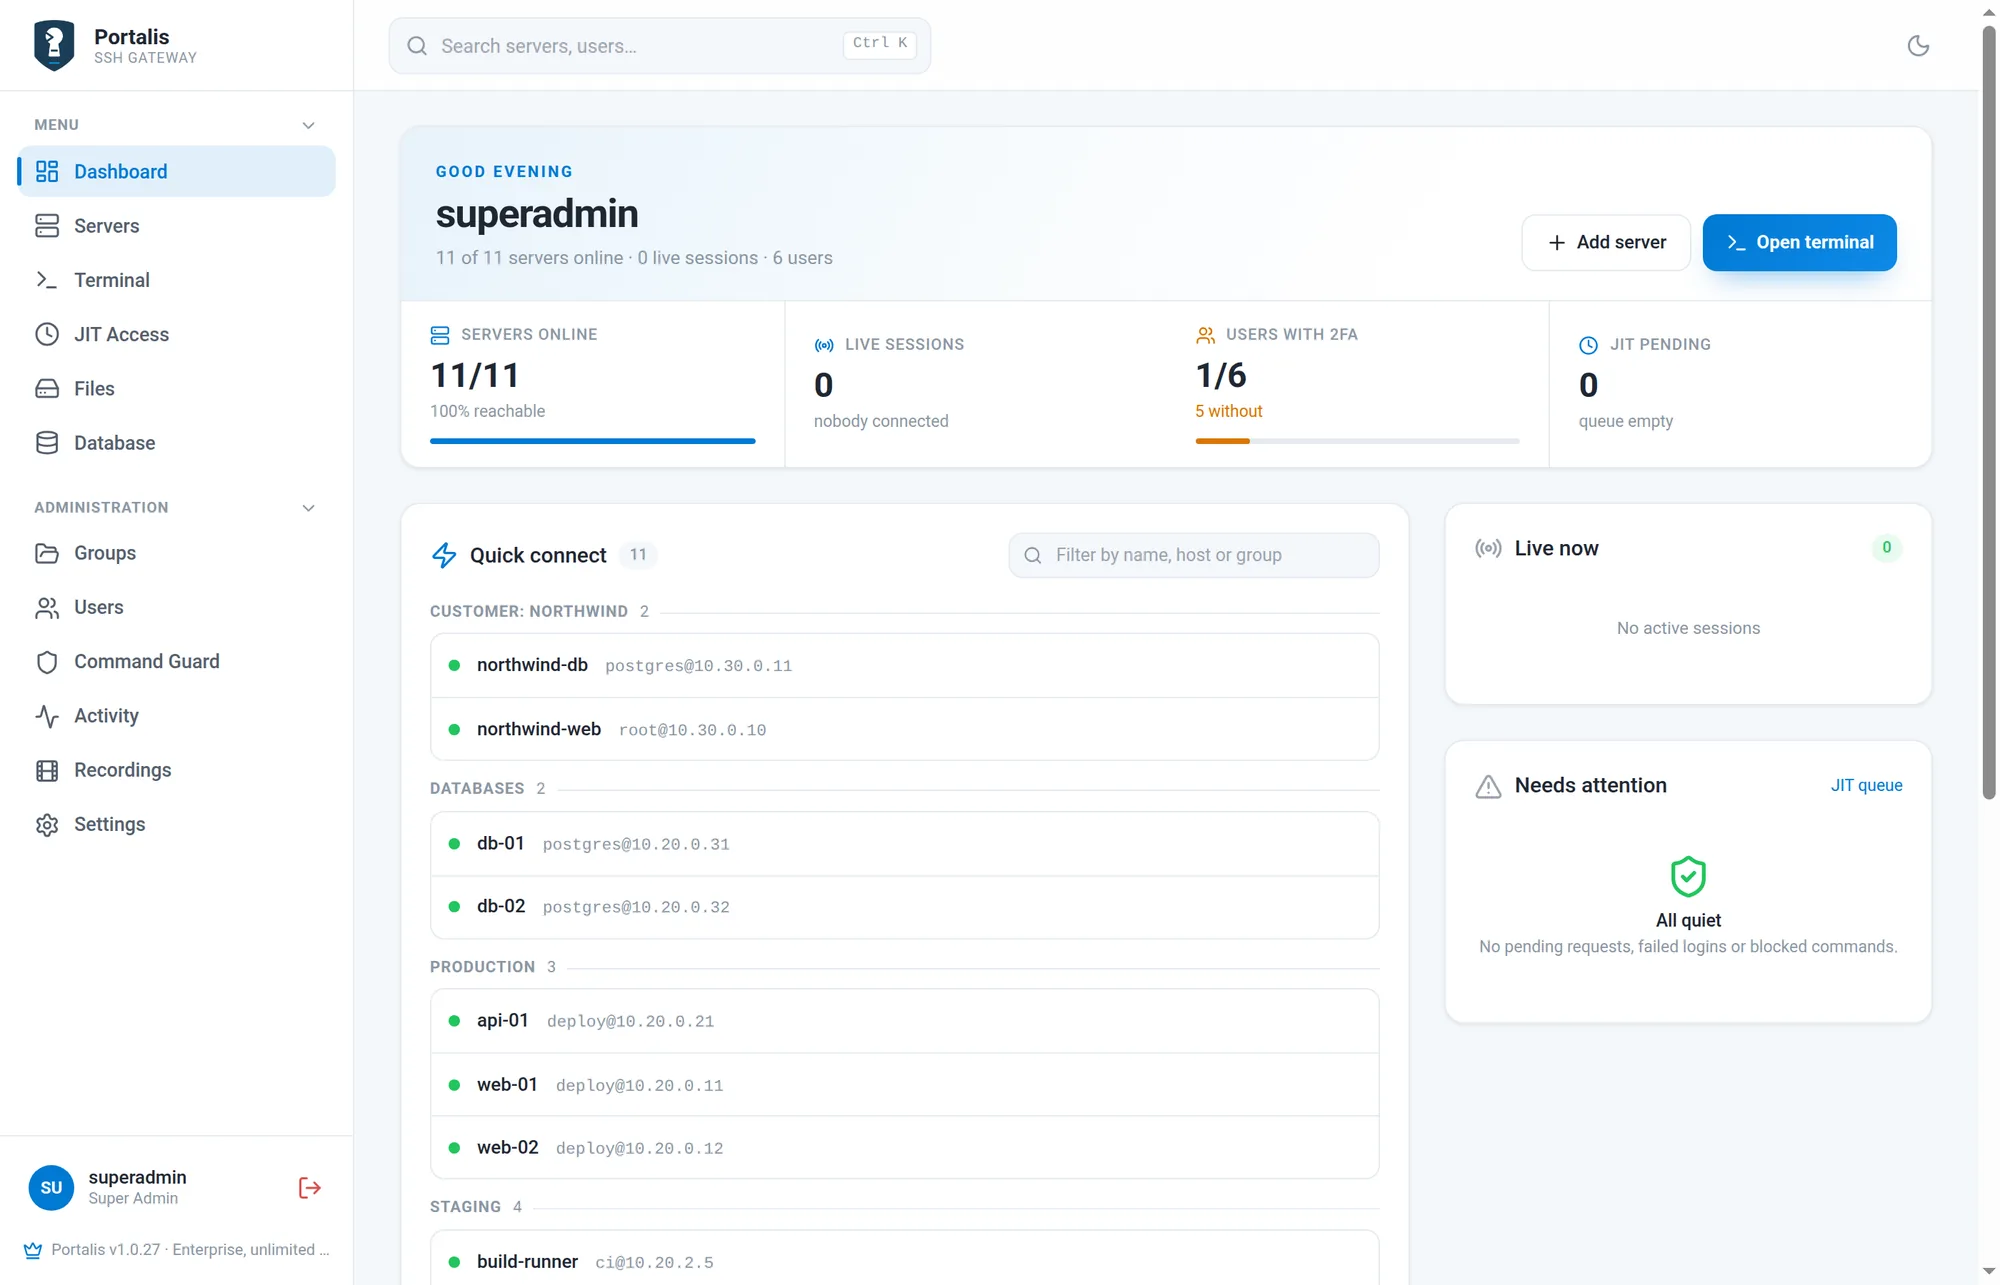
Portalis is a self-hosted SSH gateway. You install it on one machine, add the servers your team works on, and from then on people reach those servers through Portalis instead of holding the credentials themselves. Every session runs through the gateway, so sessions can be recorded, interactive commands can be checked against a rule, and access can be handed out and taken back in one place.
Two doors lead in, and both end up in the same audit log:
- The browser. A full terminal, a file manager and a database browser in the web interface. Nothing to install on the laptop.
- An ordinary SSH client.
ssh -l you your-gateway -p 2222gives a menu of the servers you may reach. Your own key, your own terminal, your own tooling.
Portalis holds the credentials for the servers. The people using it never see them, and when someone leaves you switch off one account rather than rotating a password on forty machines.
What you need
| A machine for Portalis | An x86_64 (amd64) Linux host with Docker and Compose v2. The published image does not support ARM64. A small VPS is plenty: 1 vCPU and 1 GB of RAM run it comfortably, 2 GB if you keep a lot of recordings. The installer offers to install Docker if it is missing. |
|---|---|
| Two ports | 8090 for the web interface and 2222 for the SSH gateway. Both can be changed at install time. Restrict them to the networks that need access. |
| Reachability | Portalis has to reach your servers on their SSH port. Your servers do not need to reach Portalis, and they need nothing installed on them. |
| A name and a certificate | Not required to start, but put Portalis behind a reverse proxy with HTTPS before real people use it. Caddy, Nginx, Traefik and Cloudflare Tunnel all work. |
| A licence | The Free plan covers five servers and needs no key. Pro and Enterprise come with a key you paste in once. |
Portalis is not an agent. Nothing is installed on the servers you connect to. It signs in over SSH the way you would, with a key it keeps to itself.
Install it
One line on the machine that will run Portalis:
curl -fsSL https://get.portalis.sh | sudo bashThe installer does four things and tells you which it is on:
- Checks prerequisites. Docker and Compose v2 must be there. If they are not, it asks whether to install Docker from
get.docker.com; answer n and it stops without touching anything. - Prepares
/opt/portalis. A compose file, a generated.envwith fresh secrets, and systemd units for the update checker. Re-running the installer on an existing install keeps your.envand your data. - Pulls the image and starts the containers. Portalis itself, PostgreSQL for its own data, and Redis.
- Waits until it answers. Then it prints the URL and the one-time bootstrap password.
Write that password down before you close the terminal. The installer shows it once, and it only works for the first sign-in. (The original value remains in /opt/portalis/.env, which is readable by root only; changing your account password does not rewrite that file.)
Choosing ports, a version or a directory
Pass installer variables explicitly through sudo env:
# a different web port, and pin the version
curl -fsSL https://get.portalis.sh | sudo env PORTALIS_PORT=9000 PORTALIS_VERSION=1.1.0 bash| Variable | Default | What it does |
|---|---|---|
PORTALIS_PORT | 8090 | Web interface port |
PORTALIS_SSH_PORT | 2222 | SSH gateway port |
PORTALIS_BIND | 0.0.0.0 | Address for both the web interface and SSH gateway; 127.0.0.1 restricts both to the host |
PORTALIS_DIR | /opt/portalis | Where the install lives |
PORTALIS_VERSION | latest | Pin a version instead of following the newest |
PORTALIS_TRUST_PROXY | 1 on loopback, else 0 | Trust X-Forwarded-For from private and loopback peers. On automatically when PORTALIS_BIND is loopback, because then a proxy is the only way in |
PORTALIS_TRUSTED_PROXIES | loopback and Docker bridge range when bound to loopback | CIDRs allowed to set X-Forwarded-For, comma separated. Overrides PORTALIS_TRUST_PROXY. The loopback default includes 172.16.0.0/12 because Docker forwards host traffic through its bridge; use only the actual proxy/bridge ranges on shared hosts |
PORTALIS_INSTANCE_NAME | the host's name | How this install is labelled in your account portal |
PORTALIS_INSTALL_DOCKER | ask | 1 installs Docker without asking, for unattended runs |
Your choices are remembered in /opt/portalis/.env, so re-running the installer keeps them unless you pass the variable again. The installer also writes everything it did to /var/log/portalis-install.log, with the bootstrap password masked.
Behind a reverse proxy
Bind Portalis to localhost and let the proxy hold the certificate. A Caddy example:
portalis.example.com {
  reverse_proxy 127.0.0.1:8090
}
Then re-run the installer with the bind address set. That publishes the web interface on 127.0.0.1 only, so the proxy is the sole way in, and it switches on trust for that proxy so the audit log records the visitor's address instead of the proxy's:
curl -fsSL https://get.portalis.sh | sudo env PORTALIS_BIND=127.0.0.1 bashThis also binds the SSH gateway to 127.0.0.1: remote SSH clients cannot connect directly. To make it available, use an authenticated VPN or a TCP proxy that can reach 127.0.0.1:2222. The gateway sees the TCP proxy's address for audit and IP allowlist checks.
A proxy on another machine needs Portalis bound to a reachable private interface and its address listed explicitly: pass PORTALIS_TRUSTED_PROXIES=10.0.0.5/32 in the same way. Without a trusted proxy, Portalis ignores X-Forwarded-For on purpose, because otherwise any client could name the address it wants recorded. The list can also be viewed and changed under Settings → Security → Trust a reverse proxy.
The SSH gateway on port 2222 is a raw TCP listener, not HTTP. It cannot go through an HTTP reverse proxy — expose the port itself, or put a TCP proxy in front of it.
First login
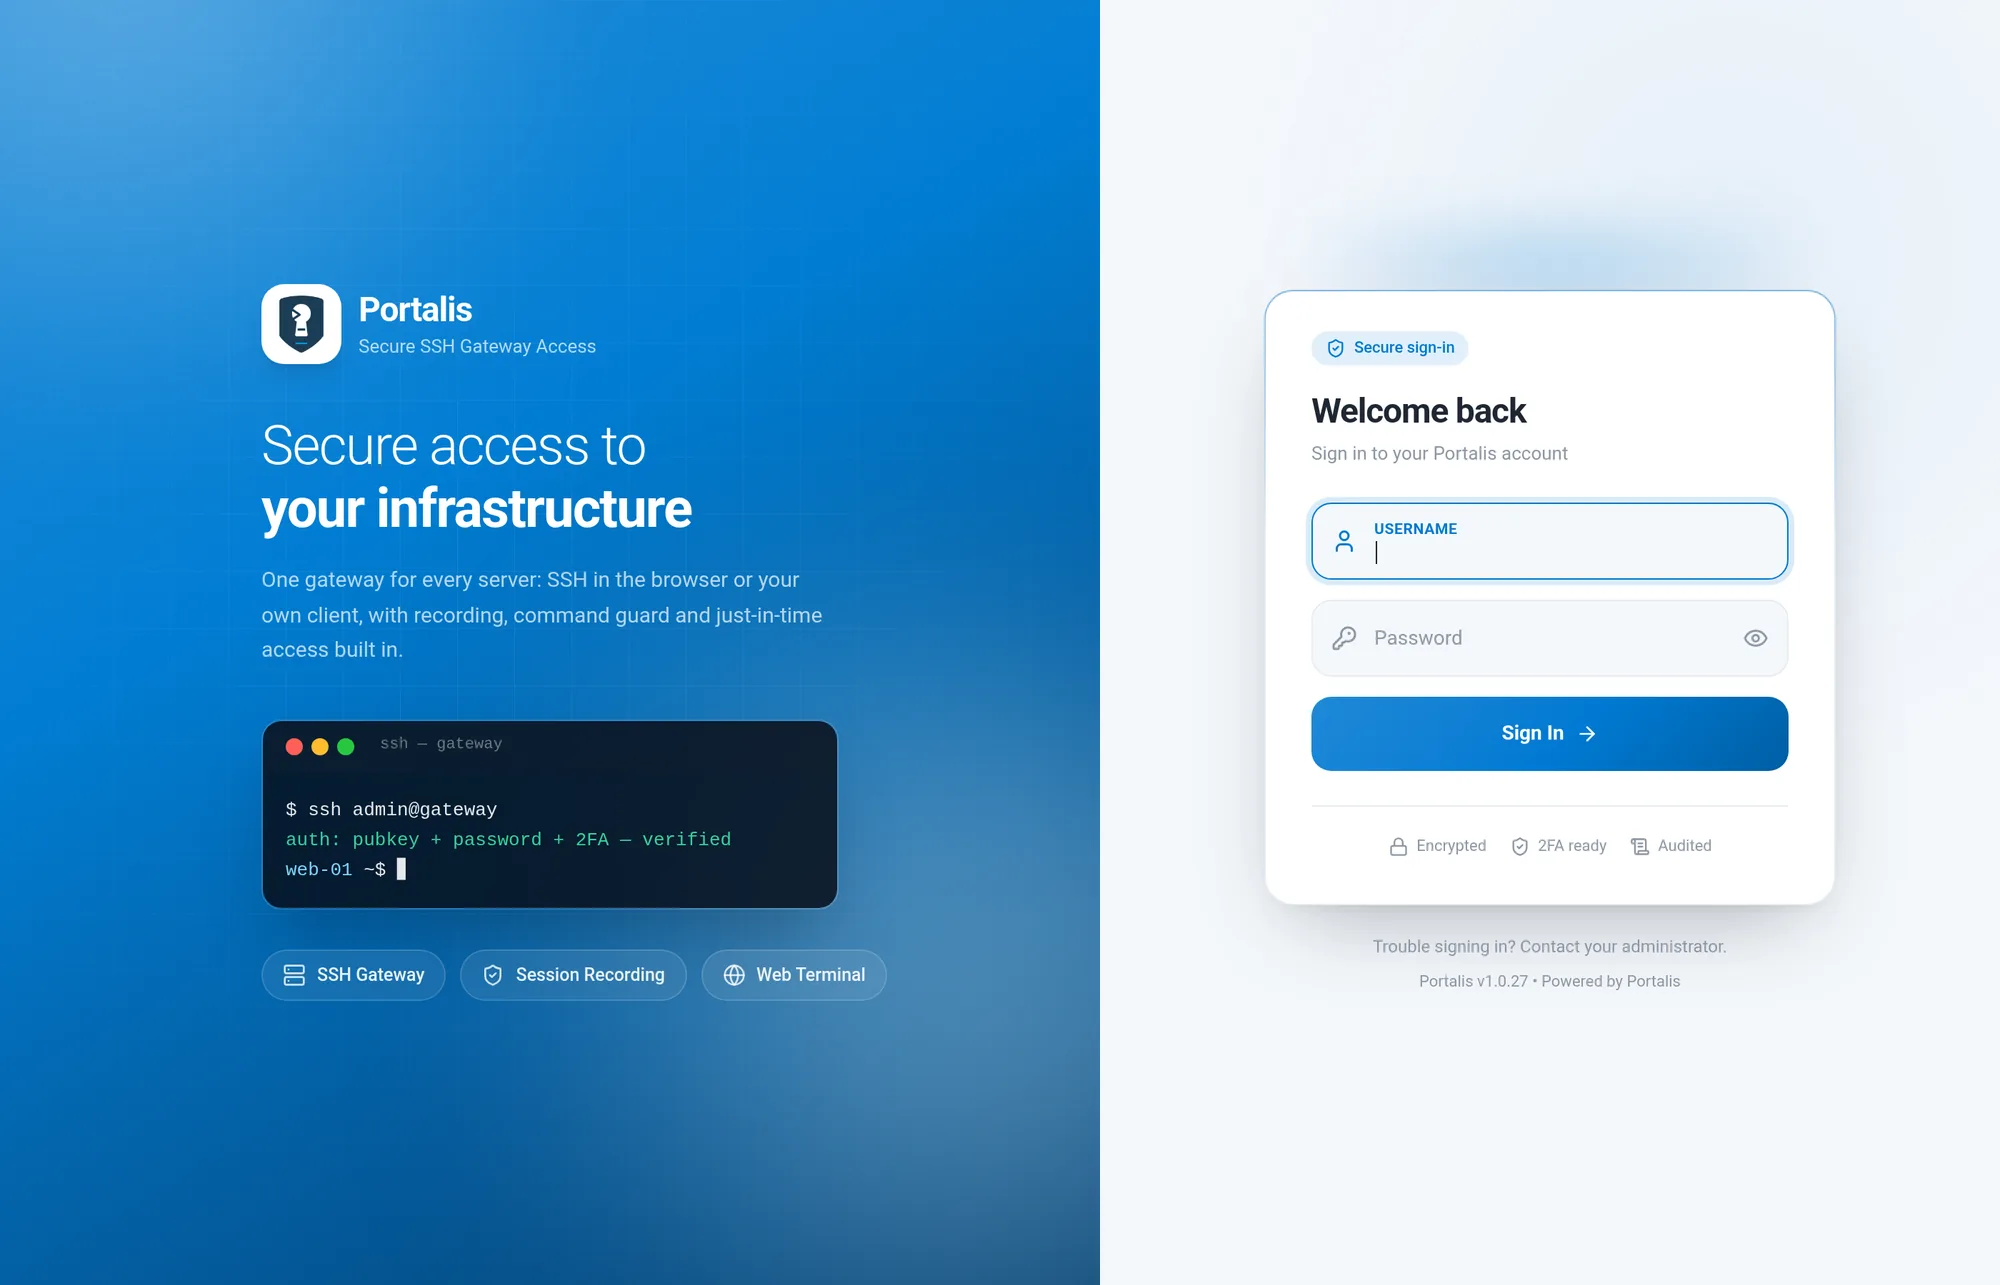
Configure HTTPS before entering the bootstrap password, then open the protected URL and sign in as superadmin with the bootstrap password. Portalis then makes you do two things, in this order, before it lets you anywhere:
- Replace the bootstrap password. The one from the installer stops working the moment you do. The password policy is checked as you type.
- Set up two-factor authentication. Scan the code with any authenticator app. This is not optional: an SSH gateway with a password-only administrator is a bad trade.
You are also handed a set of recovery codes. Each one works once, in place of an authenticator code. Put them where you keep your other break-glass credentials.
Your licence
A fresh install runs on the Free plan: five servers, the browser terminal, the SSH gateway, recordings and the audit log. No key needed, nothing expires.
Pro and Enterprise are bought at my.portalis.sh and lift the server limit and switch on the paid modules. After paying you get a licence key by email. Paste it under Settings → License & Modules and it applies straight away — no restart.
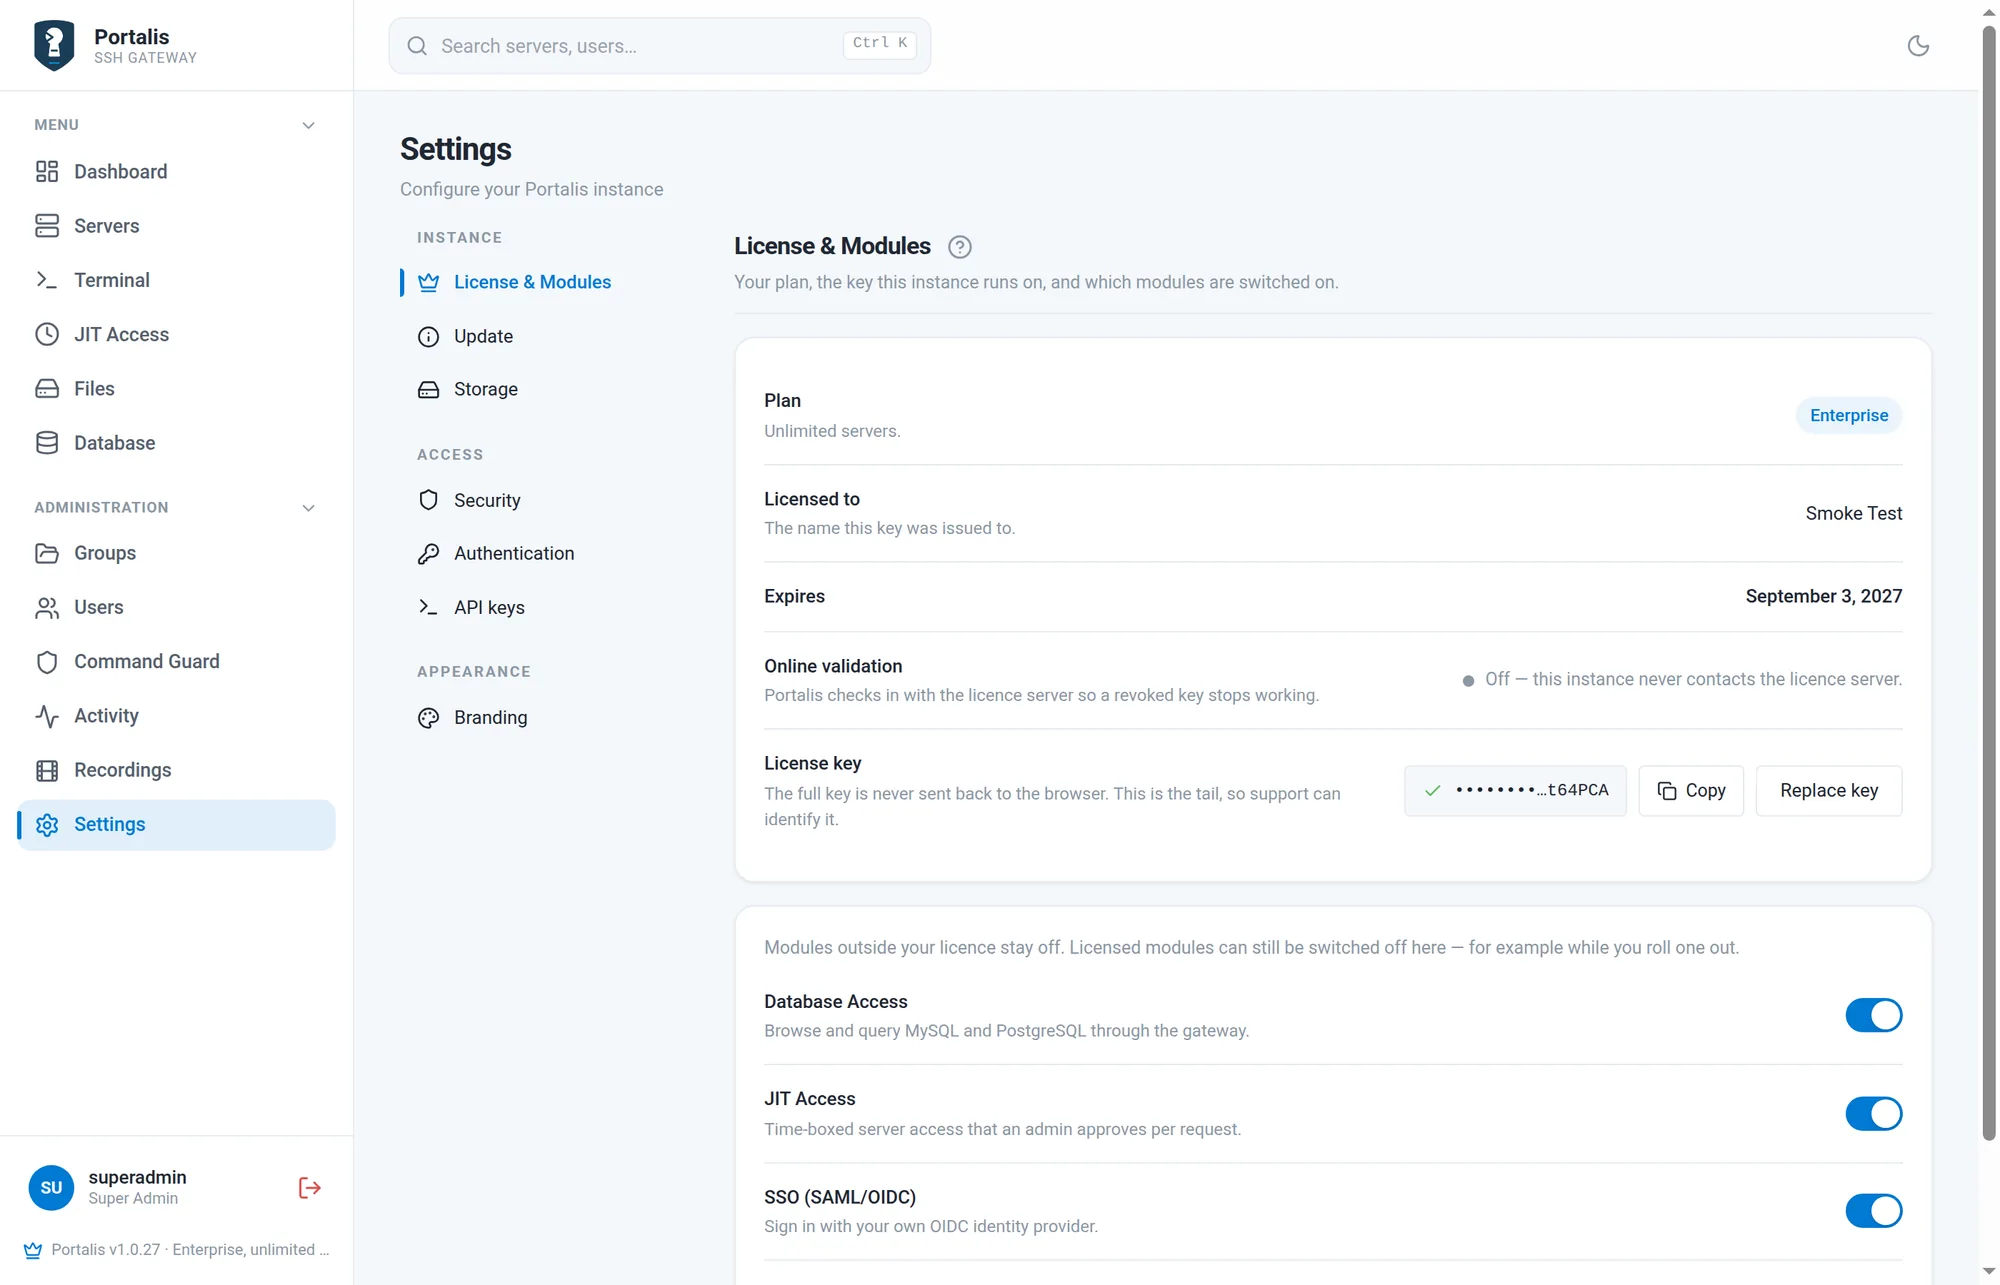
Changing plan later needs no copy-and-paste. When you upgrade or downgrade in the portal, the key is re-signed for the same licence and your instance picks it up at its next check-in, then logs license.updated_from_portal. Nothing to do on the server.
| Free | Pro | Enterprise | |
|---|---|---|---|
| Servers | Up to 5 | Unlimited | Unlimited |
| Users | Unlimited | Unlimited | Unlimited |
| Browser terminal, SSH gateway, recordings, activity log | Yes | Yes | Yes |
| File manager, command guard, API keys, alerts, audit export | Yes | Yes | Yes |
| Just-in-time access | — | Yes | Yes |
| Temporary accounts for people from outside | — | Yes | Yes |
| Single sign-on (OIDC) | — | Yes | Yes |
| Database browser | — | — | Yes |
| White-label branding (own logo, favicon, sign-in background) | — | — | Yes |
Plans count servers, never people, and there are no separate add-ons: a module is either part of your plan or it is not. The app name and accent colour can be changed on every plan; the logo, favicon, sign-in background and the “Powered by” line are the Enterprise part. Settings → License & Modules shows the same comparison with your own plan highlighted, and lets you switch a licensed module off for everyone while you roll it out.
Your instance checks in with the licence server once a day. If it cannot reach it, paid features keep working for a week of grace before they fall back to Free. For an Enterprise installation without internet access, contact us for the offline licence and deployment configuration; an ordinary paid key alone does not disable online check-ins.
Add a server
A server in Portalis is one machine it can sign in to. Go to Servers → Add server.
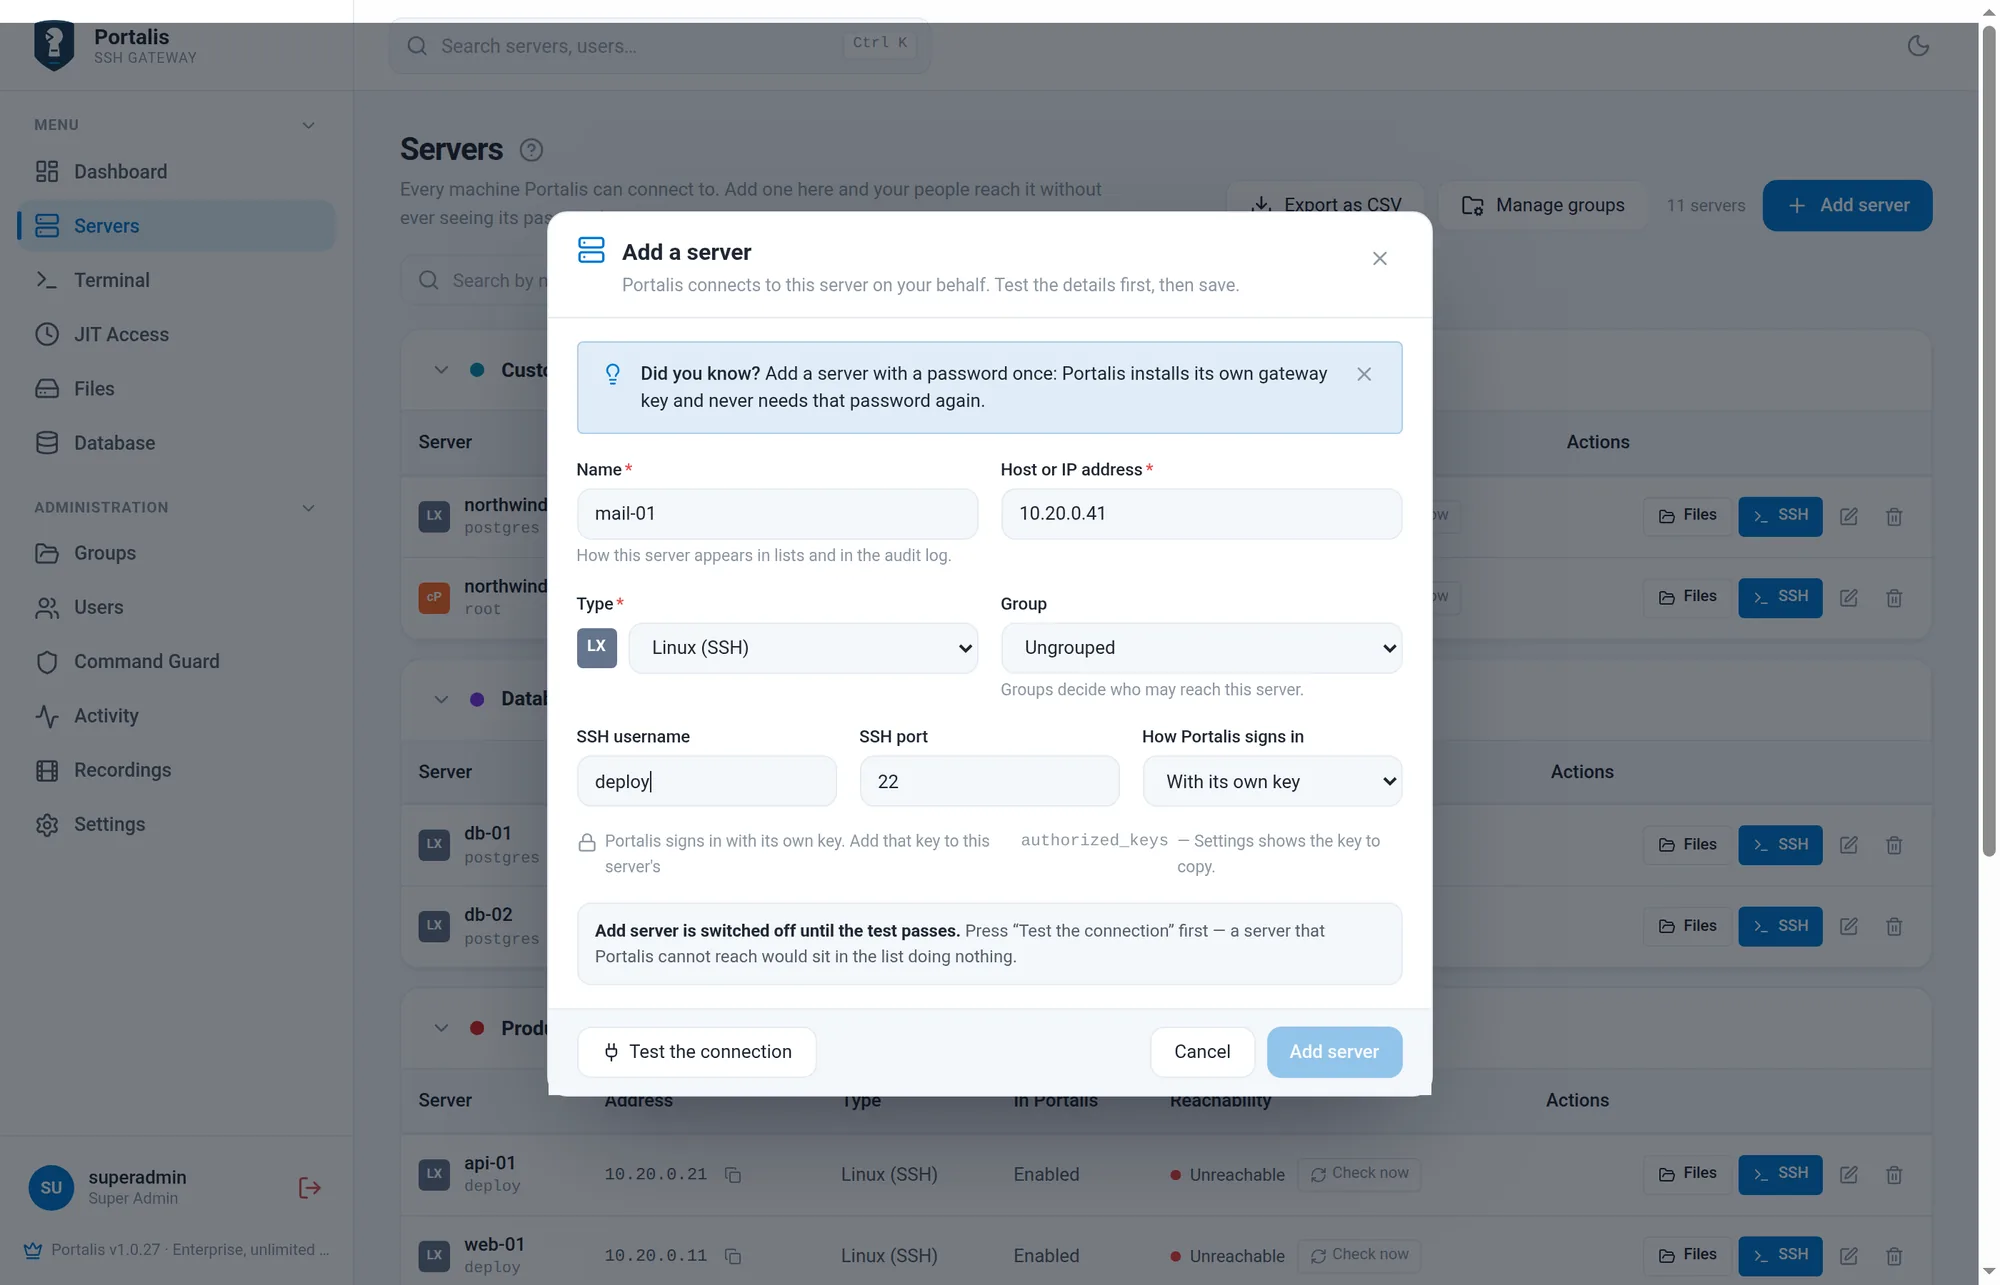
| Name | How the server appears in lists and, more importantly, in the audit log. Use the name your team already says out loud. |
|---|---|
| Host or IP address | Whatever Portalis itself can resolve and reach. A private address is fine and usually better. |
| Type | Linux (SSH) or Windows for ordinary machines; cPanel, WHM, DirectAdmin, Plesk or CyberPanel for hosting servers. A panel type adds a Panel login link, built from the host and the panel's usual port, so people reach the control panel from the same list; the SSH side is identical. |
| Group | The server group it belongs to. Groups are how access is handed out, so this field is worth getting right — but you can move a server later. |
| SSH username | The account Portalis signs in as. Prefer a dedicated account with the least privileges needed and explicit sudo rules. Everyone who opens a session on this server lands in that account, under their own name in the log. |
| SSH port | 22 unless you moved it. |
| How Portalis signs in | With its own key (recommended) or with a password, which Portalis stores encrypted until you install the gateway key. See below. |
Press Test the connection first. A server that Portalis cannot reach would sit in the list doing nothing, so the button stays disabled until the test comes back green. Once a server is in the list, Portalis checks it over TCP every five minutes, and Check now on its row tests it immediately. You can also switch a server off without deleting it: nobody can connect, and it stays in the list.
The gateway key
Portalis generates one SSH key pair for itself at install time and presents it to every server. That key is what makes the whole thing work without storing passwords: you install the public half once per server, and Portalis never needs a credential from you again.
Copy it from Settings → Security and add it to the target account's authorized_keys:
# on the server you are adding, as the account Portalis will use
mkdir -p ~/.ssh && chmod 700 ~/.ssh
echo 'ssh-ed25519 AAAA... ezssh-gateway' >> ~/.ssh/authorized_keys
chmod 600 ~/.ssh/authorized_keys
If installing the key by hand on forty servers is not appealing, choose With a password when you add the server. After the test passes, the dialog offers to install the gateway key on the server: Portalis signs in once with the password, adds its own key to authorized_keys, checks that the key works, switches the server to key login and drops the stored password. If you skip that step, the server stays on password login and the password stays stored, encrypted, until you install the key from the server's edit dialog.
The gateway key does not rotate on its own and does not change when you update Portalis. Install it once per server, protect its private half and replace it on every target if it is compromised. It is shown in full under Settings → Security whenever you need it again.
Host keys
The first time Portalis connects to a server it records that server's host key and pins it. If the key changes later — a rebuild, a restore, someone in the middle — the connection is refused and the audit log says why. After a legitimate rebuild, verify the new SSH host-key fingerprint through a trusted channel. Then open the server, press Forget the pinned host key, and let the next connection pin the new one. Do that only after a rebuild you expected: the next connection trusts whatever key the server presents.
Server groups
A server group is a bag of servers with a name and a colour: Production, Staging, Databases, Customer: Northwind. They exist for two reasons: the lists stay readable, and access is granted per group rather than per machine.
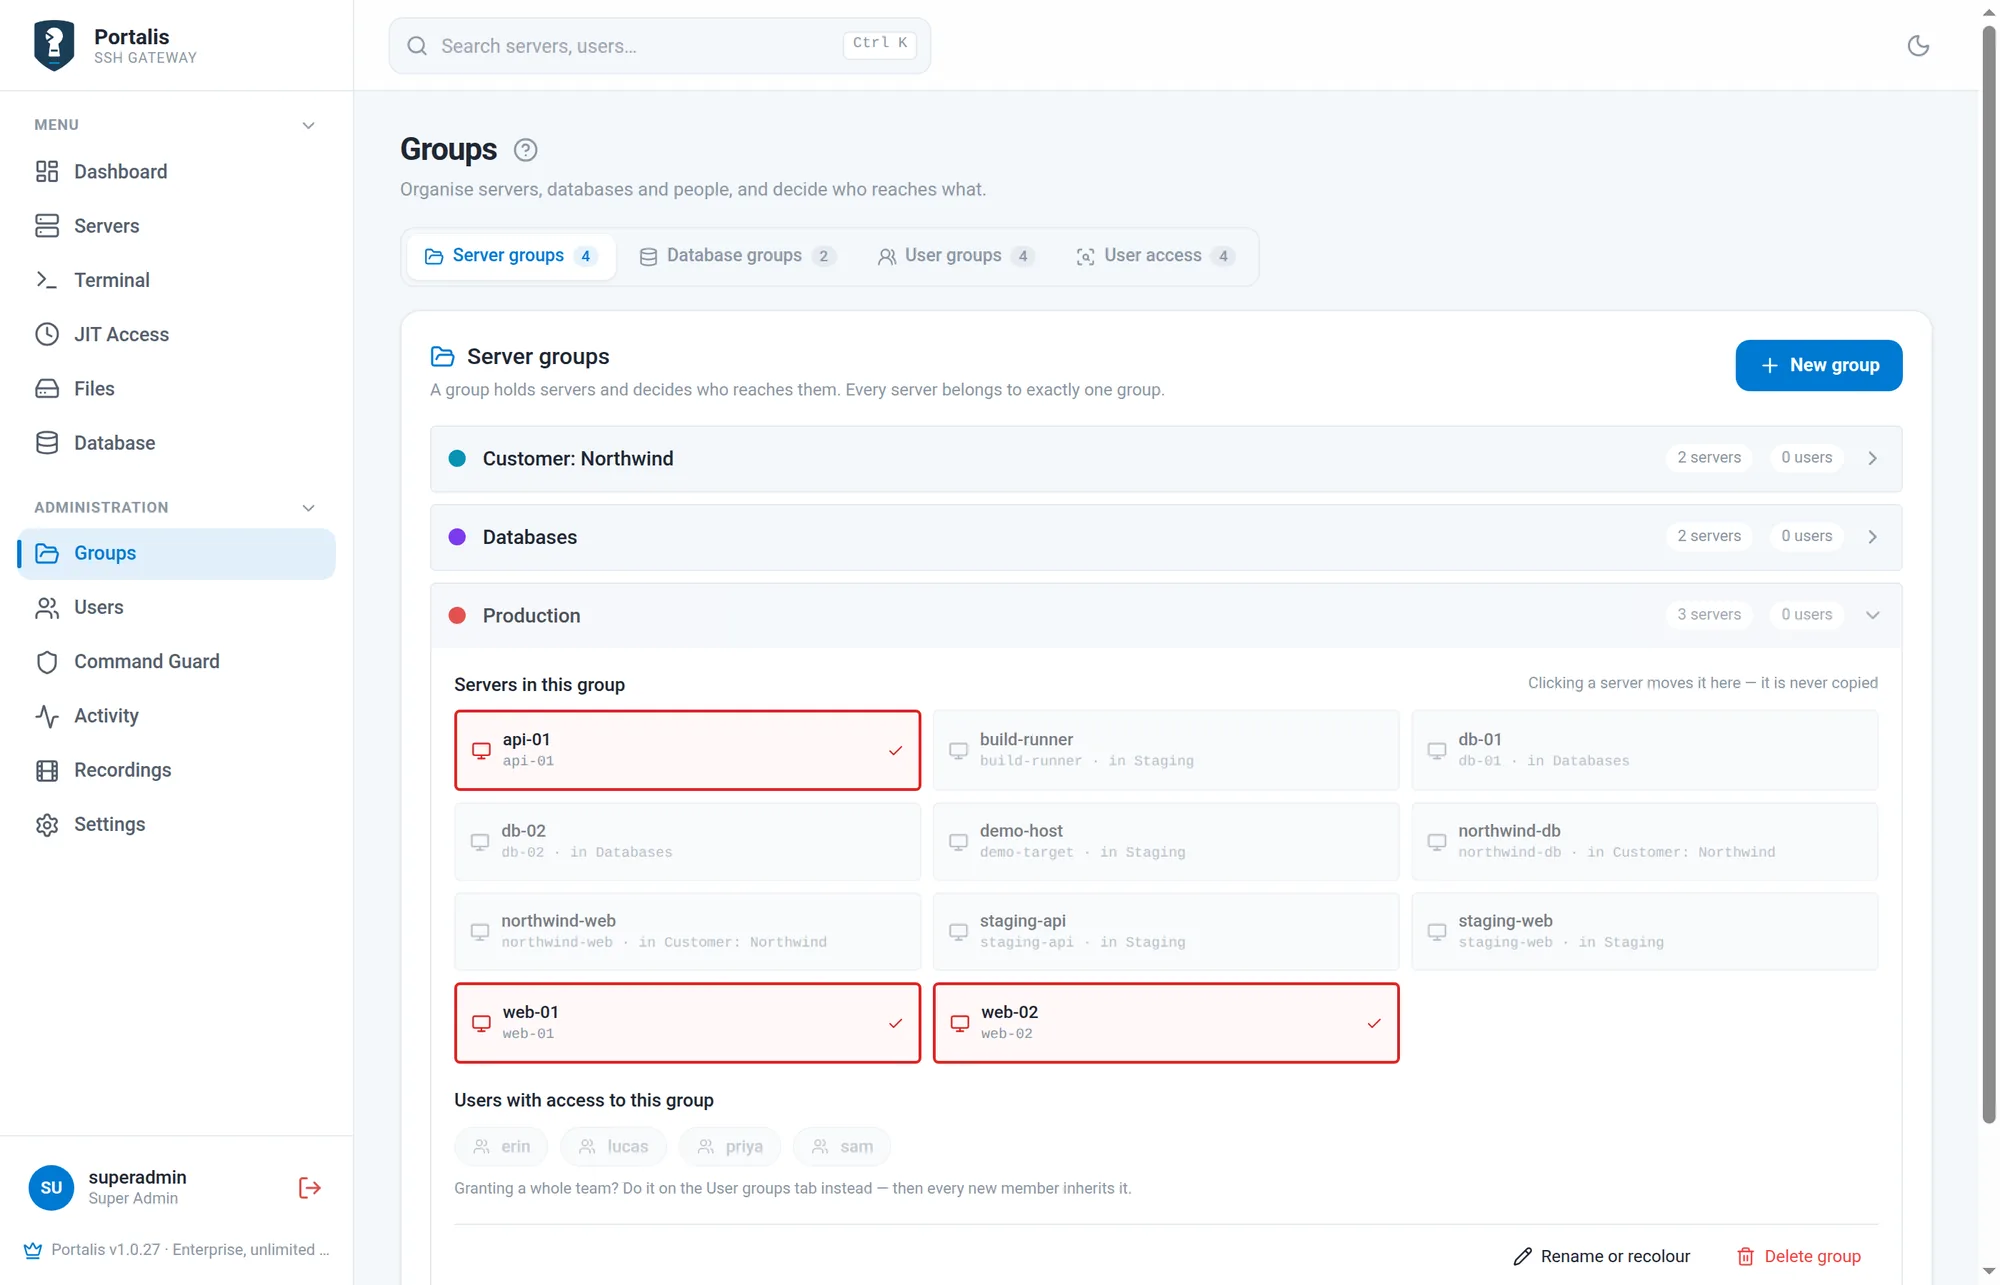
That last part is the point. Grant the DevOps team the Production group today, add web-03 to that group next month, and the whole team can reach it without anyone touching permissions again.
Group by what decides access, not by what a server runs. If Support may reach staging but not production, then Staging and Production are the right groups. If a customer's servers are handled by one team, a group per customer beats a group per role.
cPanel and other panels
Setting a server's type to cPanel, WHM, DirectAdmin, Plesk or CyberPanel changes two things: the row gets that panel's badge, and you can store the panel URL so people reach the control panel from the same list. Everything else — SSH, files, recording, the command guard — behaves exactly as it does for a Linux server.
Database connections
The database browser is an Enterprise module and it is worth being precise about what it connects to, because it is the one part of Portalis that does not go through your servers.
A database connection is its own thing: a MySQL, MariaDB or PostgreSQL login that Portalis dials directly. It does not use your server list, and it does not tunnel through SSH. The database has to be reachable from the machine Portalis runs on.
Go to Databases → New connection and fill in a name, the kind of database (MySQL / MariaDB or PostgreSQL), host, port, database name, user and password. Group it the way you group servers — Reporting, Production data — because database groups are how access is granted.
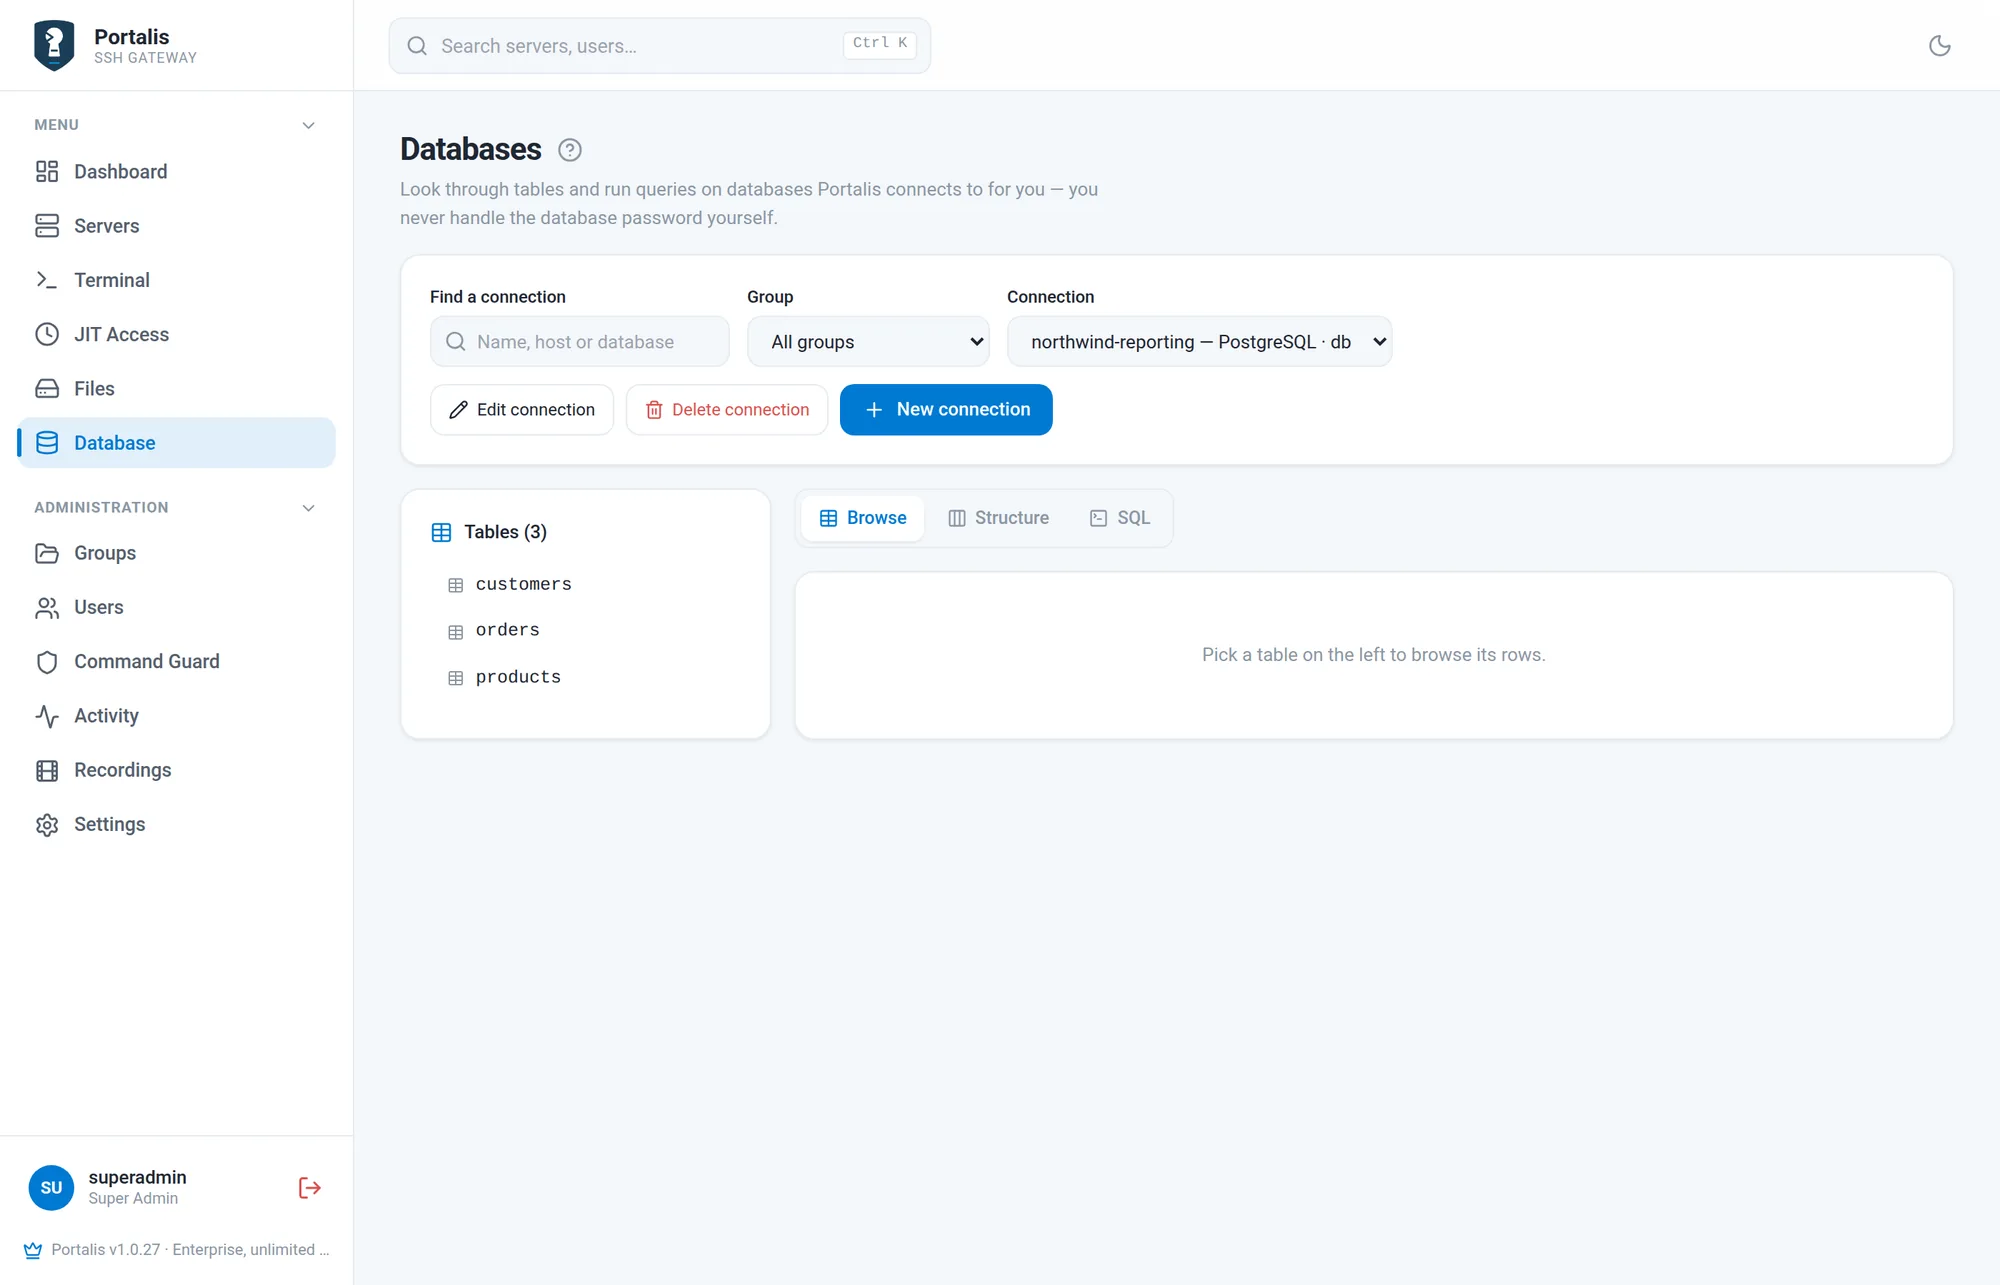
Test connection works the same way as it does for servers. Editing a connection later leaves the password field blank: fill it in only when you want to change it.
If the database only listens on 127.0.0.1 on its own machine, Portalis cannot reach it. Either bind it to a private address Portalis can reach and firewall it to the gateway only, or keep using the SSH terminal and the database's own client on the server. Tunnelling a database connection through the gateway is on the roadmap and not built yet.
How access works
Four things decide whether a person can open a session on a server. For ordinary users the grants combine; administrators reach all active servers through their role.
| Layer | What it grants | Where you set it |
|---|---|---|
| Role | Super admin and admin reach every server. Everything below applies to ordinary users. | People |
| Team | A user group is granted whole server groups. Every member inherits every server in them, including the ones added later. | Groups → User groups |
| Person, whole group | One person can be granted a server group directly, without being in a team. | Groups → User access |
| Person, one server | One person can be granted a single server on top of everything else. | Groups → User access |
They add up: someone in two teams reaches the union of both. For ordinary users, a deny on a server or its whole server group overrides every grant, including JIT access. Denies do not restrict administrators. That is how you hand a team the whole of Production and still keep one machine out of their reach.
The recommended order when setting up is: server groups first, then servers, then teams, then people. Do it that way and every account you create is useful the moment it exists.
Add a user
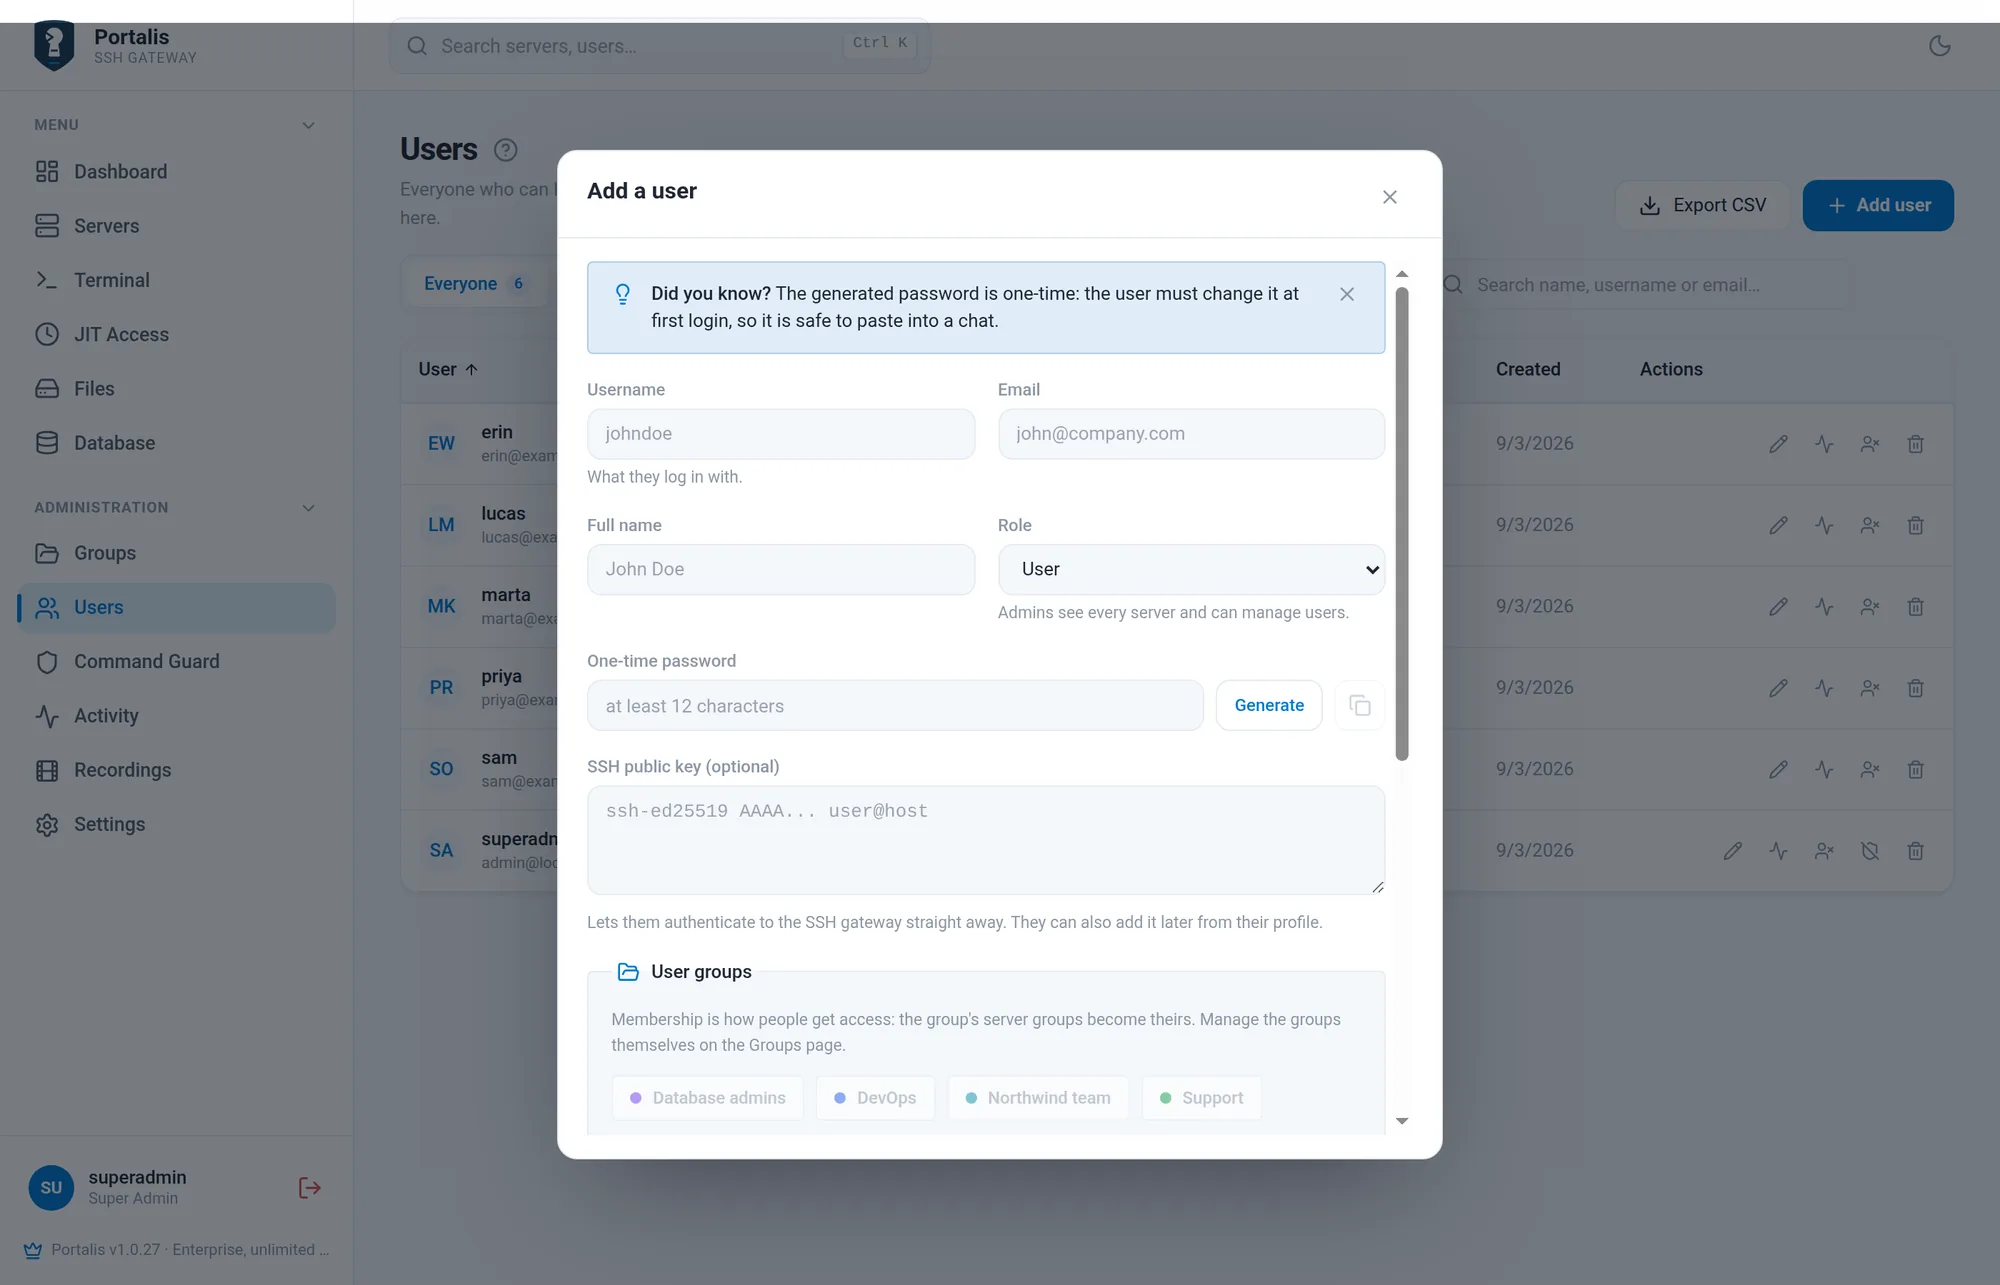
People → Add person. Username, full name, email, role, and a one-time password you either type or generate.
| Role | Reaches |
|---|---|
| User | Only what their teams and personal grants give them. This is almost everybody. |
| Admin | Every server, plus servers, users, groups, the guard and the audit log. |
| Super admin | Everything an admin does, plus the licence, updates and other super admins. |
The password you set is one-time: the person must replace it at their first sign-in, and they have to enrol two-factor authentication before they reach anything. You can also paste their SSH public key while creating the account, which saves them a step — and after the account exists, the same dialog lists the keys on it so you can check or remove one.
Deactivating a user is usually better than deleting them: their history stays readable in the audit log, and their sessions stop immediately either way.
Teams and their servers
A user group is a team. Give the team whole server groups and everyone in it inherits them.
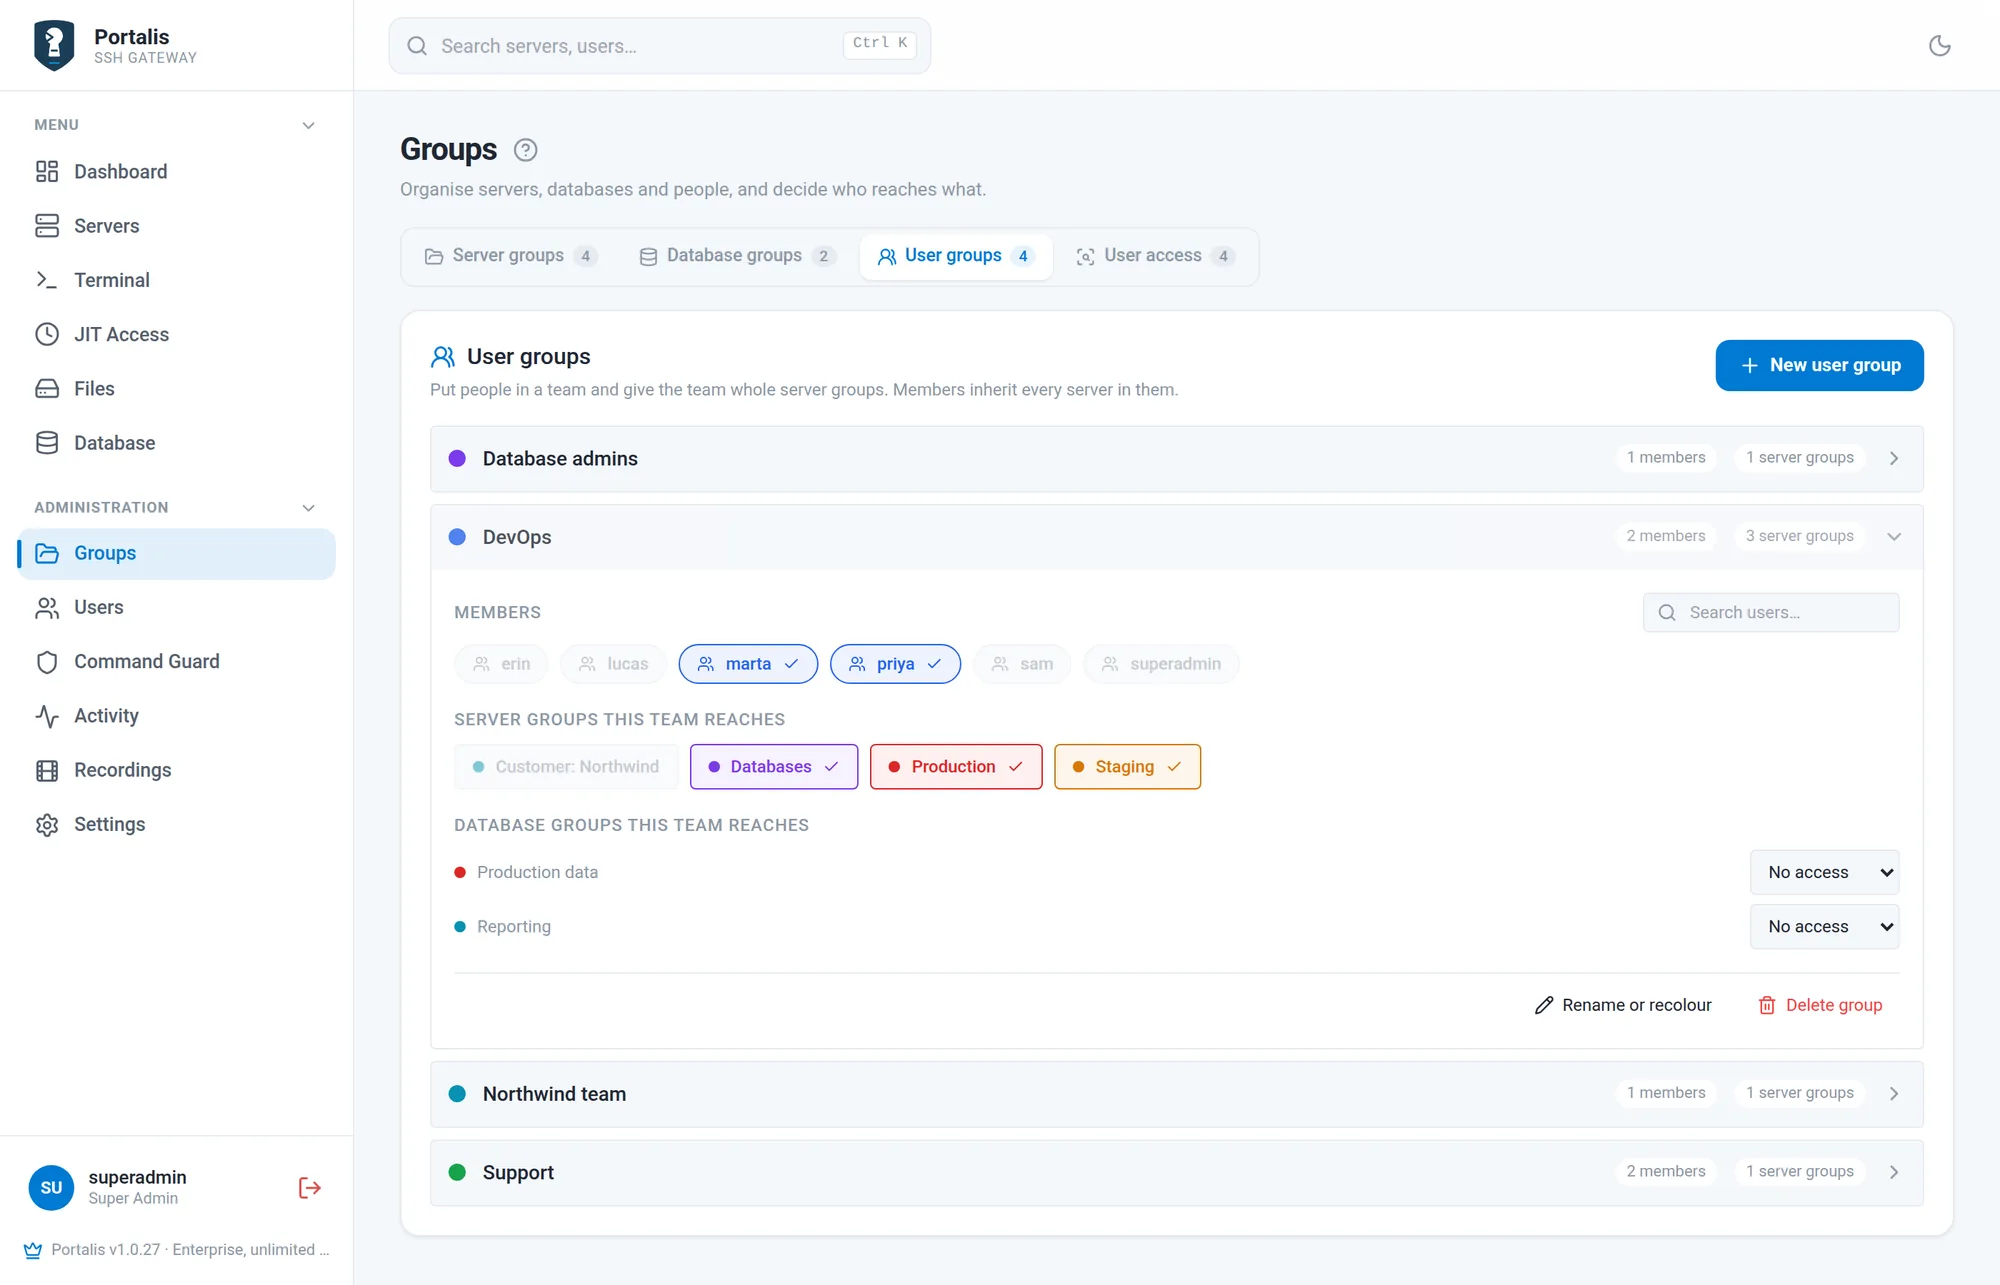
- Open Groups → User groups and press New user group. Name it after the team, not the access: DevOps, Support, Northwind team.
- Open the group and tick the people in it. The chips fill in as you go.
- Under Server groups this team reaches, tick the groups they need. That is the grant — there is no save button, it applies as you click.
This is the layer you want to be using for almost everything. A new server joins a group and the right people can already reach it. A new colleague joins a team and has the right access before their first day is over. Nothing to review server by server.
One server for one person
Sometimes a team grant is too much. A support engineer needs to look at one database server, once, and putting them in Database admins would hand them all of it. Portalis has a layer for exactly that.
- Go to Groups → User access.
- Find the person and open their row. Everyone is listed with how many single servers they already hold.
- Open the group the server sits in — the groups here are only a way to find the machine, not a grant.
- Tick the one server. It applies immediately; the badge on their row goes to 1 single server.
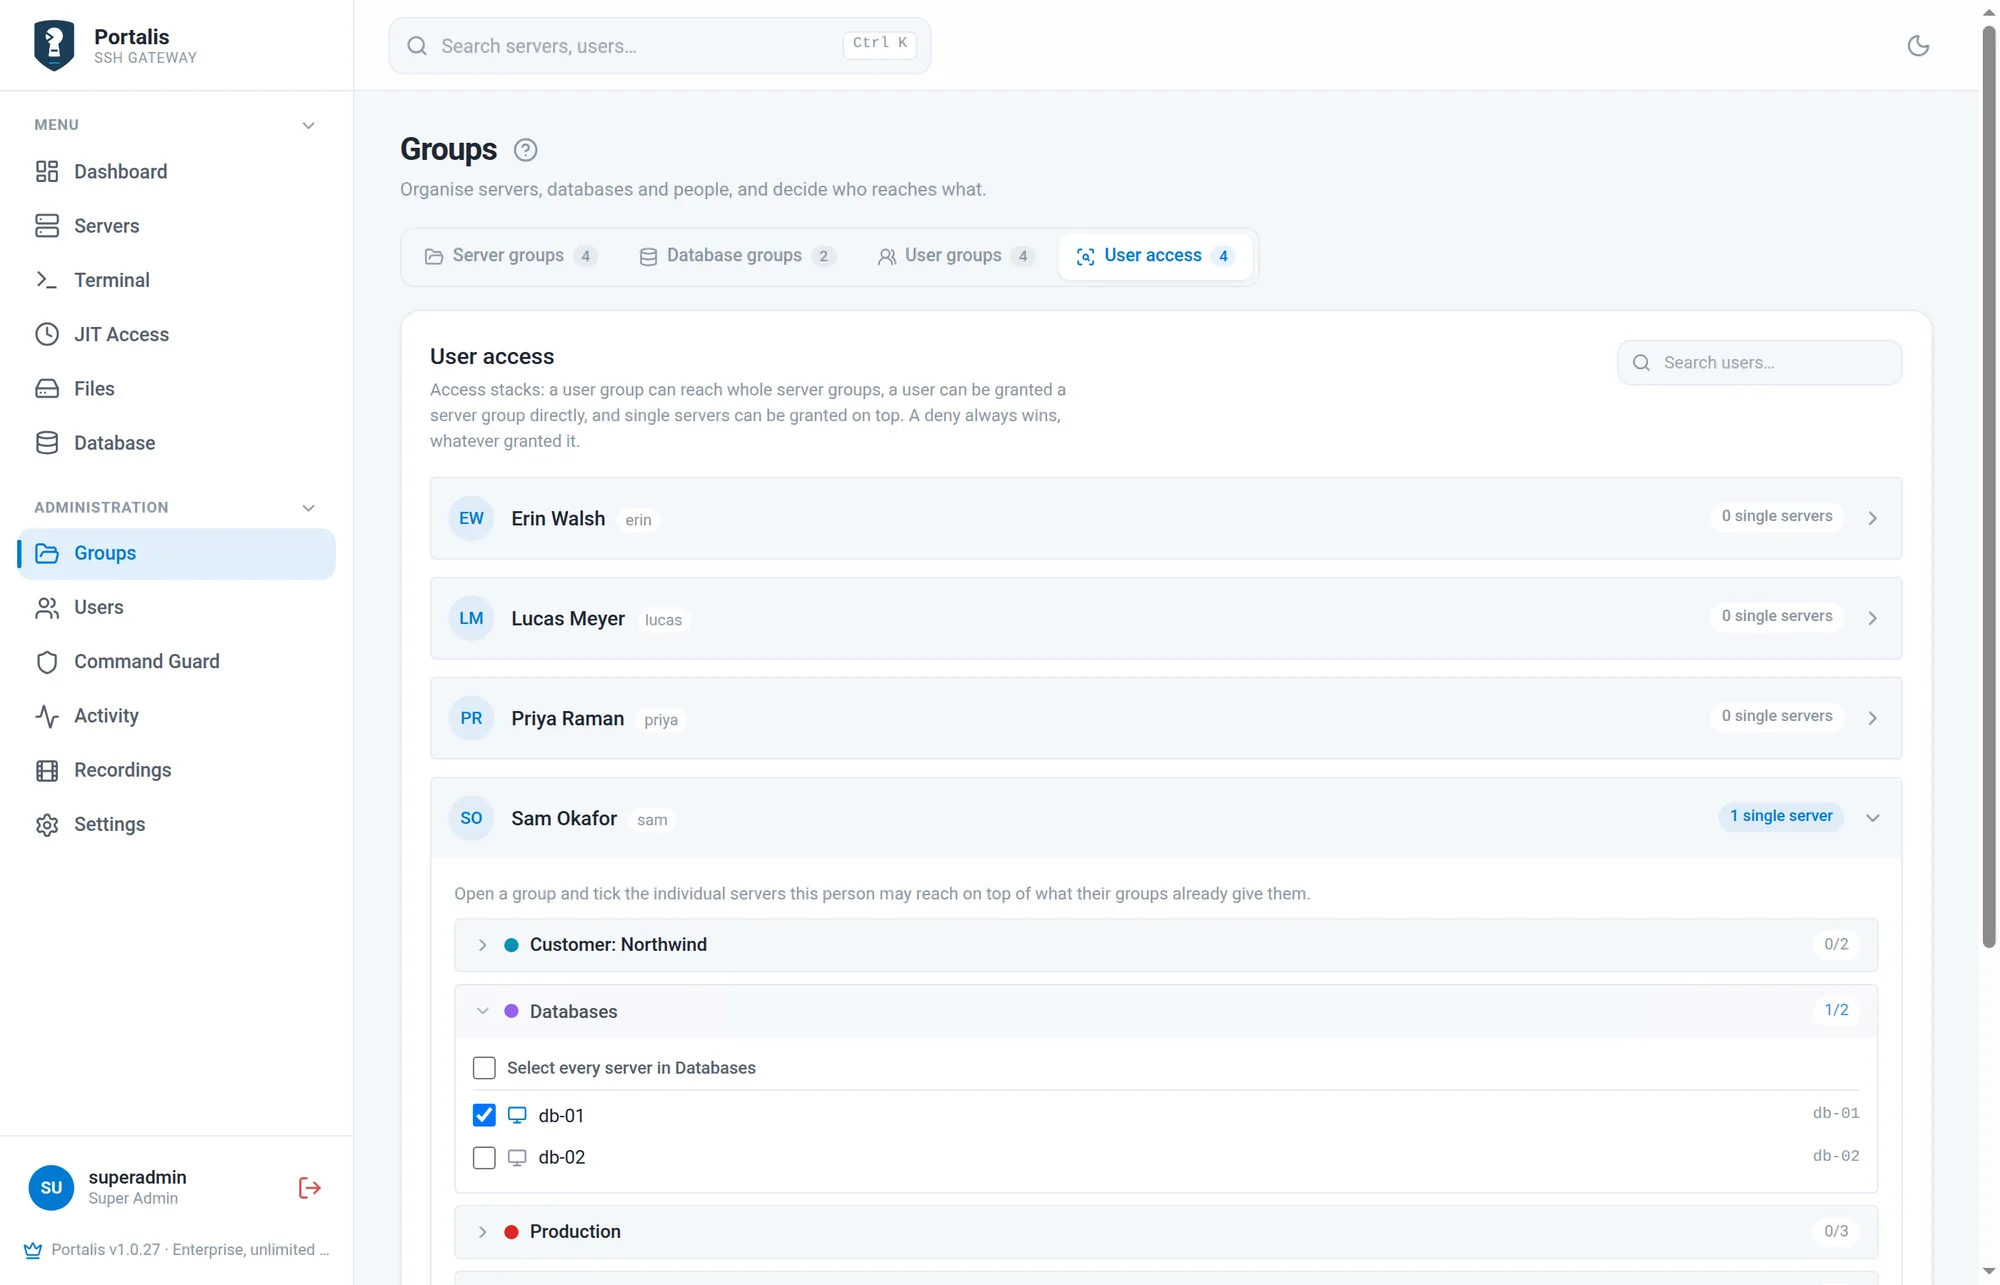
db-01 and nothing else in that group. No team membership, no group grant.This grant sits on top of whatever their teams already give them, and it is the same panel you use to take it away again: untick, and the access is gone at once. Open browser and SSH shells are rechecked as soon as you change access. A session closes if the person no longer has access through any grant; another team or personal grant can still keep it authorised. Deactivating the account under People closes all its shells.
The same row also holds Select every server in a group, which grants that whole group to this one person without creating a team for them. Use it when one person genuinely is the exception; use teams when there will ever be a second person.
Single-server grants are the layer that quietly rots. They are invisible in the team view, so someone keeps a server long after the reason expired. Check User access every few months, or use just-in-time access instead, which expires on its own.
Who can reach what
At the bottom of Groups → User access is Effective access. Pick a person and it lists every server they can reach right now, and which rule put it there.
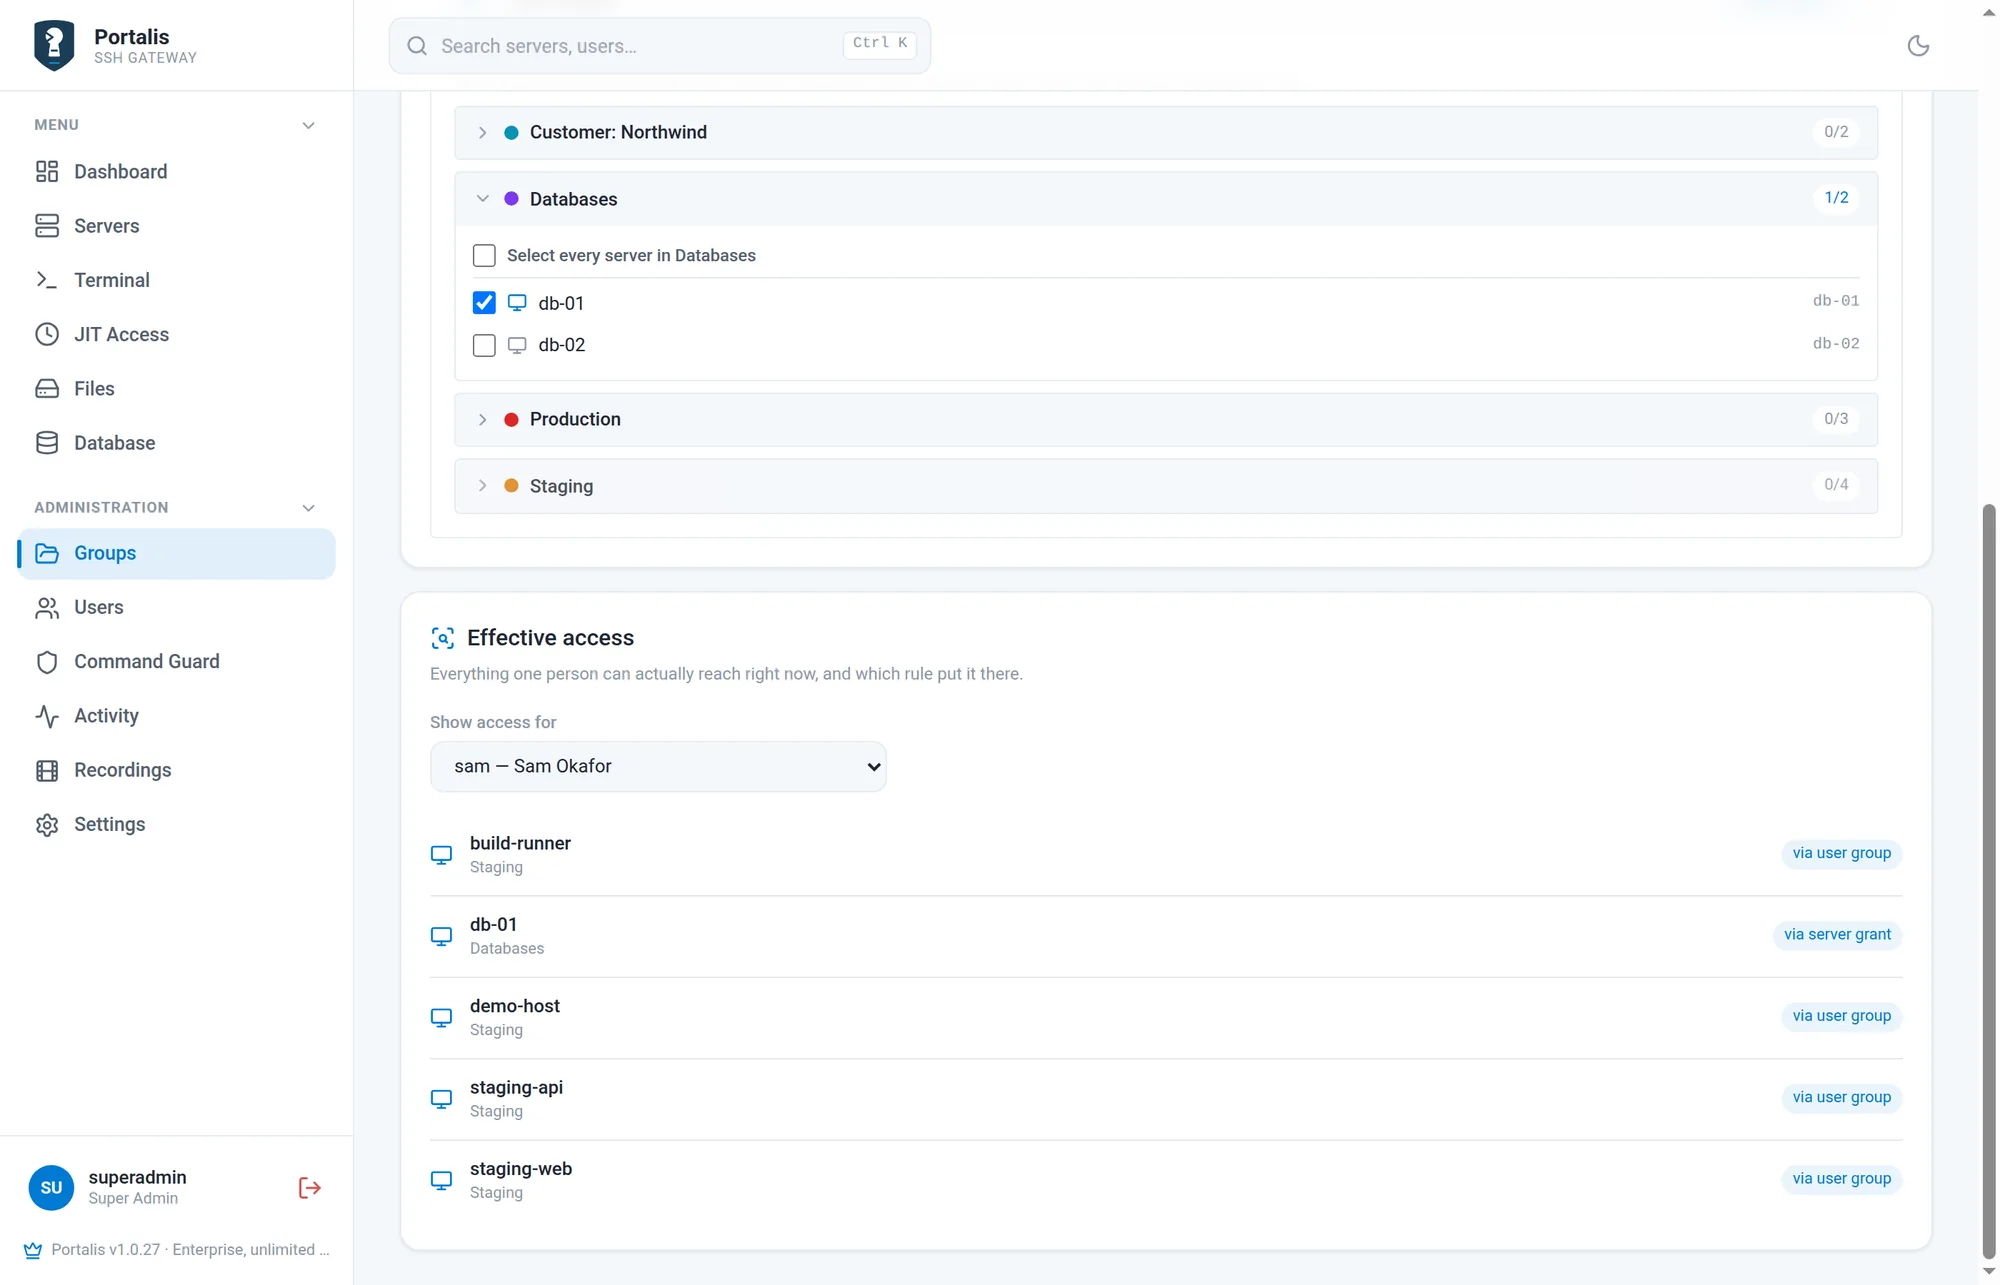
This is the answer to "why can she reach that?" and to "did we actually remove his access?". Use it after any change to access, and when an audit asks.
Database access
Database access follows the same shape as servers, with one extra choice: read-only or read and write.
- Put connections in database groups when you create them.
- Open Groups → User groups and expand a team.
- Under Database groups this team reaches, set each group to No access, Read-only or Read & write.
A read-only grant is enforced by the database itself: the query runs inside a read-only transaction, so anything that would write is refused by the engine rather than by a checkbox. The row editor is hidden and the read-only switch in the SQL console is locked on. A crafted request cannot get around it.
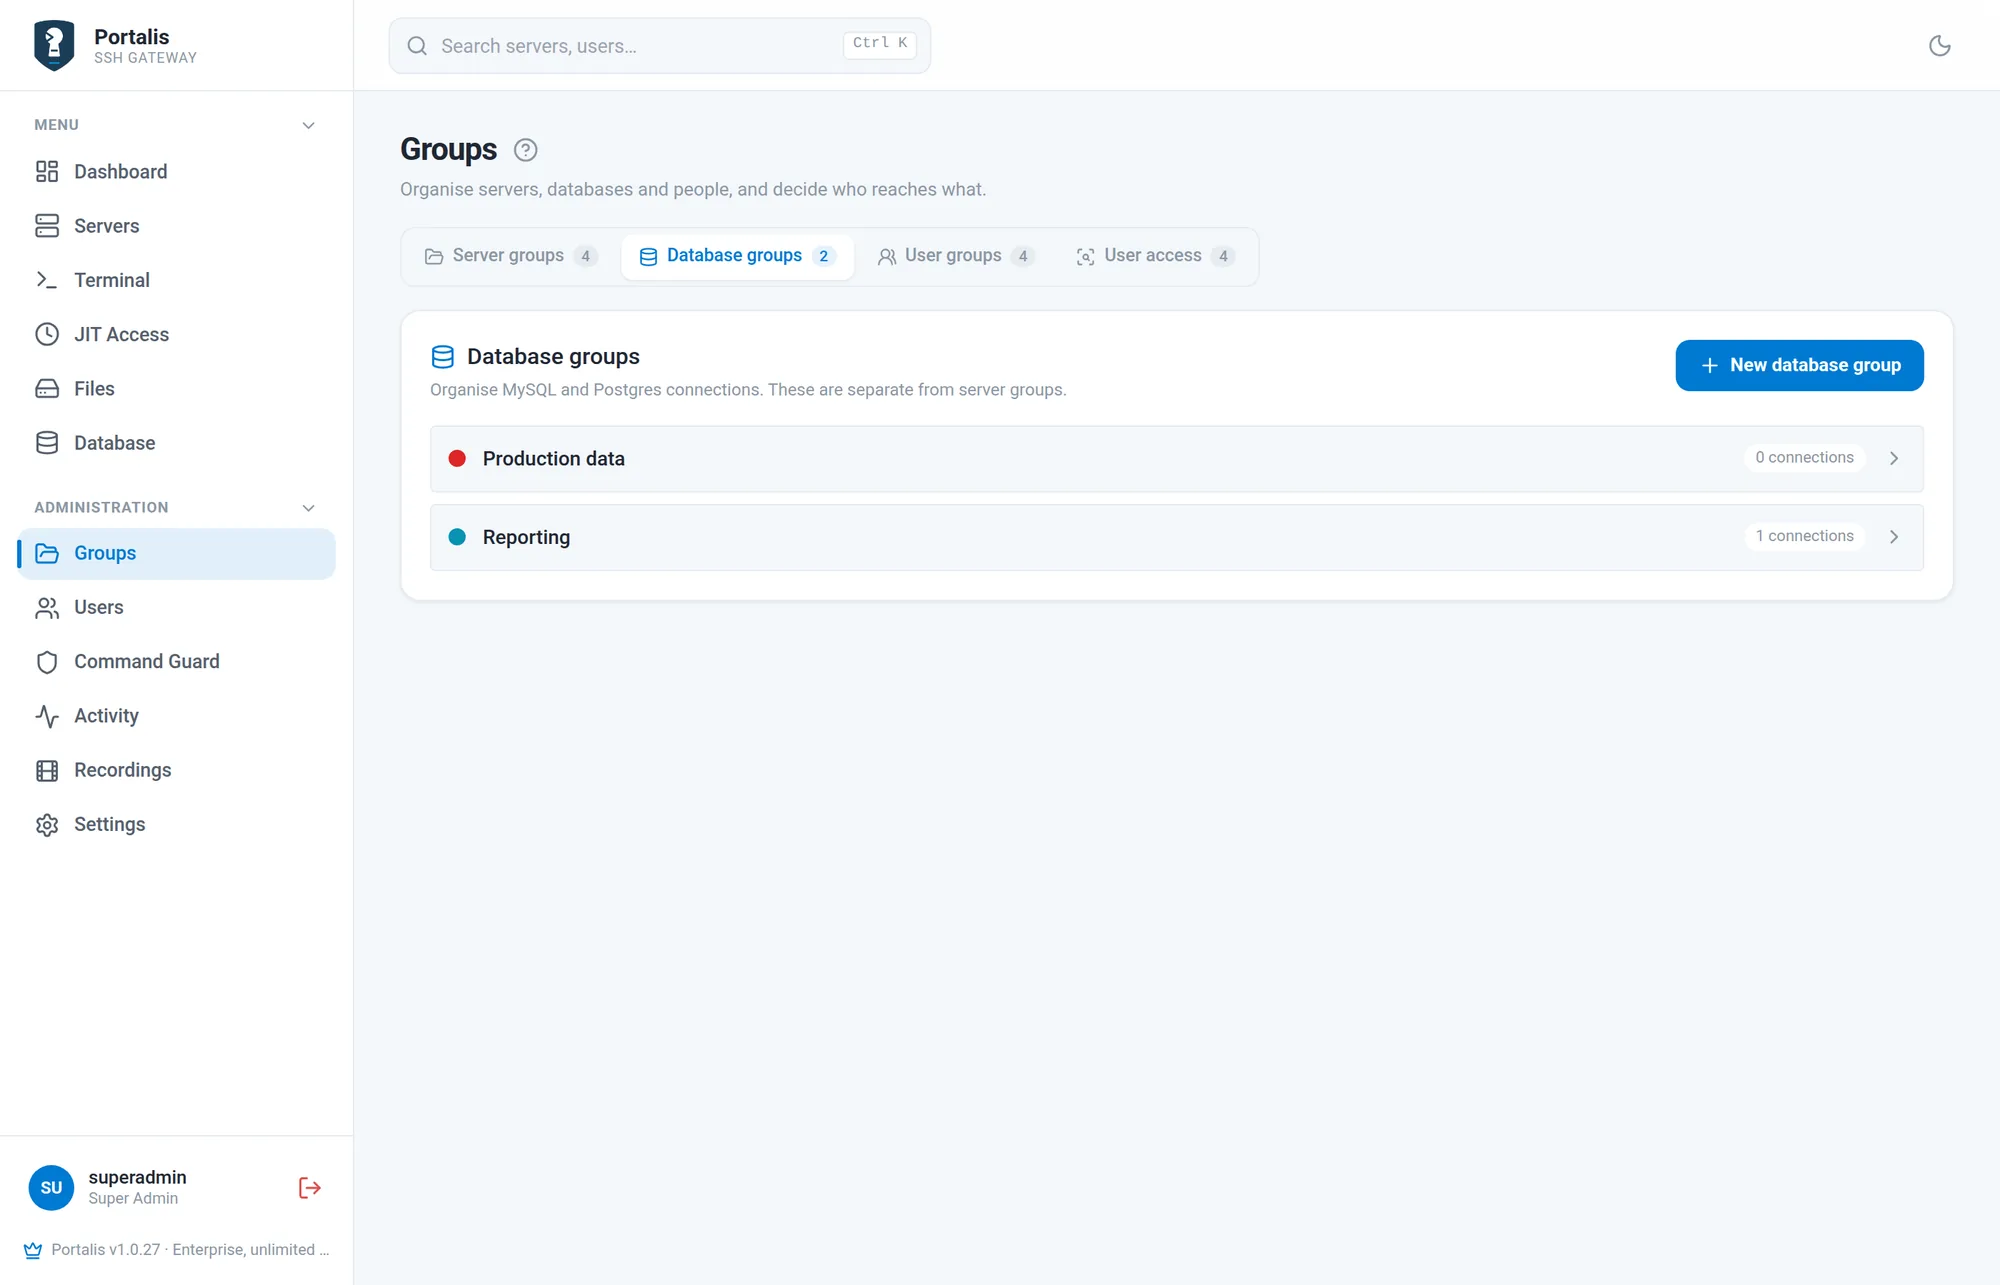
Creating, editing and deleting connections stays with administrators, whatever grants a team holds.
Switching modules off for one person
On Pro and Enterprise, the Add and Edit user dialog has three switches that take capability away from that one account, whatever their groups say:
- Browser terminal — off means they use their own SSH client only. Handy for people who should not have a terminal in a browser tab on a shared laptop.
- Files — off removes the file manager.
- Database — off removes the database browser. Only shown on Enterprise, where the module exists.
These are subtractions, not grants. Switching Files on for someone who reaches no servers still gets them nothing.
Just-in-time access
Standing access is the thing audits complain about. Just-in-time access, a Pro and Enterprise module, lets someone ask for a server for a set number of hours; an admin approves, and the grant removes itself when the clock runs out.
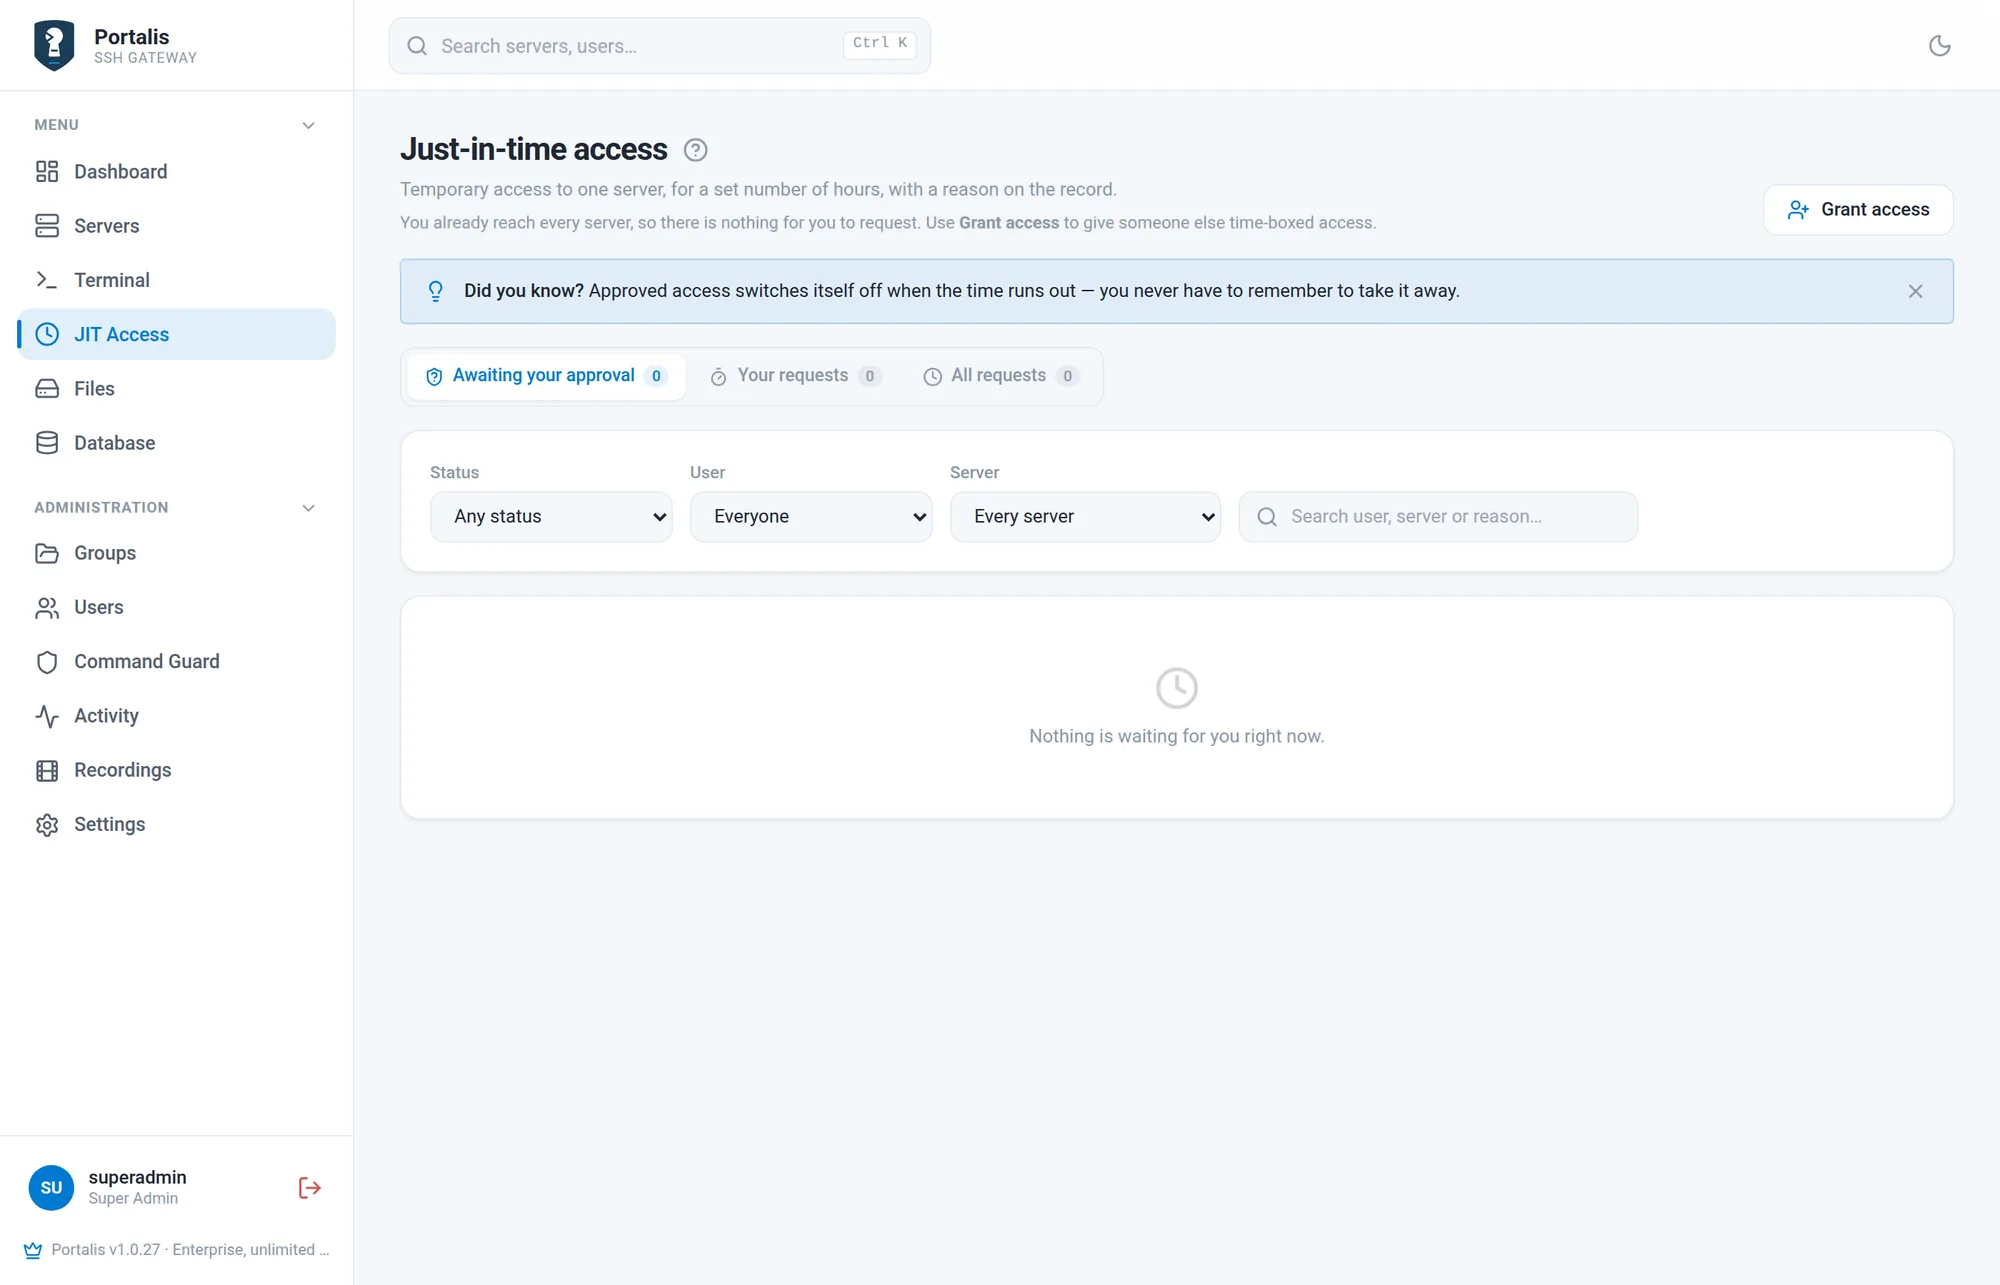
Asking: JIT Access → Request access, pick a server, choose how long, say why. The reason is not decoration — it is what the approver reads and what stays in the log.
Approving: admins see waiting requests on the Overview page and on the JIT Access page, and can approve or deny. A denial needs a short reason, which the requester sees. Admins cannot approve their own request: it is marked Needs another admin. An approved grant shows a bar draining towards its end time, and turns amber in the last stretch. Revoke early with Revoke now. An admin can also skip the request and use Grant access to give a named person one server for a set time.
Requests run from 5 minutes to 24 hours; the dialog offers 30 minutes, 1, 2, 4, 8 or 24 hours. When the window closes, new connections are refused unless another grant still permits them. Open shells are checked every 30 seconds and close when no remaining grant permits that server; revoking a grant explicitly triggers an immediate check. What remains afterwards is the request, the approval, the reason and the session recording it produced, and Recordings marks that session JIT when the person had no standing access to the server.
People from outside
A supplier, a contractor or an auditor needs an account for a few days, not for ever. Temporary accounts, a Pro and Enterprise module, are accounts that end by themselves. Only a super admin can invite one: People → Invite outside engineer.
- Fill in the invitation. Username, email, full name and how long the account lasts: 1 to 12 hours, or 1 to 180 days, subject to the maximum configured under Settings → Temporary accounts (14 days by default).
- Choose what they may reach. One server, a whole server group, or nothing at all, and whether the browser terminal, file transfer and the database browser are on for them. The access is written before the invitation is sent, so nobody arrives before their boundaries exist.
- They accept. The invitation is a single-use link. They choose their own password and must add an authenticator before they reach anything. Until then the account cannot be signed into at all.
- It ends. When the end date passes, the account loses access and open shells close at the next access check, within 30 seconds. The background expiry job deactivates the account and revokes its tokens within five minutes. Extending an account brings a lapsed one back.
Every step is an audit event (user.invited, user.invite_accepted, user.expired, user.expiry_changed), and Recordings marks their sessions External. Invitations are sent by email, so configure Settings → Mail first. Under Settings → Temporary accounts you set the default length, the longest allowed (never more than 180 days), and whether the inviter gets a warning mail a day before the account ends.
Browser terminal
A real terminal, in the browser, on any server you may reach. Open it from the Terminal page, from the SSH button on a server's row, or by pressing Ctrl+K (⌘+K on a Mac) to search servers from anywhere.
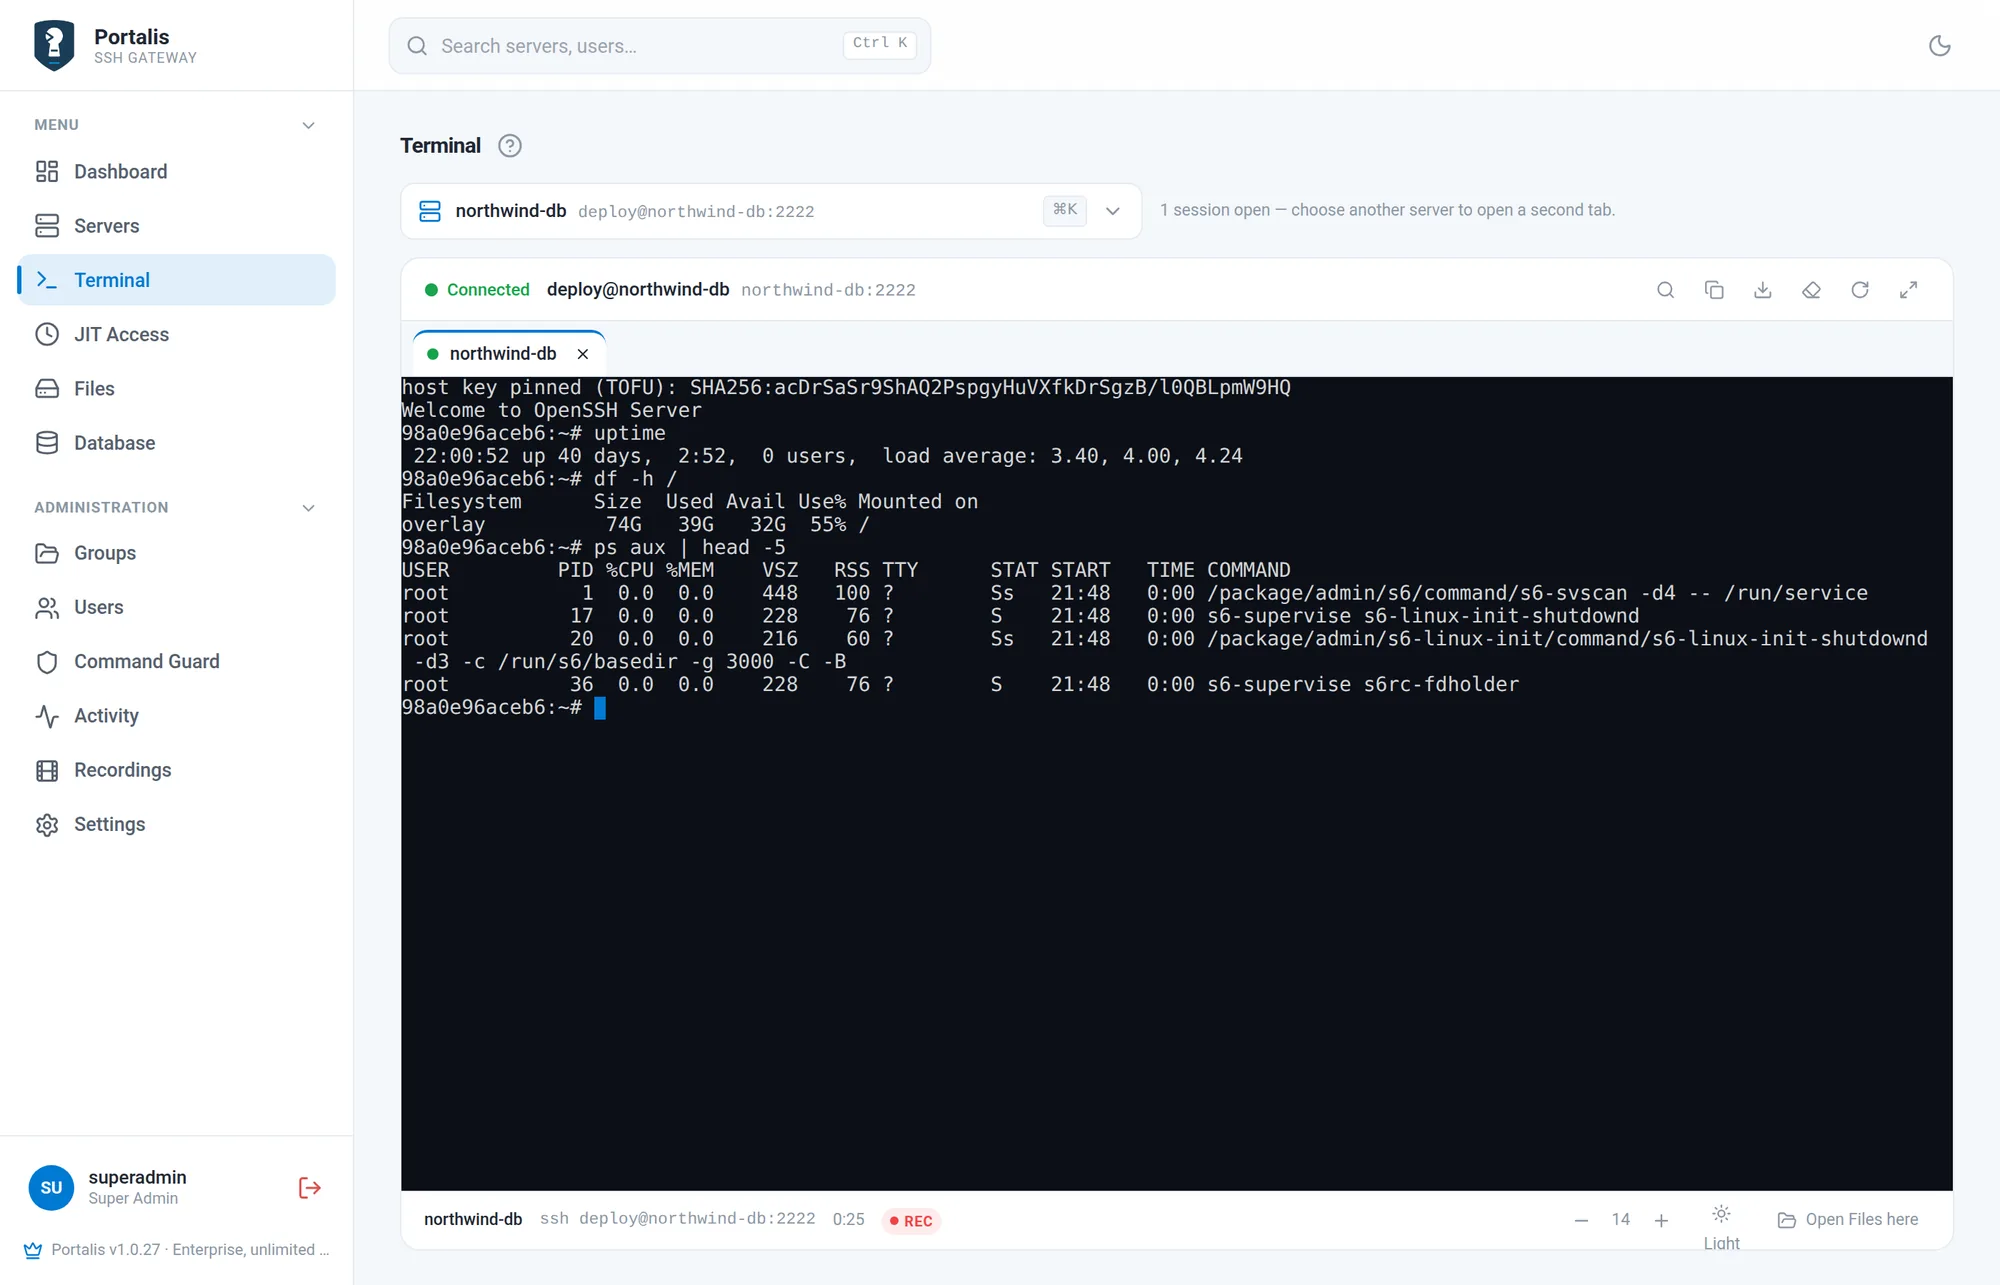
Every server you open gets its own tab, so you can work on three machines at once without three windows. The toolbar searches the output, copies all of it, downloads the transcript, clears the screen and goes full-screen. The zoom control and the light-and-dark switch are per session.
Sessions survive a hiccup: if the connection drops, an overlay offers to reconnect rather than throwing the tab away.
When browser recording is enabled, the recording captures terminal output, not a separate keystroke stream. Passwords typed into sudo do not appear in a recording, because the screen never showed them.
Your own SSH client
People who live in a terminal do not have to use the browser. Point your own client at the gateway:
ssh -l you portalis.example.com -p 2222The gateway asks for up to three things, in this order:
- Your SSH key, which must be registered on your profile.
- Your password, the same one as the web interface.
- Your two-factor code. The gateway accepts a current authenticator code; recovery codes work on the web sign-in page only.
Then you get a menu of the servers you may reach. Pick one and you are on it, with the session recorded exactly like a browser session. Sessions end the way SSH sessions always do — exit, or Ctrl+D — and you land back in the menu where you left it.
In a terminal window of at least 100 columns by 20 rows the menu is a split view: Recent and your server groups on the left, the servers of the selected entry in the middle, and a preview of the selected server on the right. Move with ↑↓, switch panes with ←→, connect with Enter, search every server with /, press ? for help and q to quit. A smaller window gets a plain two-level list instead: groups first, then servers, with type-to-filter and Ctrl+C to leave. One server per session for now; running several at once is what the browser terminal is for.
How many of those three are asked for is a policy under Settings → Security → SSH key policy:
| Required | Key, then password, then code. Three authentication checks. This is the default and the one to keep. |
|---|---|
| Optional | A key-holder may skip the key and sign in with password and code. |
| Off | Keys are ignored: password and code only. |
Complete the first web sign-in, password change and local authenticator enrolment before using SSH. If you normally use SSO, you still need a local password and authenticator for the gateway. An authenticator code cannot be reused after it has succeeded: wait for the next 30-second code if you just used one in the browser.
Add your key yourself under Profile → SSH keys, or have an administrator paste it when they create your account.
You have two minutes to get through the prompts. If your key has a passphrase and your authenticator is on a phone in another room, run ssh-add first so the passphrase is not part of the clock.
Files
The file manager, available on every plan, is SFTP over the same connection as the terminal. Browse, upload (several files at once, by dragging them in), download, create folders, rename and delete. Open it from the Files page or the Files button on a server's row.
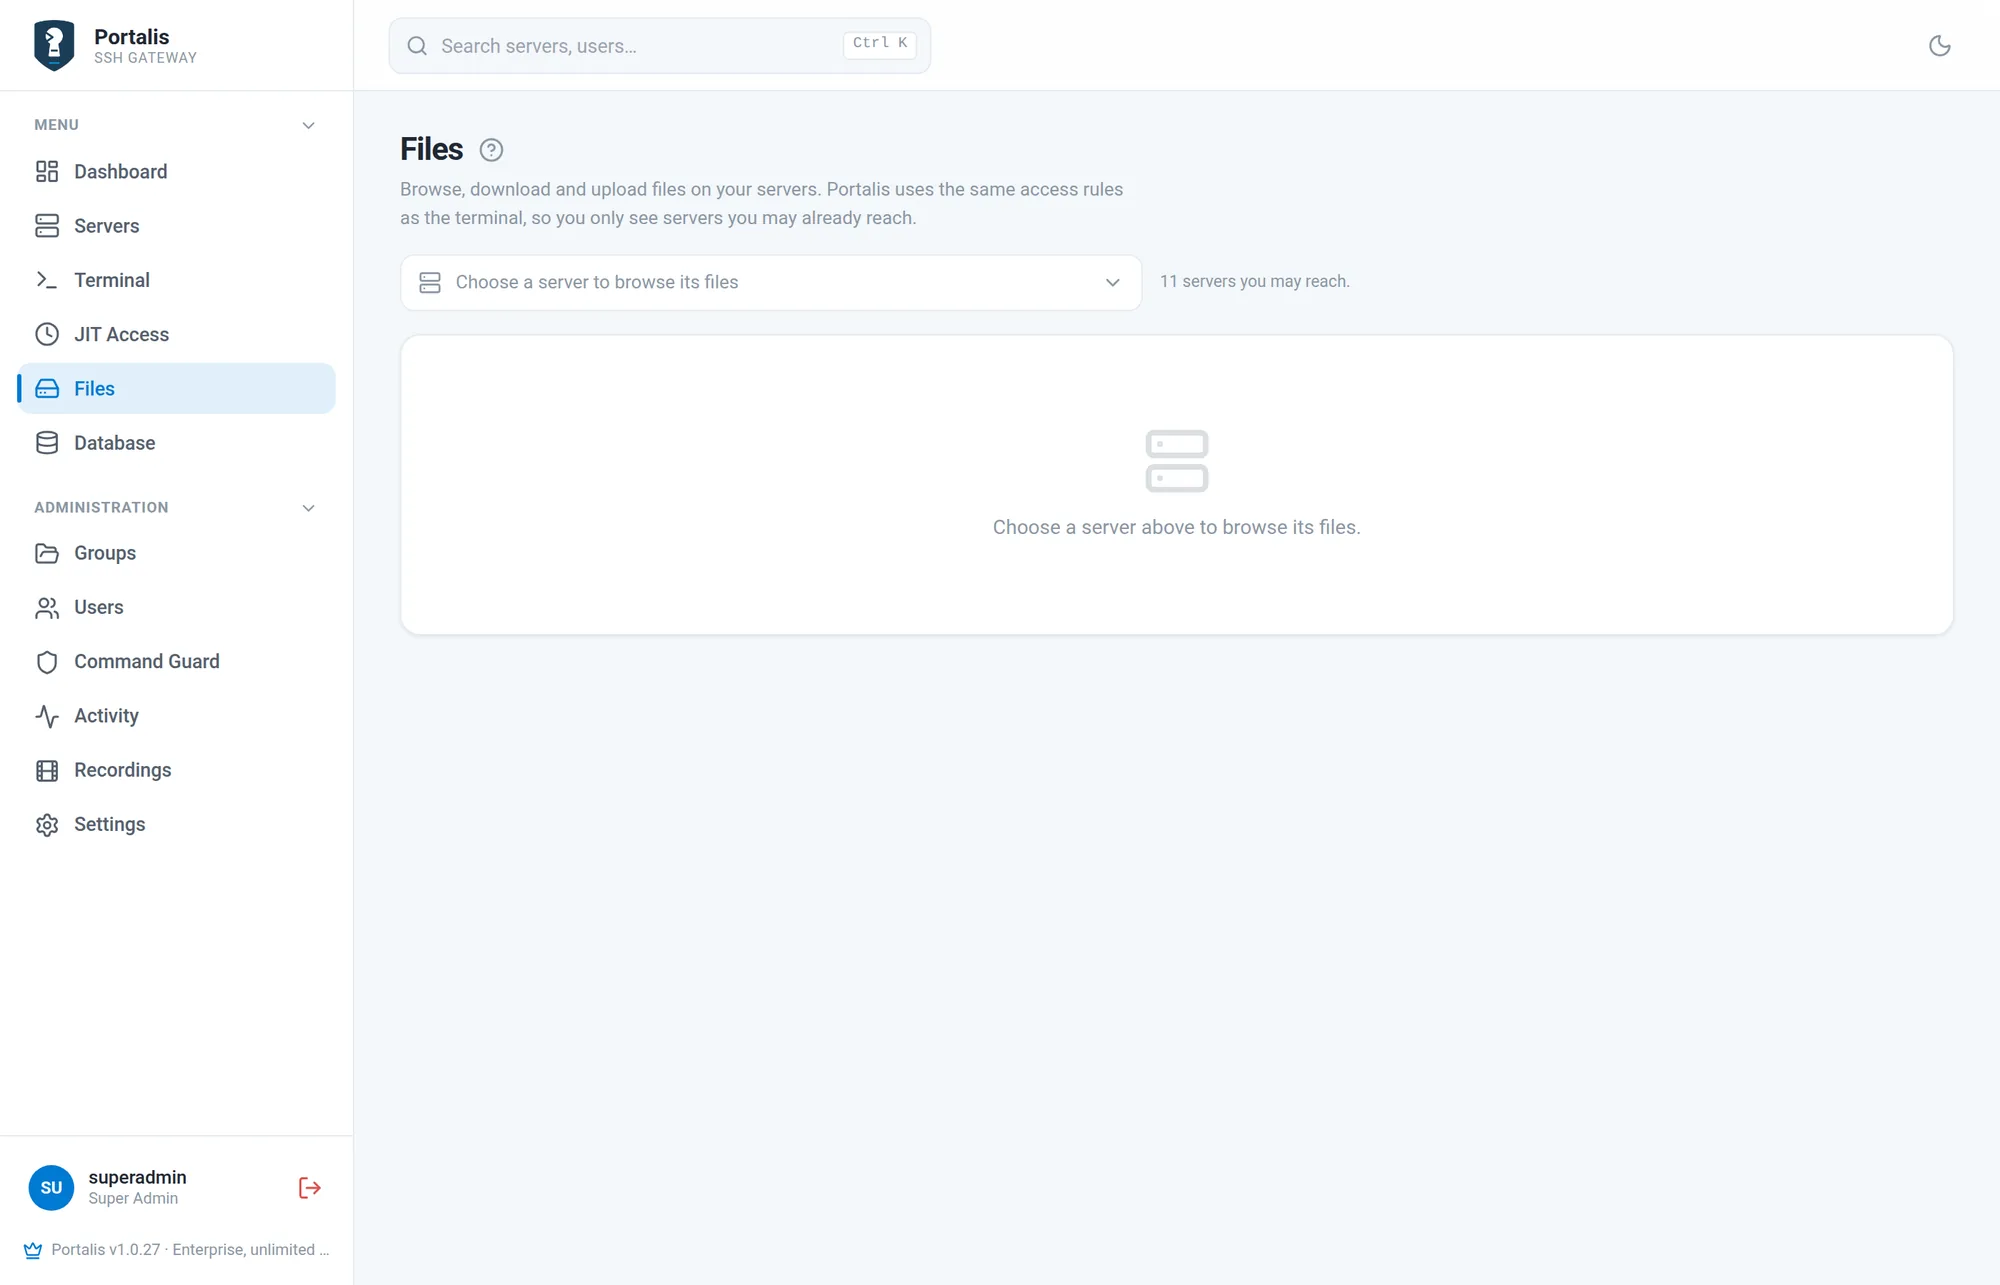
The same access rules apply: you see the servers you may reach and nothing else. Uploads, downloads, renames and deletes are written to the audit log with your name when Settings → Storage → Record file transfers is enabled (the default).
Browsing a database
With the Enterprise module and a connection you may reach, Database gives you three tabs.
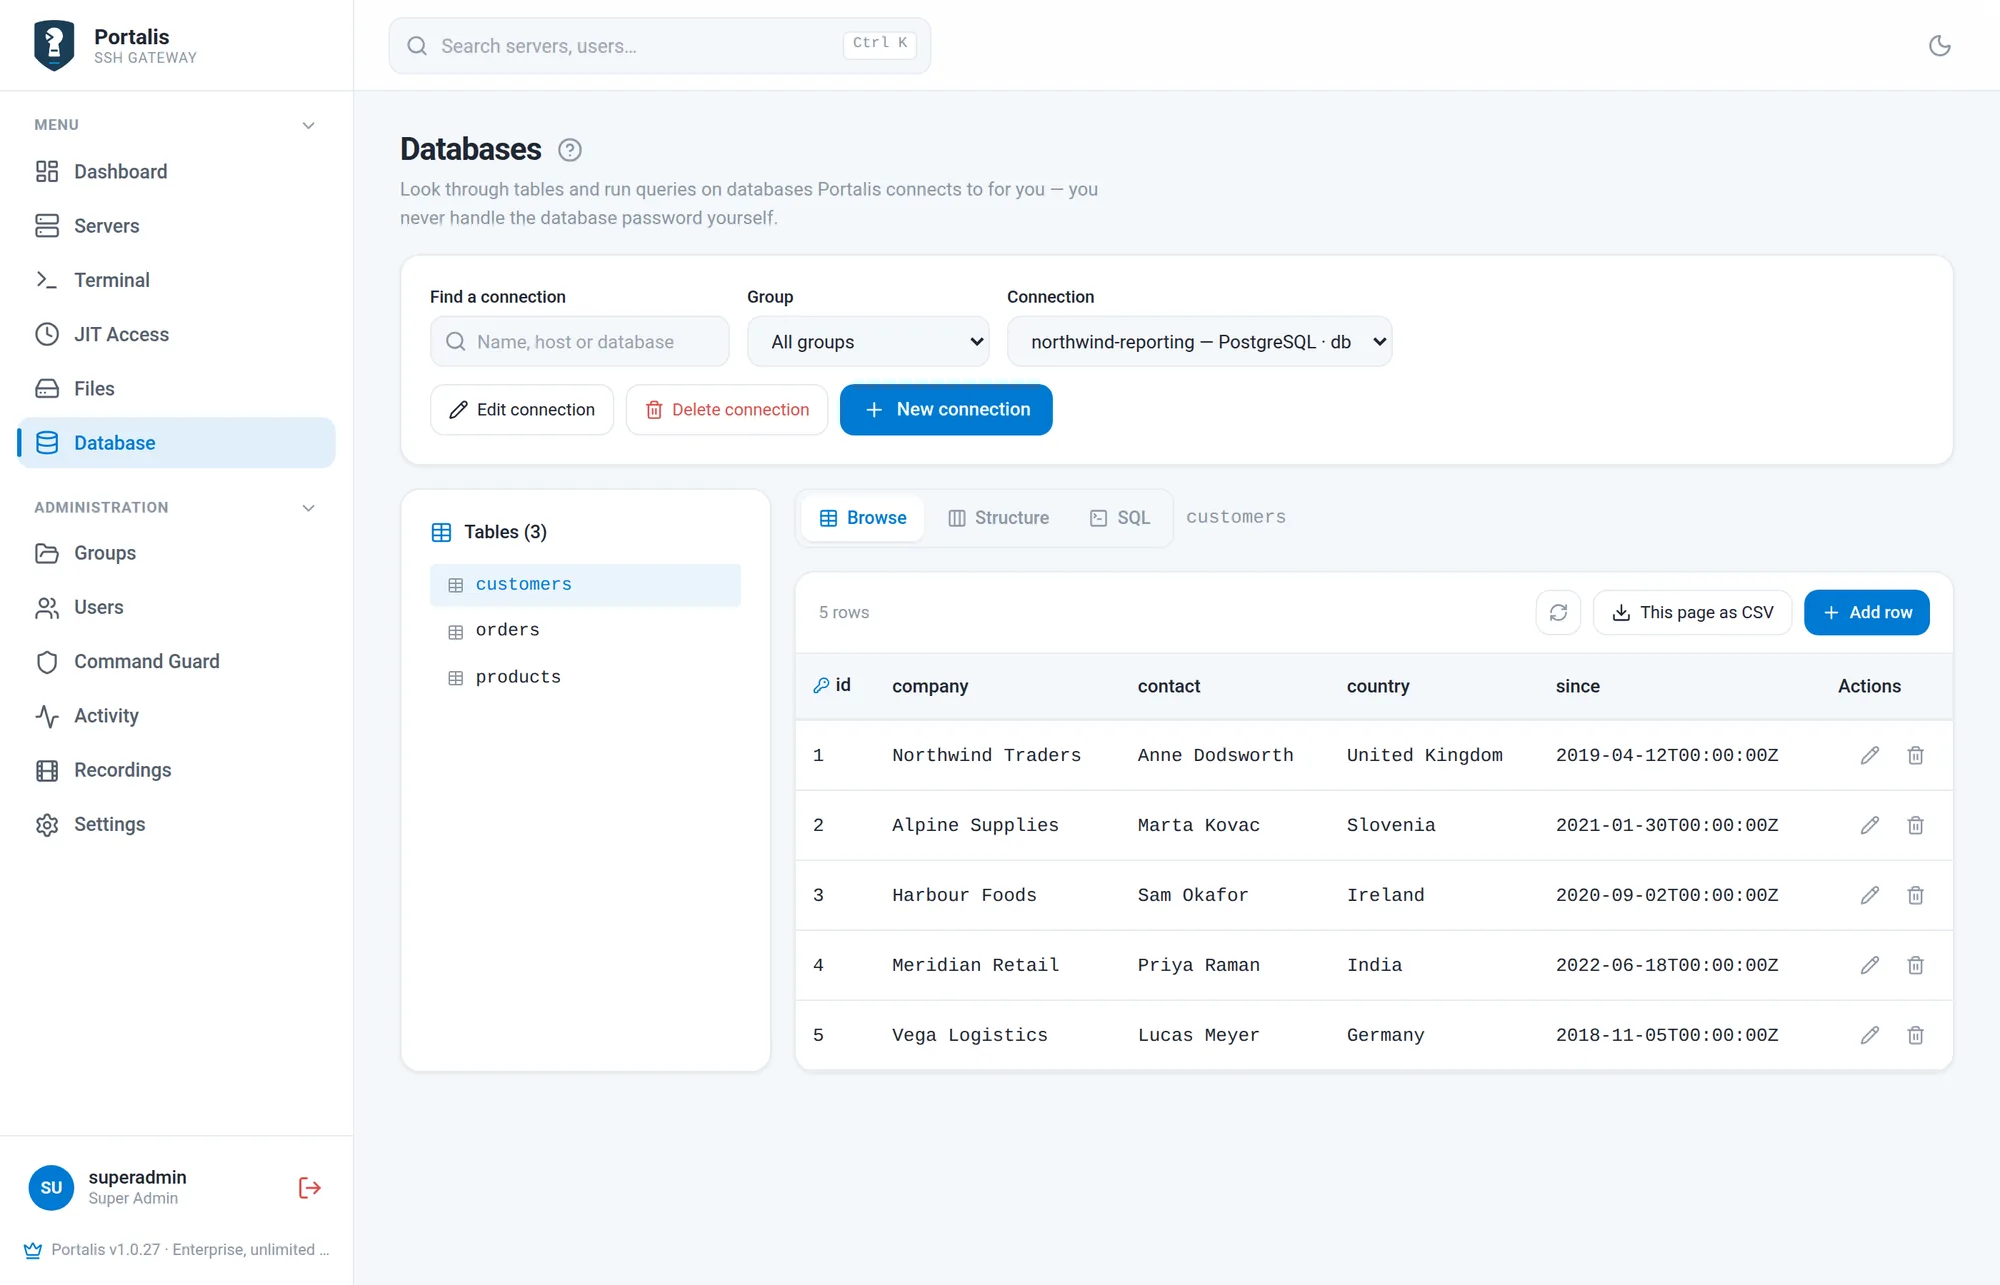
Structure lists the columns, their types, nullability and keys. SQL is a console with a read-only switch.
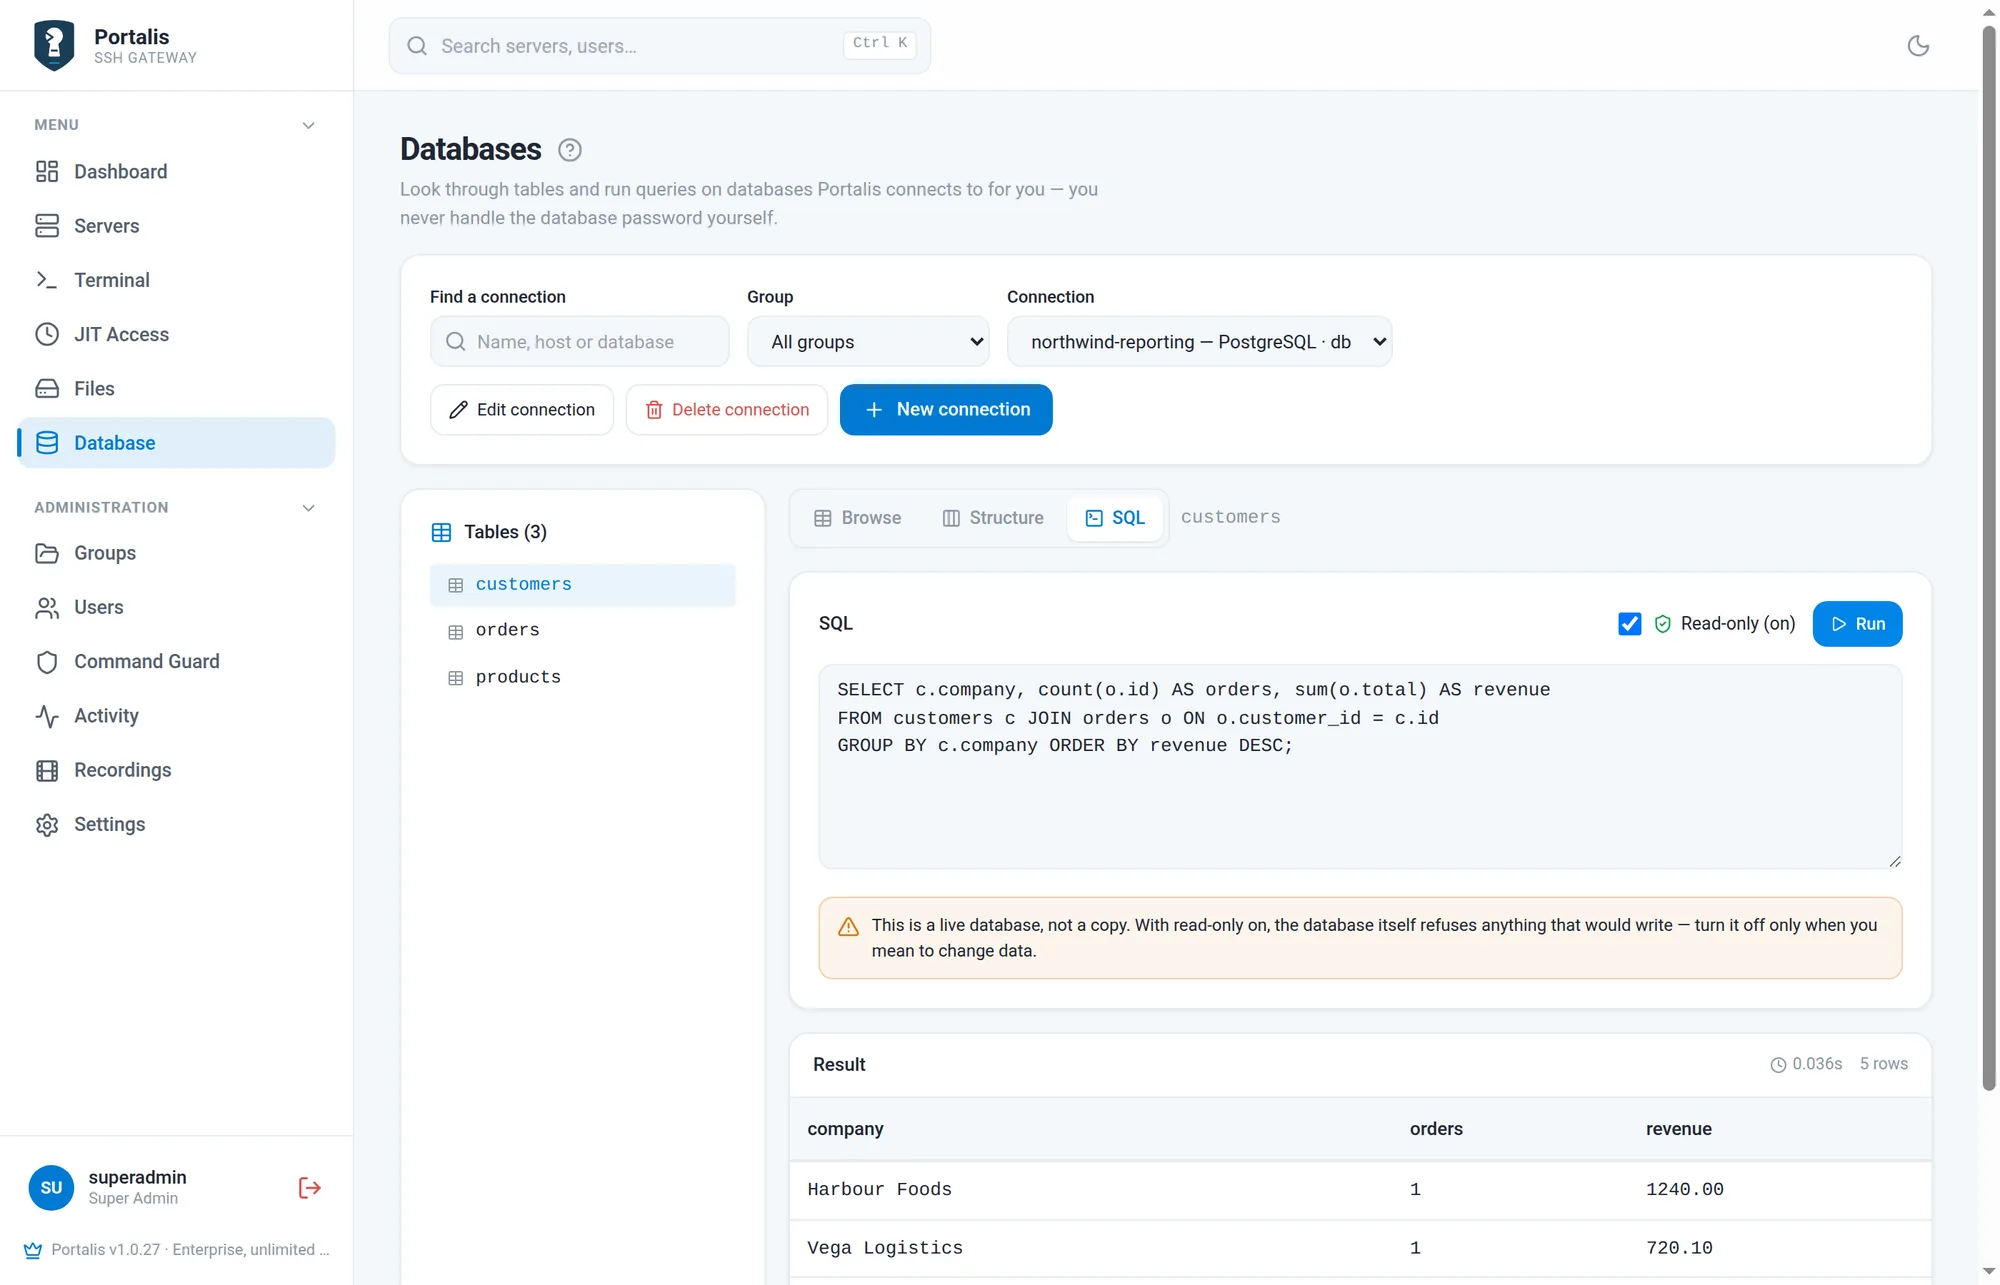
Read-only is a real read-only transaction, not a keyword check, so a write hidden inside a common table expression is refused just as plainly as an obvious one. Turn it off deliberately when you mean to change data — and if your grant is read-only, the switch stays locked on.
A table without a primary key can be read but not edited: Portalis will not update a row it cannot point at unambiguously. Use the SQL console for those.
Command guard
The command guard, available on every plan, watches what is typed in a session and acts on patterns you write. It applies to browser sessions and to the SSH gateway alike, and lives under Command Guard in the sidebar (admins only).
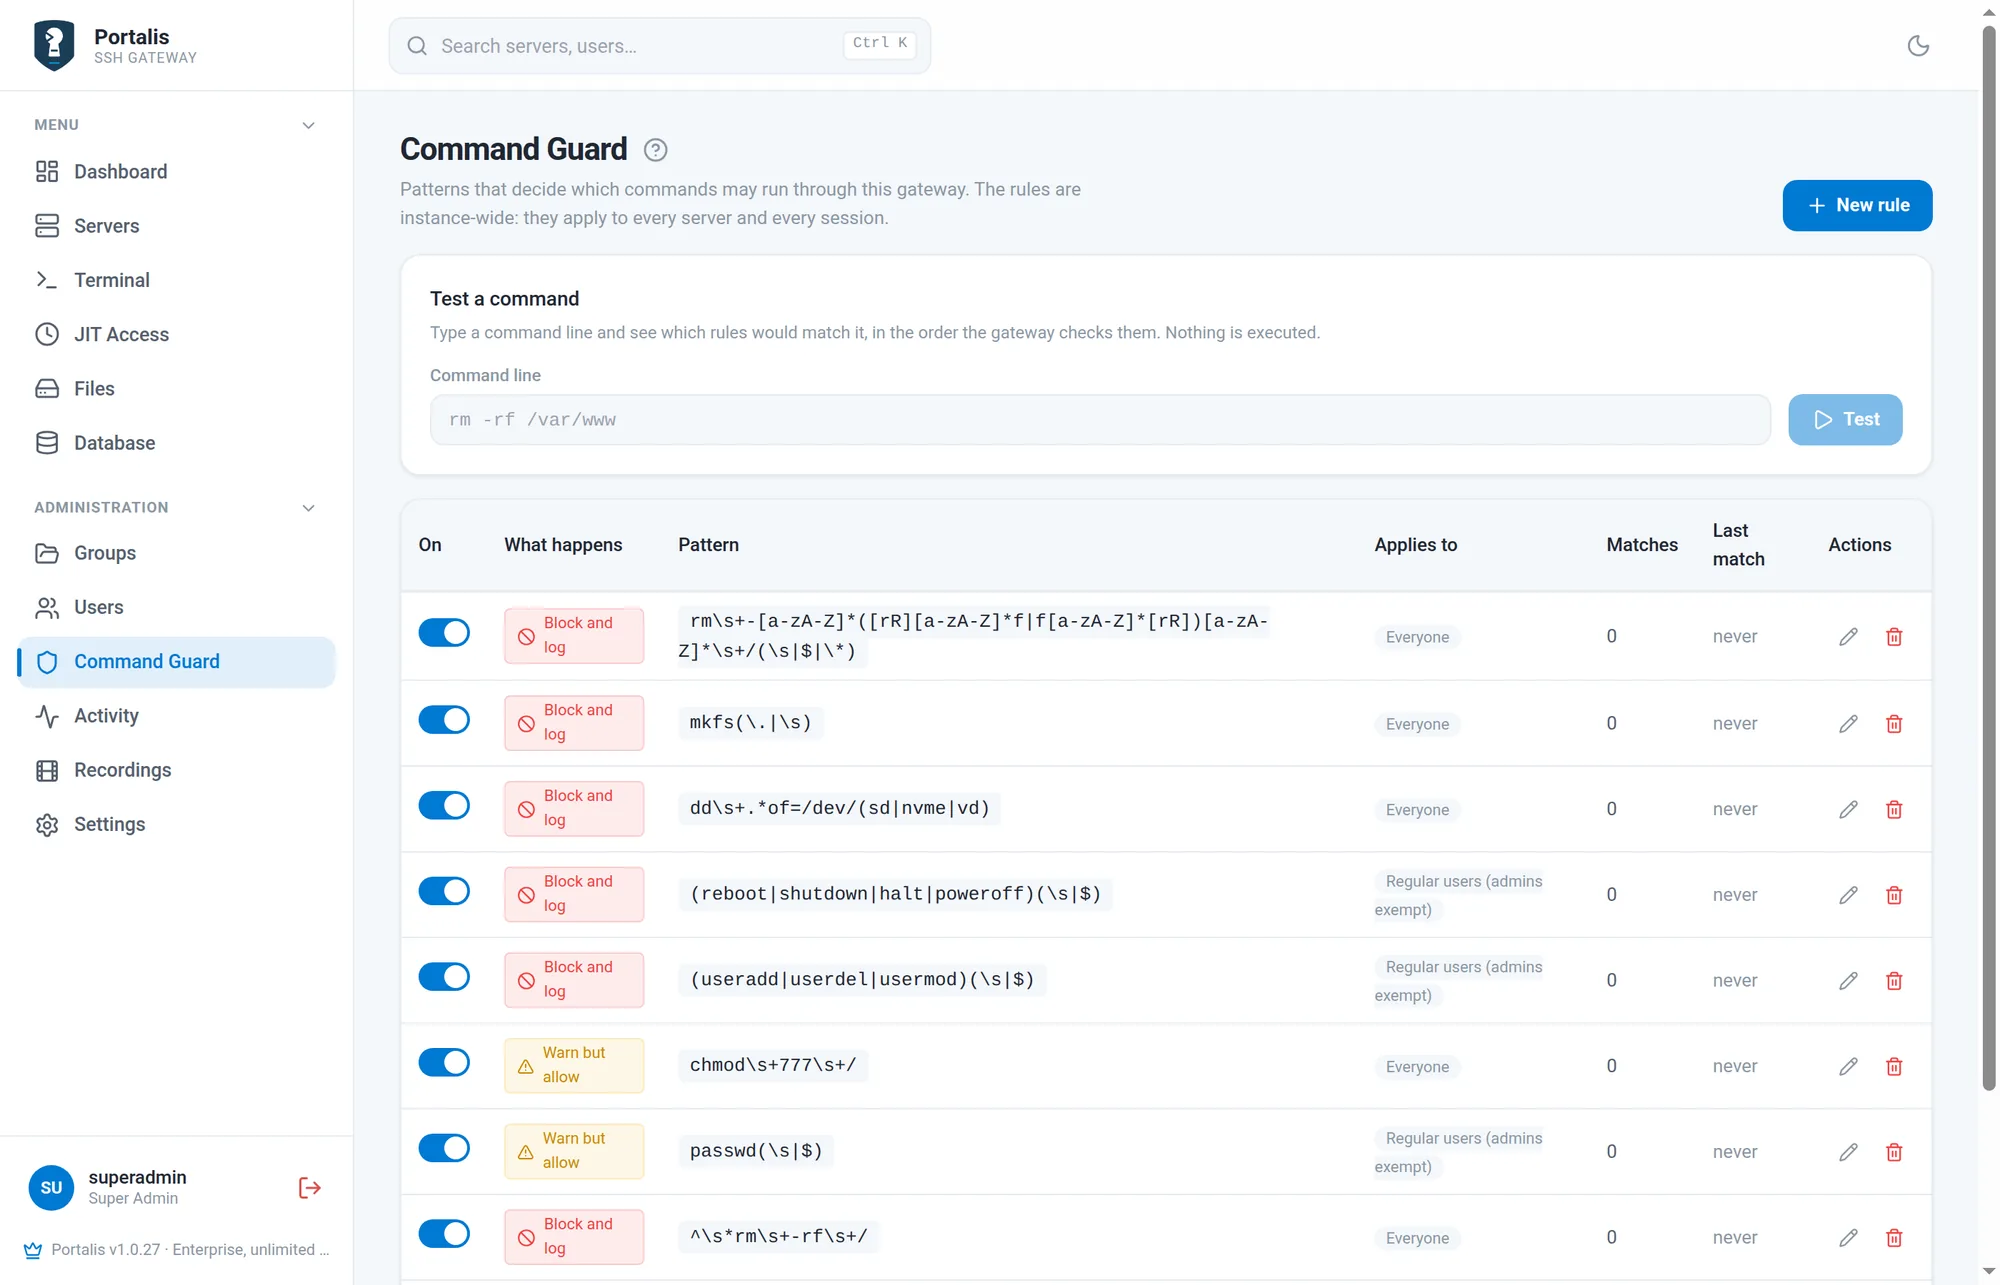
| Block | For a matched interactive line, the guard clears the pending line and withholds Enter so it is not executed. The typed characters have already reached the server. The session shows [ezssh] command blocked by policy and the attempt turns up red in Activity. |
|---|---|
| Warn | The command runs, the person sees a warning line ([ezssh] warning: command matches policy), and the attempt is flagged amber in Activity for someone to look at. |
| Log only | The command runs and nobody is told. It is only written to Activity. |
A fresh install ships with a few sensible rules (disk-wiping commands, reboots and user management for regular users, chmod 777 /). Each rule applies to everyone or to regular users only, is checked top to bottom with the first match deciding, and has a hit count so you can see which rules earn their place. Log only is the way to start: write the rule, watch what it would have caught for a week, then promote it. A tester on the same page runs a command against your rules before you rely on them.
Anchor patterns so they match a command and not a mention of it. ^\s*rm\s+-rf\s+/ catches the disaster; rm -rf unanchored also catches the sentence someone pasted into a comment.
The guard is a seatbelt, not a wall. Someone determined can wrap a command in a script, encode it, or spell it differently. Recalled shell history and edits in the middle of a line may also evade a pattern. Limit privileged actions with the target account and sudo rules. It stops the accident and it records the attempt. It does not turn an untrusted person into a safe one — that is what access control is for.
Activity
Everything that happened, in one list: sign-ins and failed sign-ins, sessions opened and closed, files moved, queries run, guard hits, access changed, licence applied.
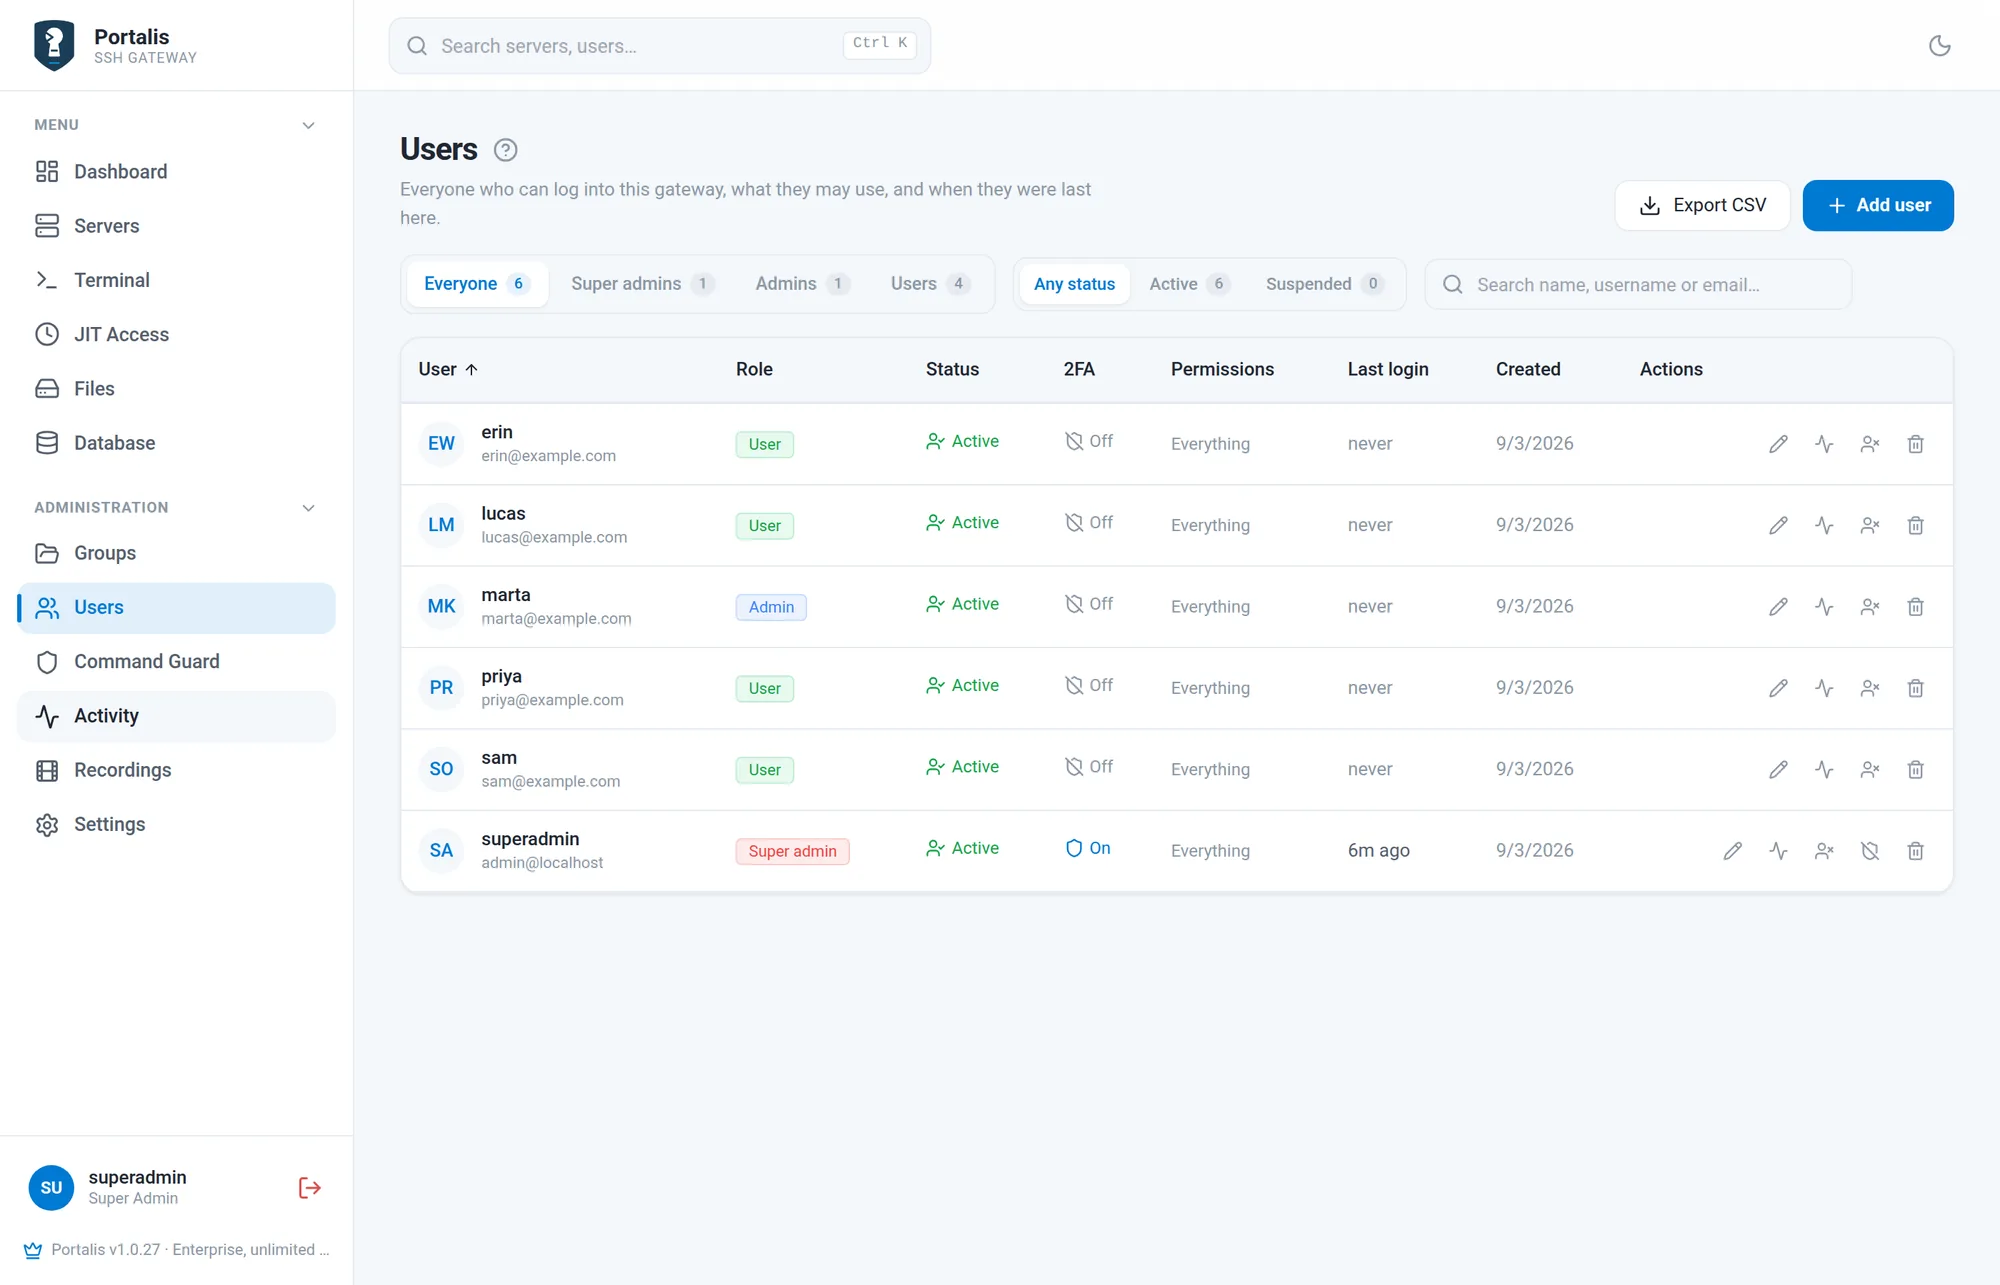
Click a row to expand the whole event: who, when, from which address, on which server, and the detail the event carried. Export the filtered view as CSV when someone needs it in a spreadsheet.
Administrators find what is running right now on the Overview page under Live now, where an admin can watch a live session read-only. Every session with a recording is on the Recordings page (admins only).
Audit events are kept for a year by default and swept nightly. Change that under Settings → Security → Keep audit events for if your retention rules differ. To keep a copy elsewhere, stream events to a SIEM (see Alerts and audit export below).
Recordings
Every session through the SSH gateway is recorded, and so is every browser terminal session unless you switch that off under Settings → Storage → Record browser terminals. Recordings is where they live.
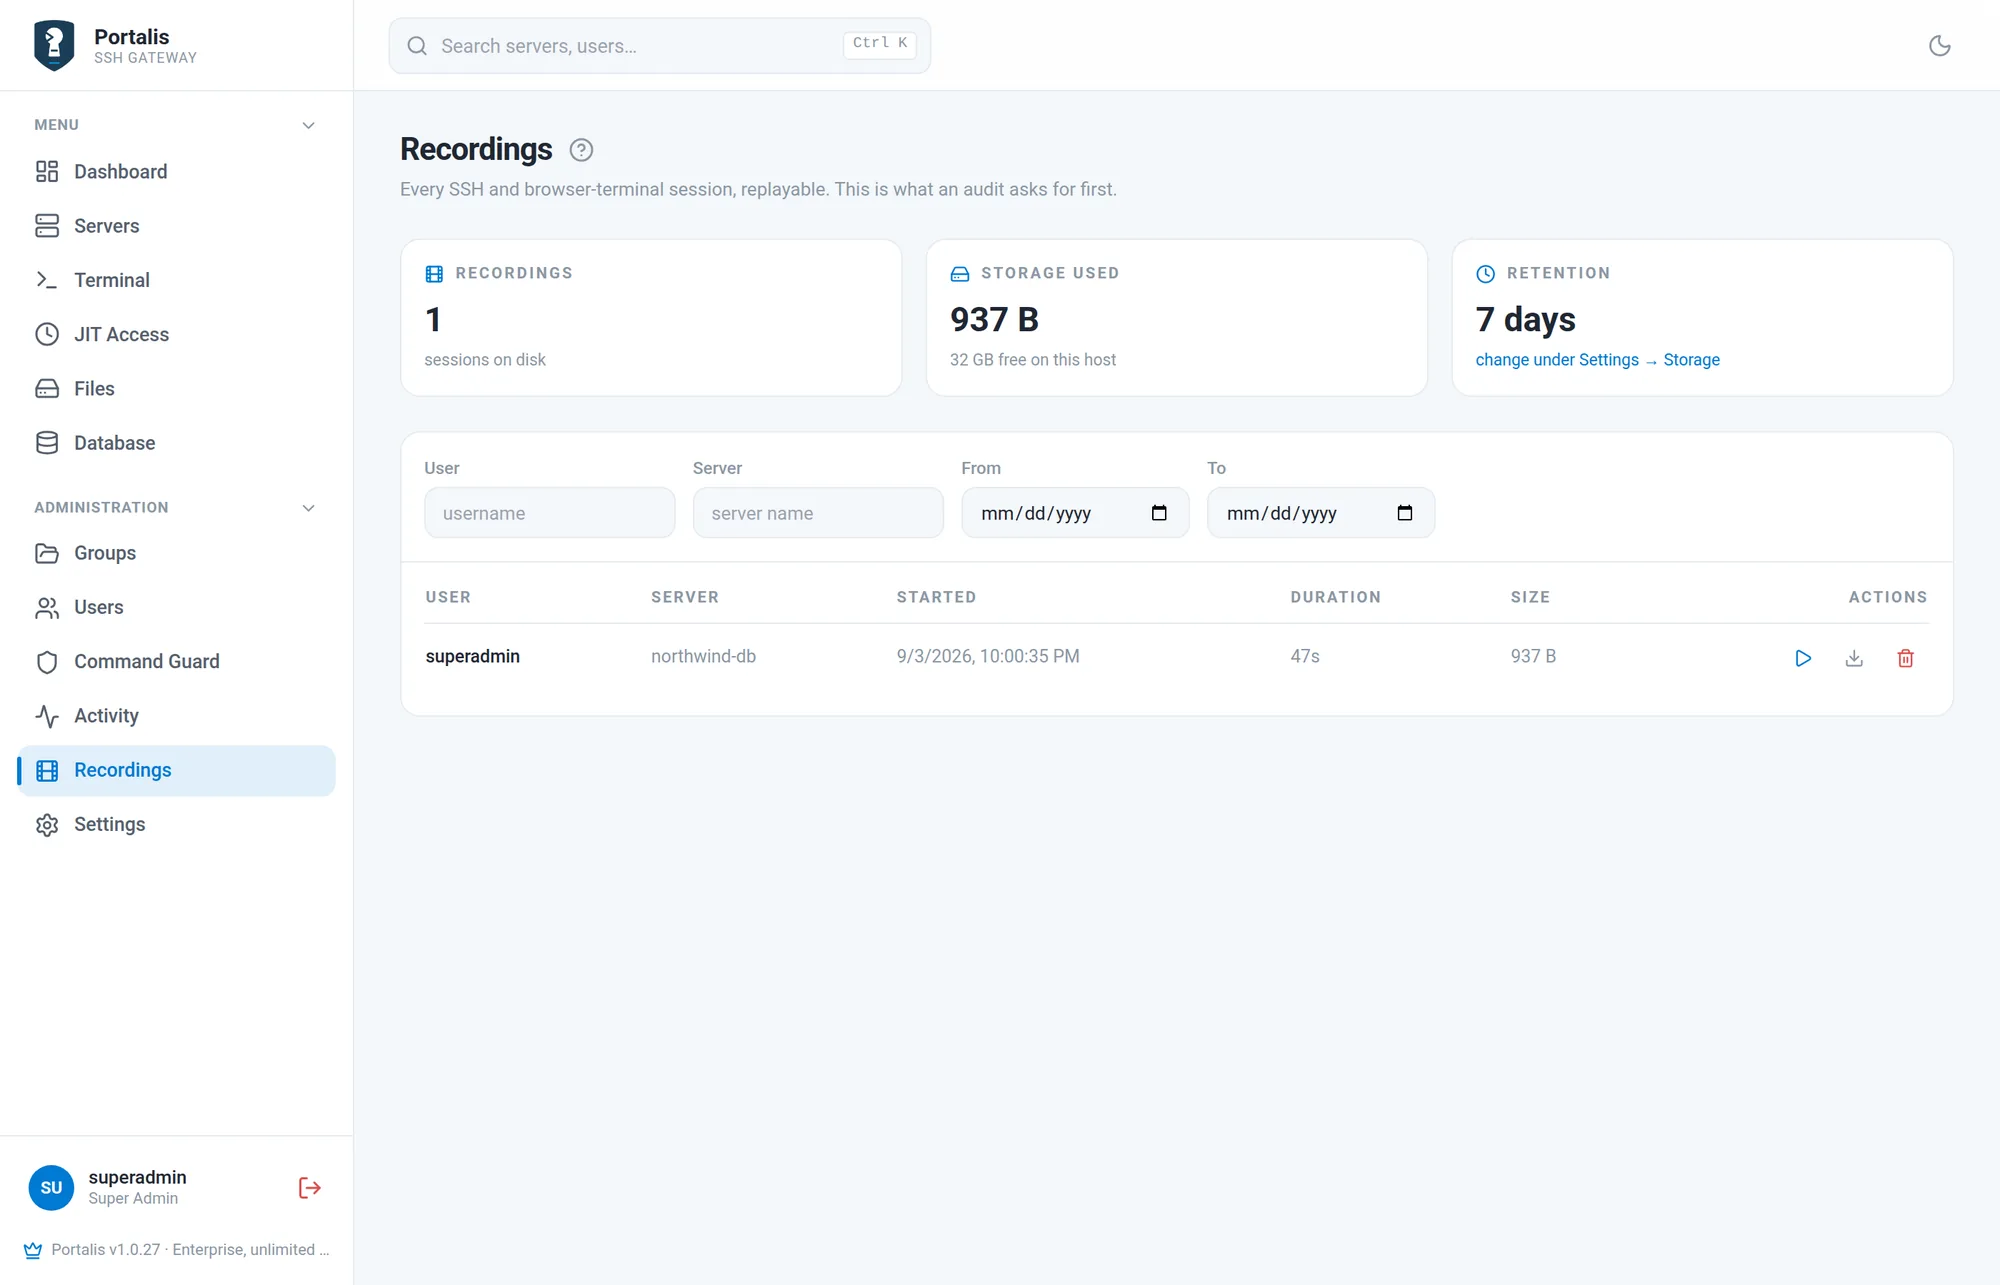
Play one and it replays at its original speed, in a terminal, exactly as it looked. Download gives you the raw .cast file, which asciinema opens. Filter by user, server or date when you are looking for something specific, and by how the person got in: External marks a session by a temporary account, JIT one that needed an approved just-in-time grant because the person had no standing access to that server. A session can carry both. The labels are written when the session starts, so extending an account or removing a grant later never rewrites history.
Click a row and it opens the way an event on the Activity page does, with everything known about that session.
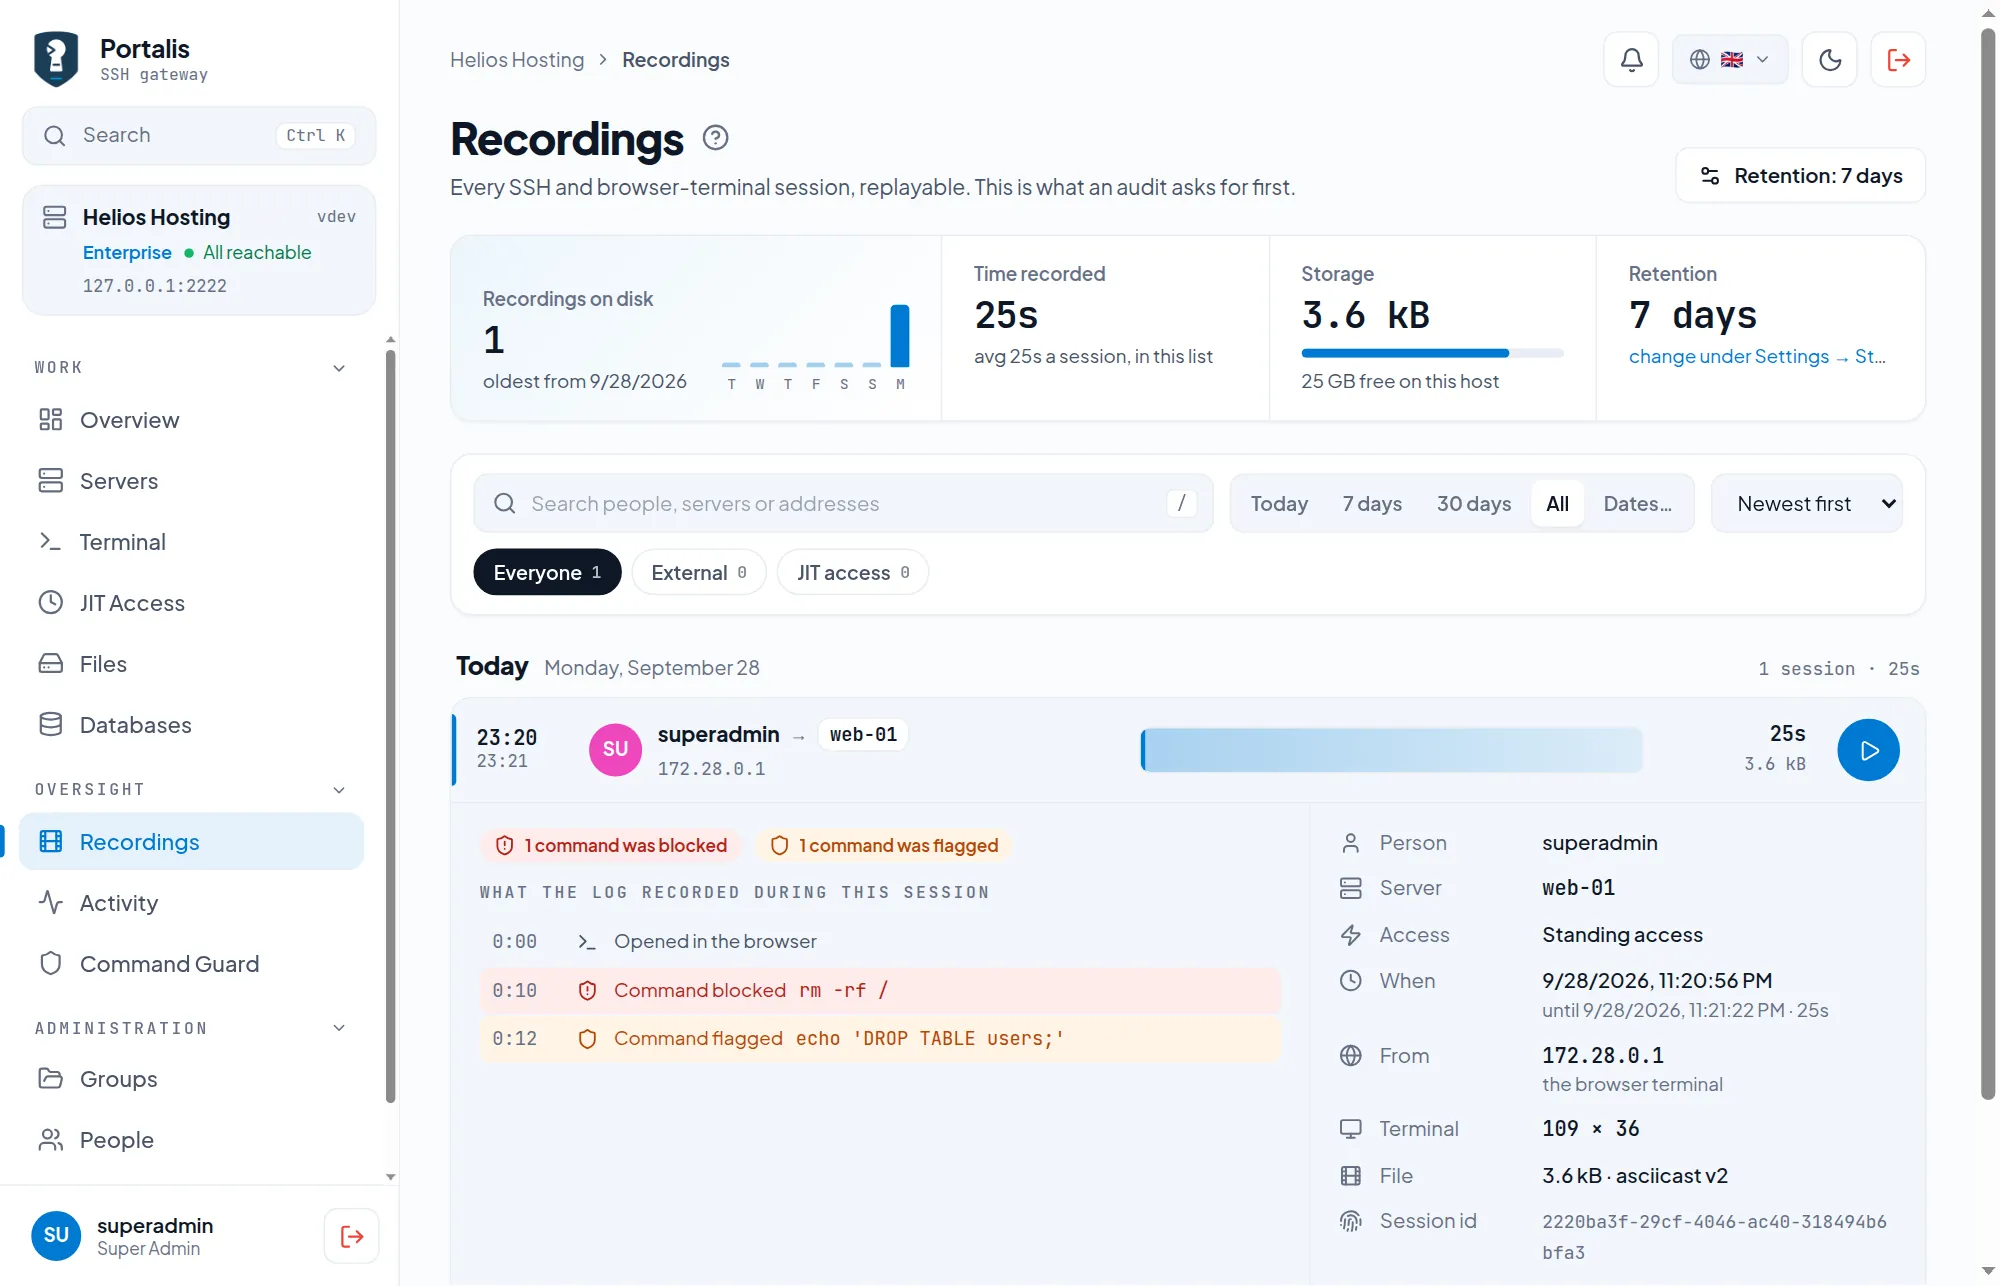
| Session | Start, end, duration, and the address the person came from. A session still running says so instead of showing an end time. |
|---|---|
| Connected via | The browser terminal or an SSH client on port 2222 — worked out from the audit trail, not guessed. |
| Terminal | The size of the window the session ran in, read from the recording itself. Useful when output looks wrapped in a way you did not expect. |
| Guard | How many commands were blocked and how many were flagged, as badges you can see without reading the trail. |
| The trail | Every audit event from those minutes in order: the connection, guard hits with the command that triggered them, file moves. Commands are only written down when a rule matches them. |
Recordings are terminal casts, not video: a long session is usually well under a megabyte. Storage and retention live under Settings → Storage, covered below.
Settings, tab by tab
Settings is grouped into Instance (Overview, General, License & Modules, Update, Storage, Mail, Alerts, Audit export), Access (Security, Authentication, Single sign-on, API keys, Temporary accounts) and Appearance (Branding). Only admins see it. The search box at the top of the list finds a setting by name, and every tab has a ? next to its heading with the tips for that screen. Each change is written to Activity, and a tab says who last changed it.
Overview and General
Overview is a checklist of how this instance is set up, with every line taken from the tabs below and a link to fix what is missing. General holds the instance name (shown in the sidebar, the SSH menu and mail), the gateway address people type after ssh, the time zone used in Activity, recordings and mail, and whether the “did you know” tips appear.
License & Modules
Your plan, who it is licensed to, when it expires, the key this instance runs on and how many servers it covers. Applying a new key replaces the current one straight away, without a restart, and the full key is never sent back to the browser. Modules lists what your plan includes; a licensed module can be switched off here, which hides it for everyone including admins while your licence stays untouched. Plan comparison shows Free, Pro and Enterprise side by side.
Update
The host checks for a newer image every 30 minutes and this tab shows the version you run, the version available and what changed. Check for updates switches that polling off; nothing is ever installed without you pressing Update now. Stay on one version explains how to pin a release. A tab that says Manual instead of Automatic means the host has no updater, for instance because systemd is missing; re-run the installer to update. See Updating below for what the button does.
Storage
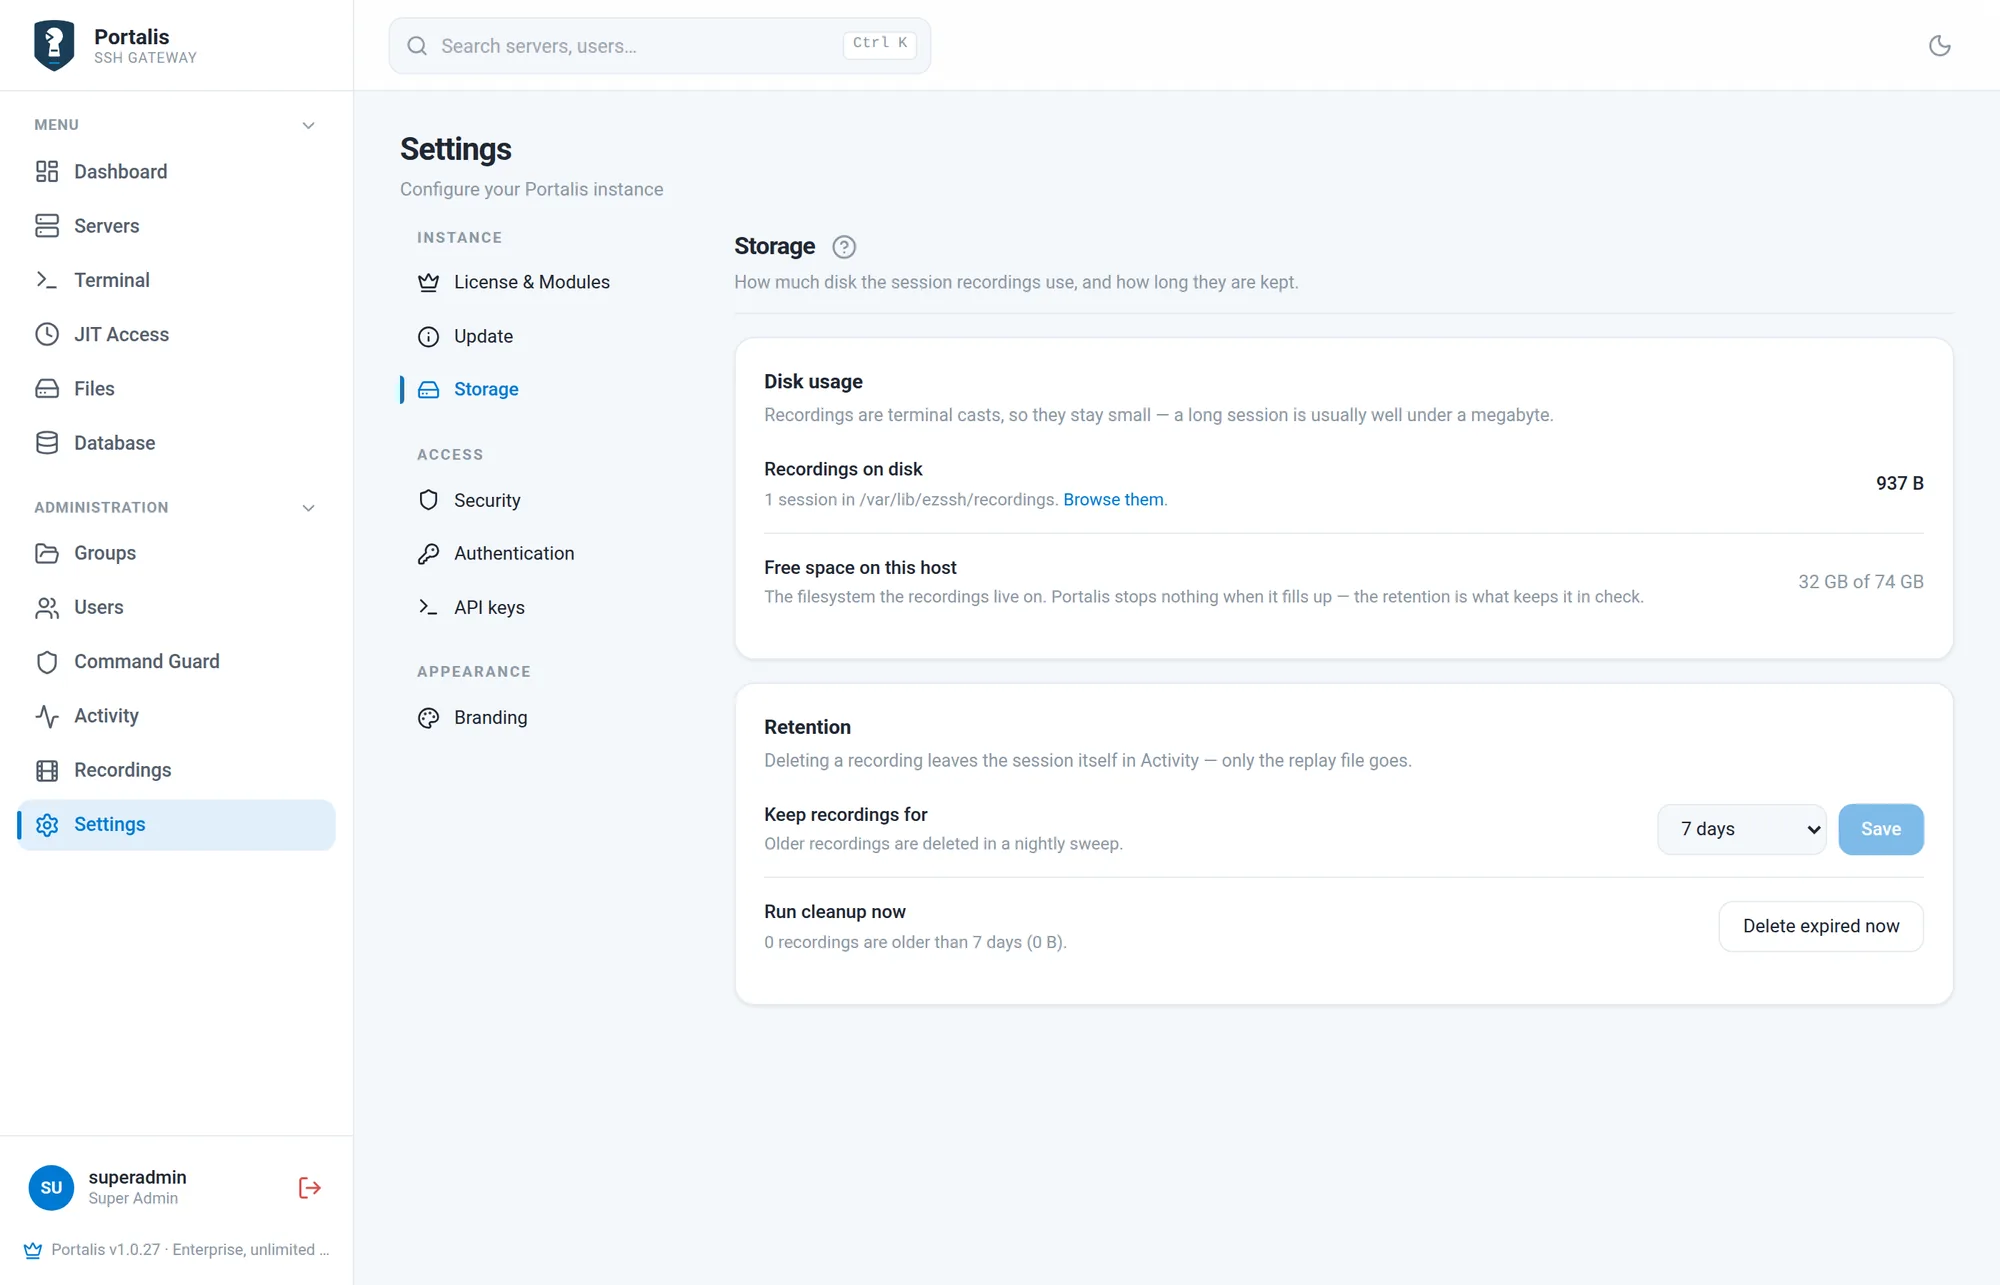
Disk usage shows how many recordings are on disk, what they weigh and how much room is left on the host. Keep recordings for decides how long they live: 7, 30, 90 or 365 days, or forever. A nightly sweep removes what is older, and Run cleanup now does it on the spot after telling you how much will go. Two switches decide what is recorded: Record browser terminals (sessions through the SSH gateway are always recorded) and Record file transfers, which writes every SFTP upload, download, rename and delete to Activity with its name and size.
The default is seven days. Deleting a recording leaves the session itself in Activity — only the replay file goes. Portalis does not stop anything when the disk fills up; the retention is what keeps it in check.
If your industry requires keeping session records for a fixed period, set the retention to match before the first nightly sweep runs. Set it to Forever if the rule is open-ended, and watch the disk instead.
Mail and Alerts
Covered in Mail and password reset and Alerts and audit export below.
Security
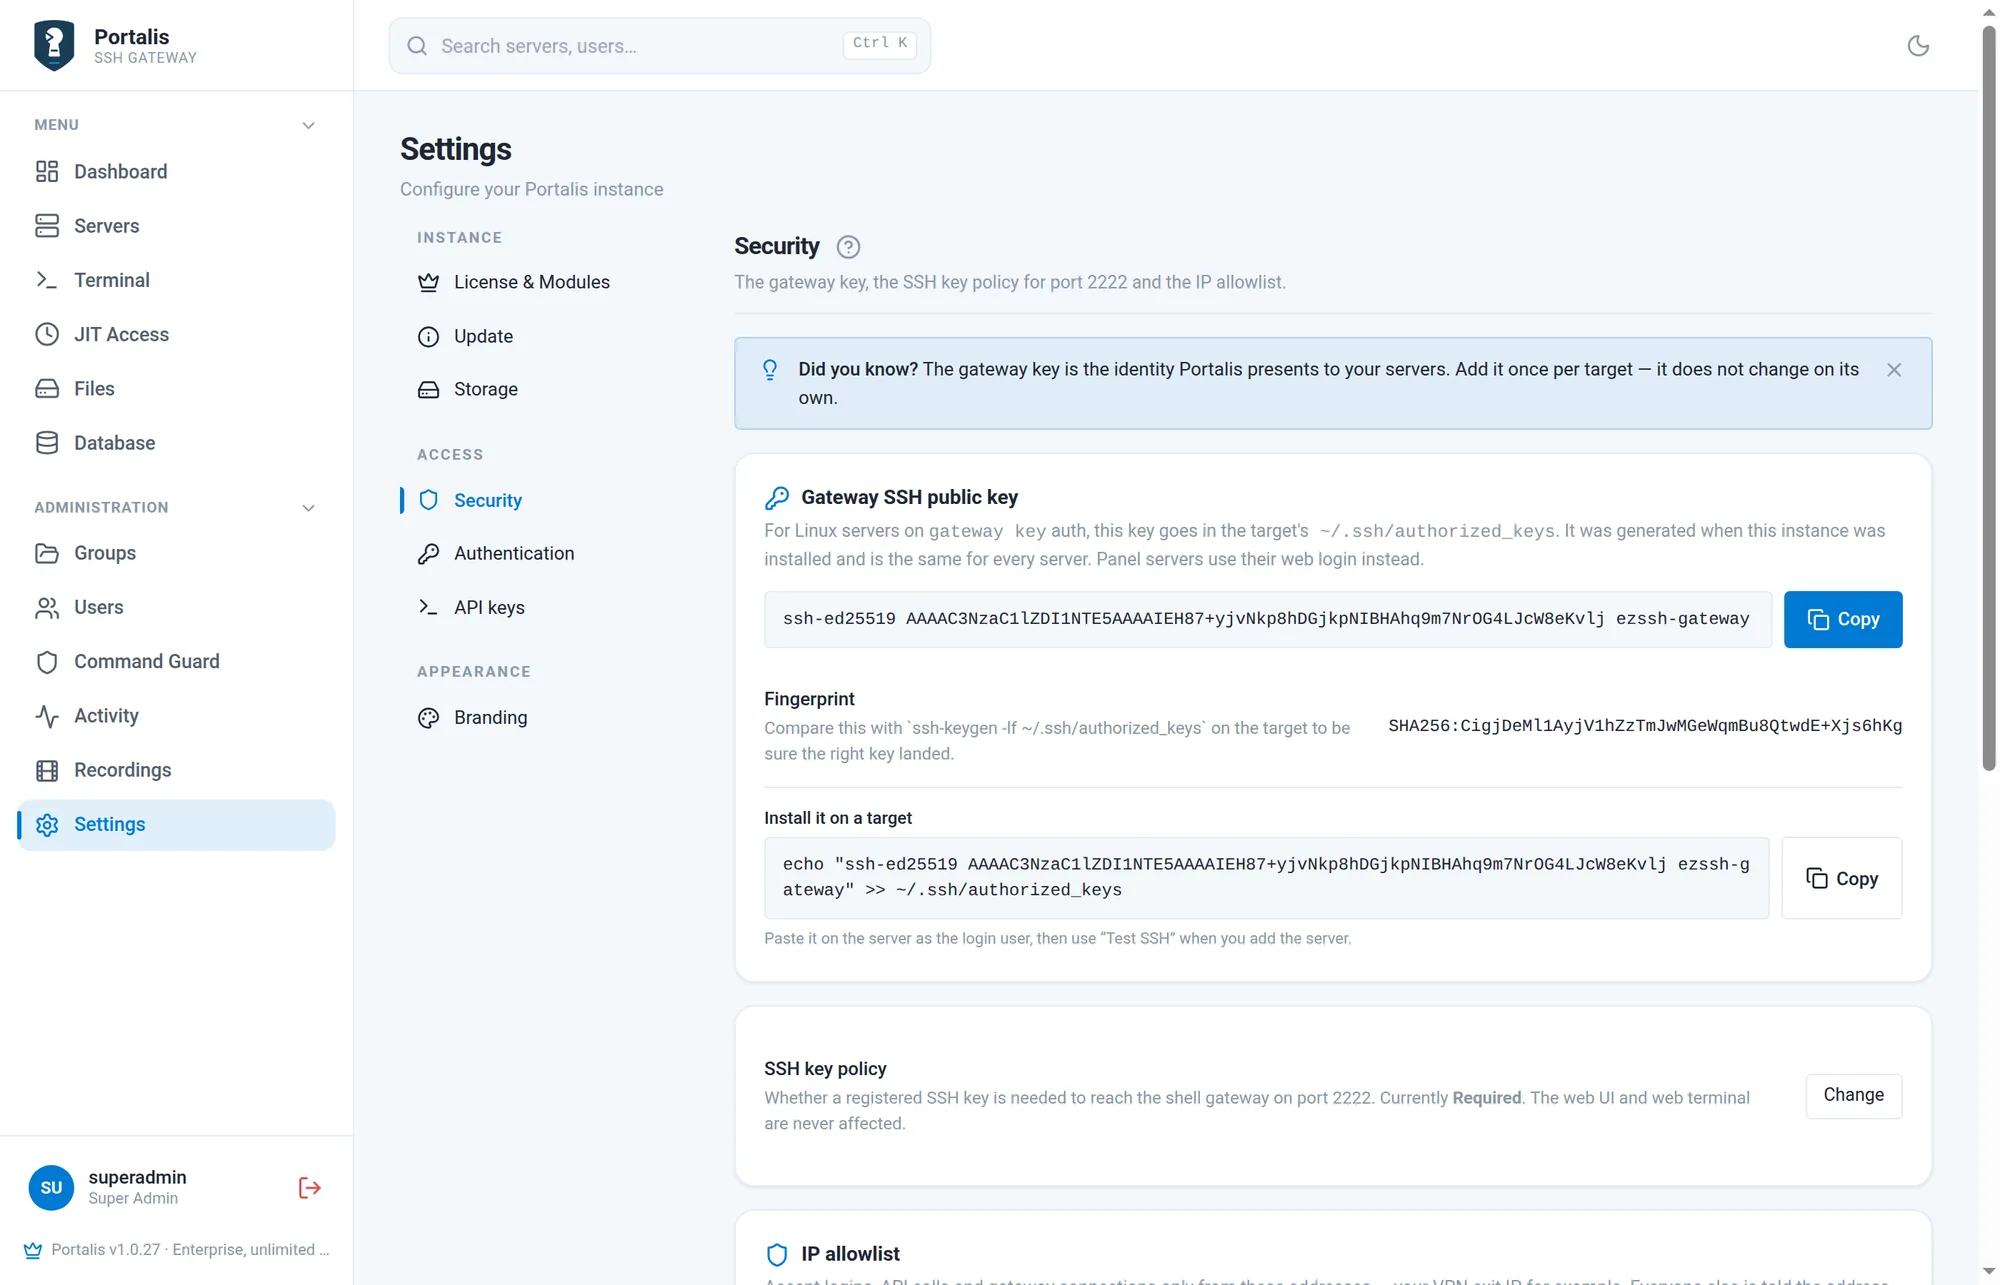
The gateway key is here to copy, with its fingerprint and a ready-made install command. The SSH key policy decides whether a registered key is required, optional or ignored on port 2222. The IP allowlist, when switched on, refuses logins, API calls and gateway connections from outside the addresses and CIDR ranges you list. Trust a reverse proxy takes the CIDRs of the proxies allowed to set X-Forwarded-For. Keep audit events for sets how long Activity is kept: 365 days by default, swept nightly; SSH recordings are never touched by it.
Add your own address to the allowlist before you switch it on. Portalis refuses to save a list that would lock out the address you are saving from, but not one that locks out your colleagues or your VPN. Recovering from a wrong list means editing the database by hand on the host.
Authentication
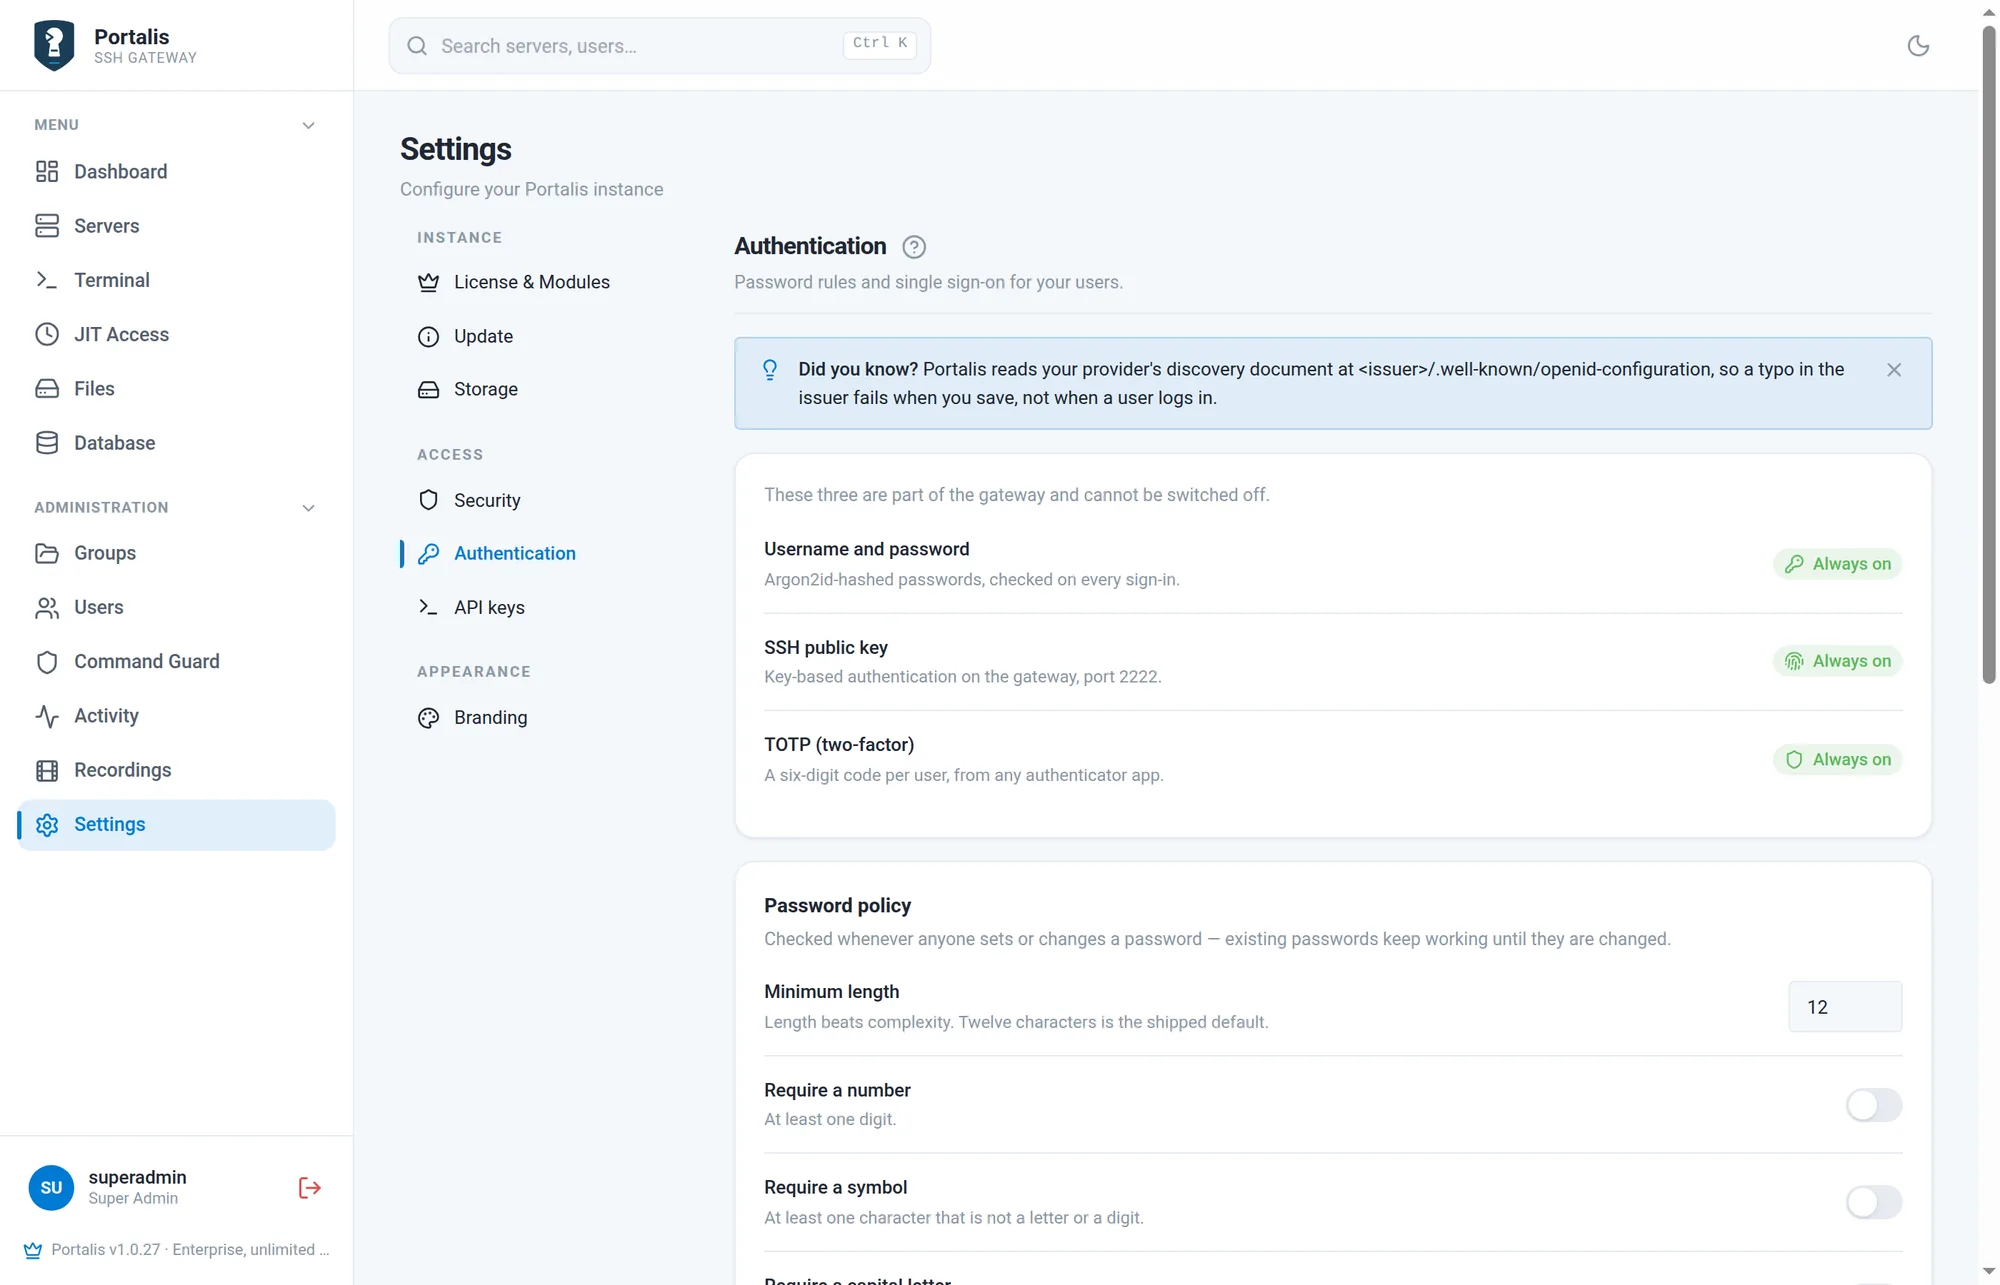
The gateway requires your account password and authenticator code. Whether an SSH public key is also required is configured under Settings → Security. Below them sits the password policy: minimum length (twelve by default), and whether a number, a symbol or a capital letter is required, plus an optional check (off by default) against a local list of common and breached passwords that never leaves the server. It is checked whenever anyone sets a password, and existing passwords keep working until they are changed.
Sign-in protection covers how many failed sign-ins lock an account and for how long, how long a browser session may sit idle before it signs out (the SSH gateway and API keys are not affected), and whether a known browser may skip the authenticator code after a correct one. People manage their own remembered browsers on their profile.
Single sign-on
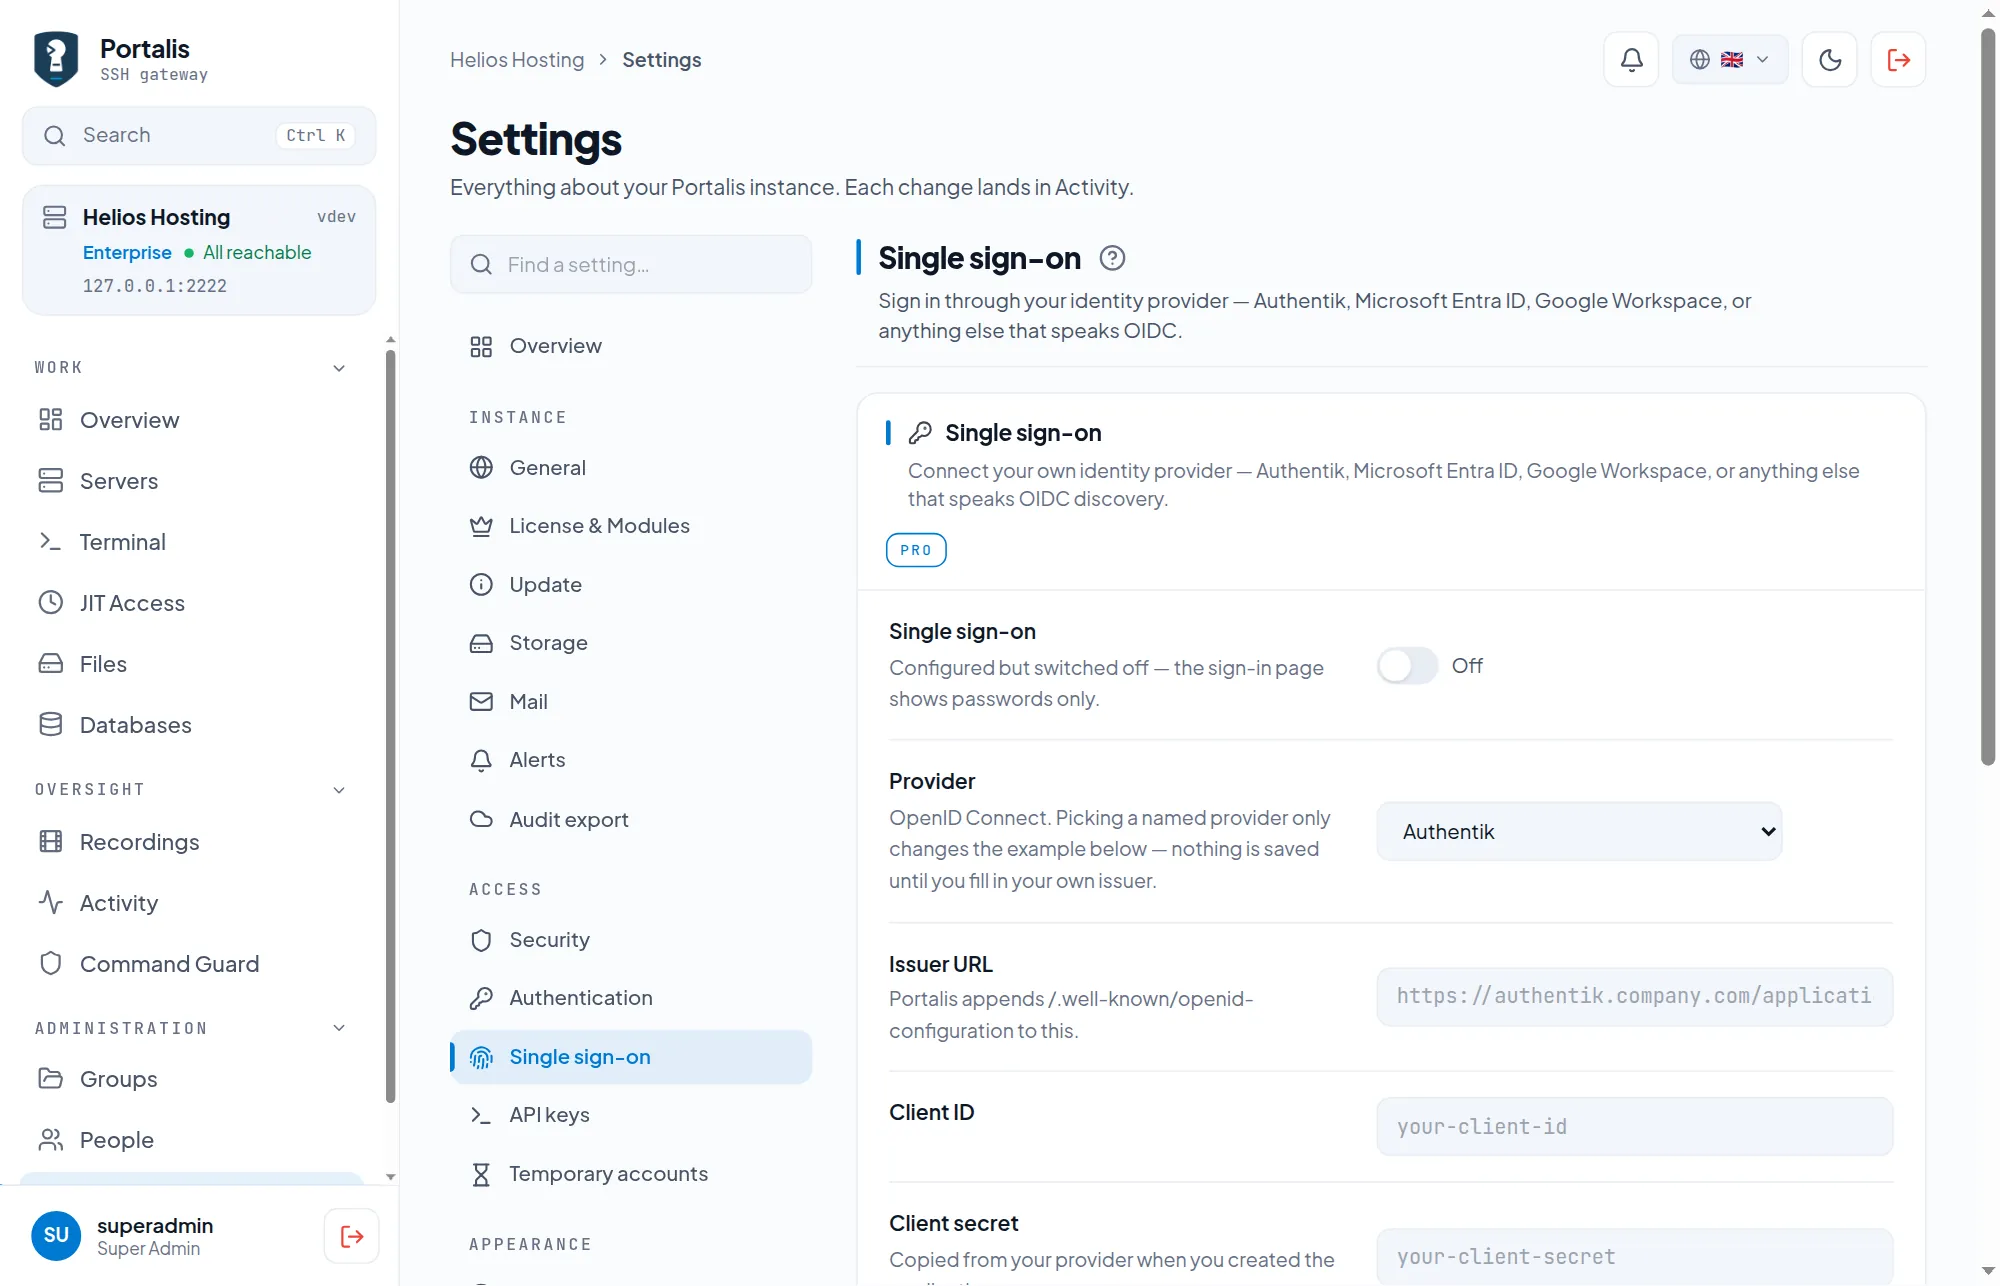
Single sign-on (Pro and Enterprise) connects an OpenID Connect provider: Authentik, Microsoft Entra ID, Google Workspace, Keycloak or anything else that offers OIDC discovery. Enter the issuer URL, client ID and client secret, and paste the shown Redirect URI into your provider exactly as it is. Portalis reads the provider's discovery document at <issuer>/.well-known/openid-configuration, so a typo in the issuer fails when you save rather than when a user tries to sign in, and Test the connection walks through discovery, keys and the redirect step by step. New people decides what happens the first time someone signs in whose email matches nobody: create the account, or refuse unless it already exists.
Administrators and super admins use local password sign-in and its two-factor policy, even with SSO switched on: one wrong assertion at the identity provider must never hand over the whole instance. For regular users signing in with SSO, MFA is the identity provider's responsibility: require it there, because local TOTP enrolment is skipped. SSO covers the web interface only. The SSH gateway still uses key, password and code, because SSH has nowhere to put a browser redirect.
API keys
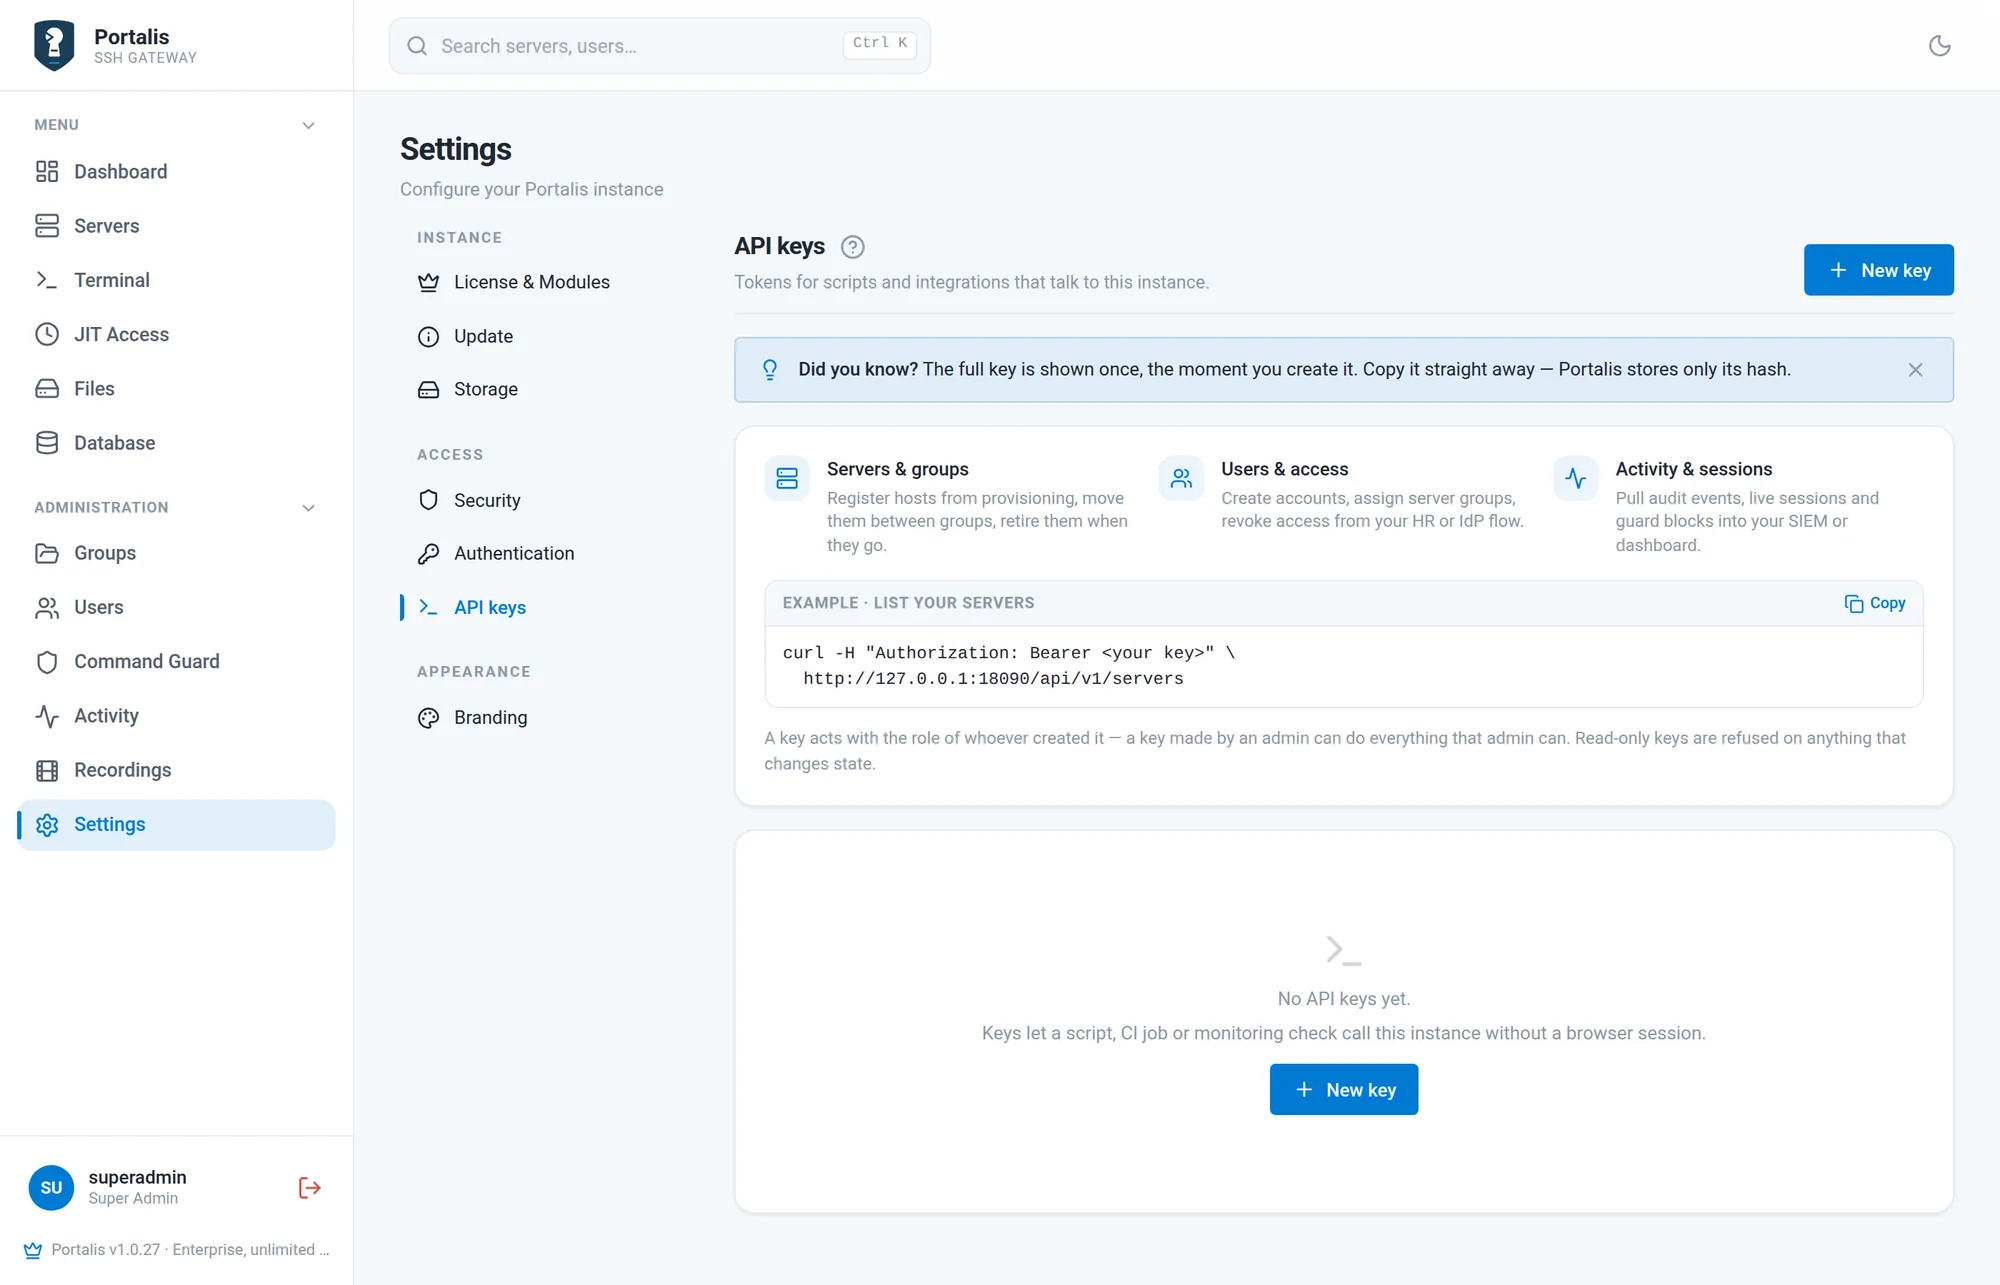
Create a key, give it a name, choose an expiry (30, 90 or 365 days, or never) and a scope, and copy the secret — it is shown once and stored only as a hash. Revoking a key takes effect immediately. See API and keys for how to use one and what the scopes mean.
Temporary accounts
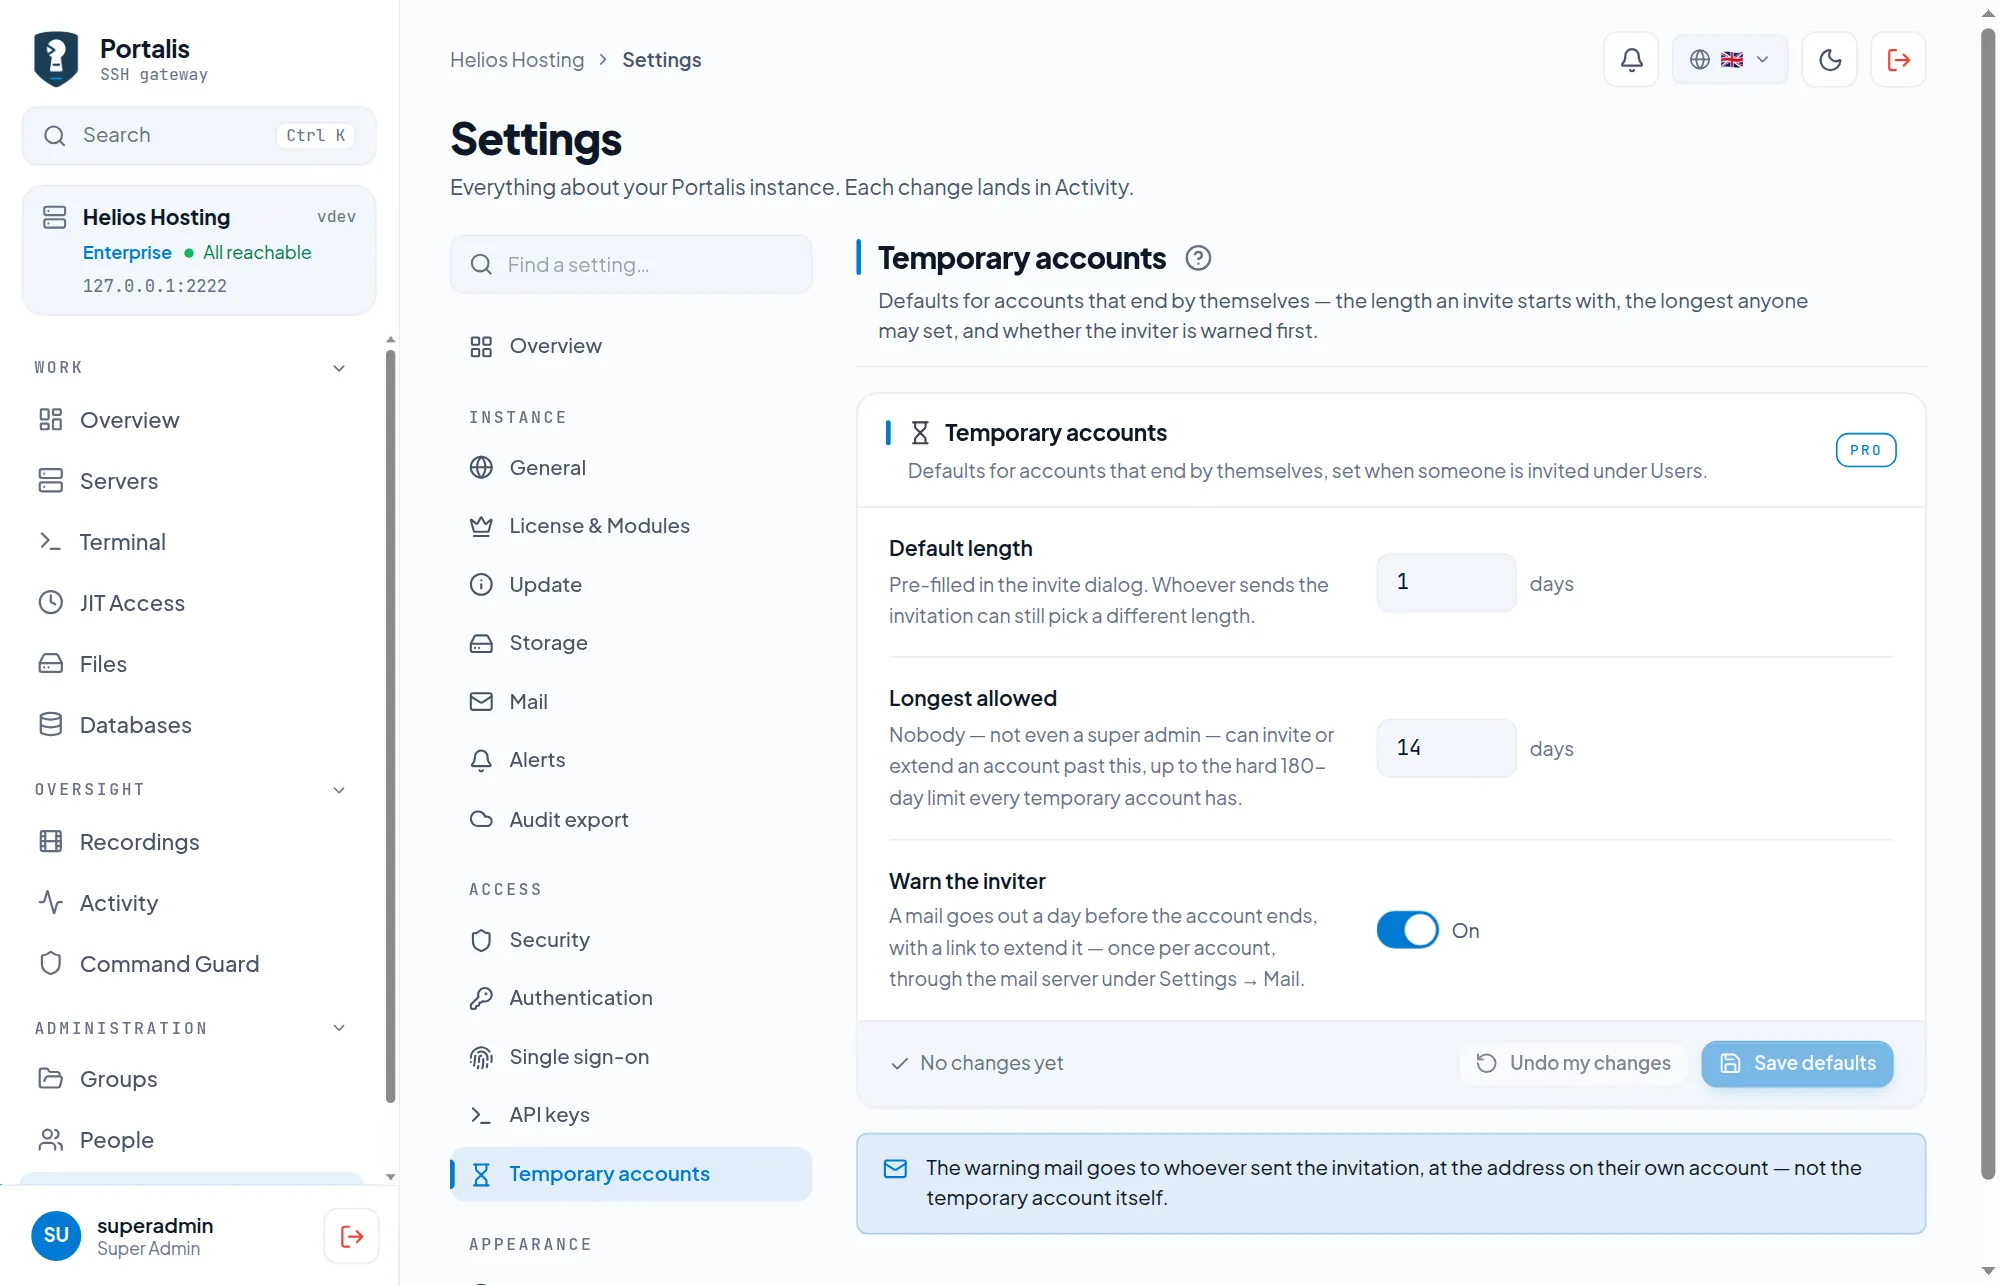
The defaults for the invitations described under People from outside: the length an invite starts with, the longest anyone may set, and whether the inviter is warned by mail a day before the account ends.
Branding
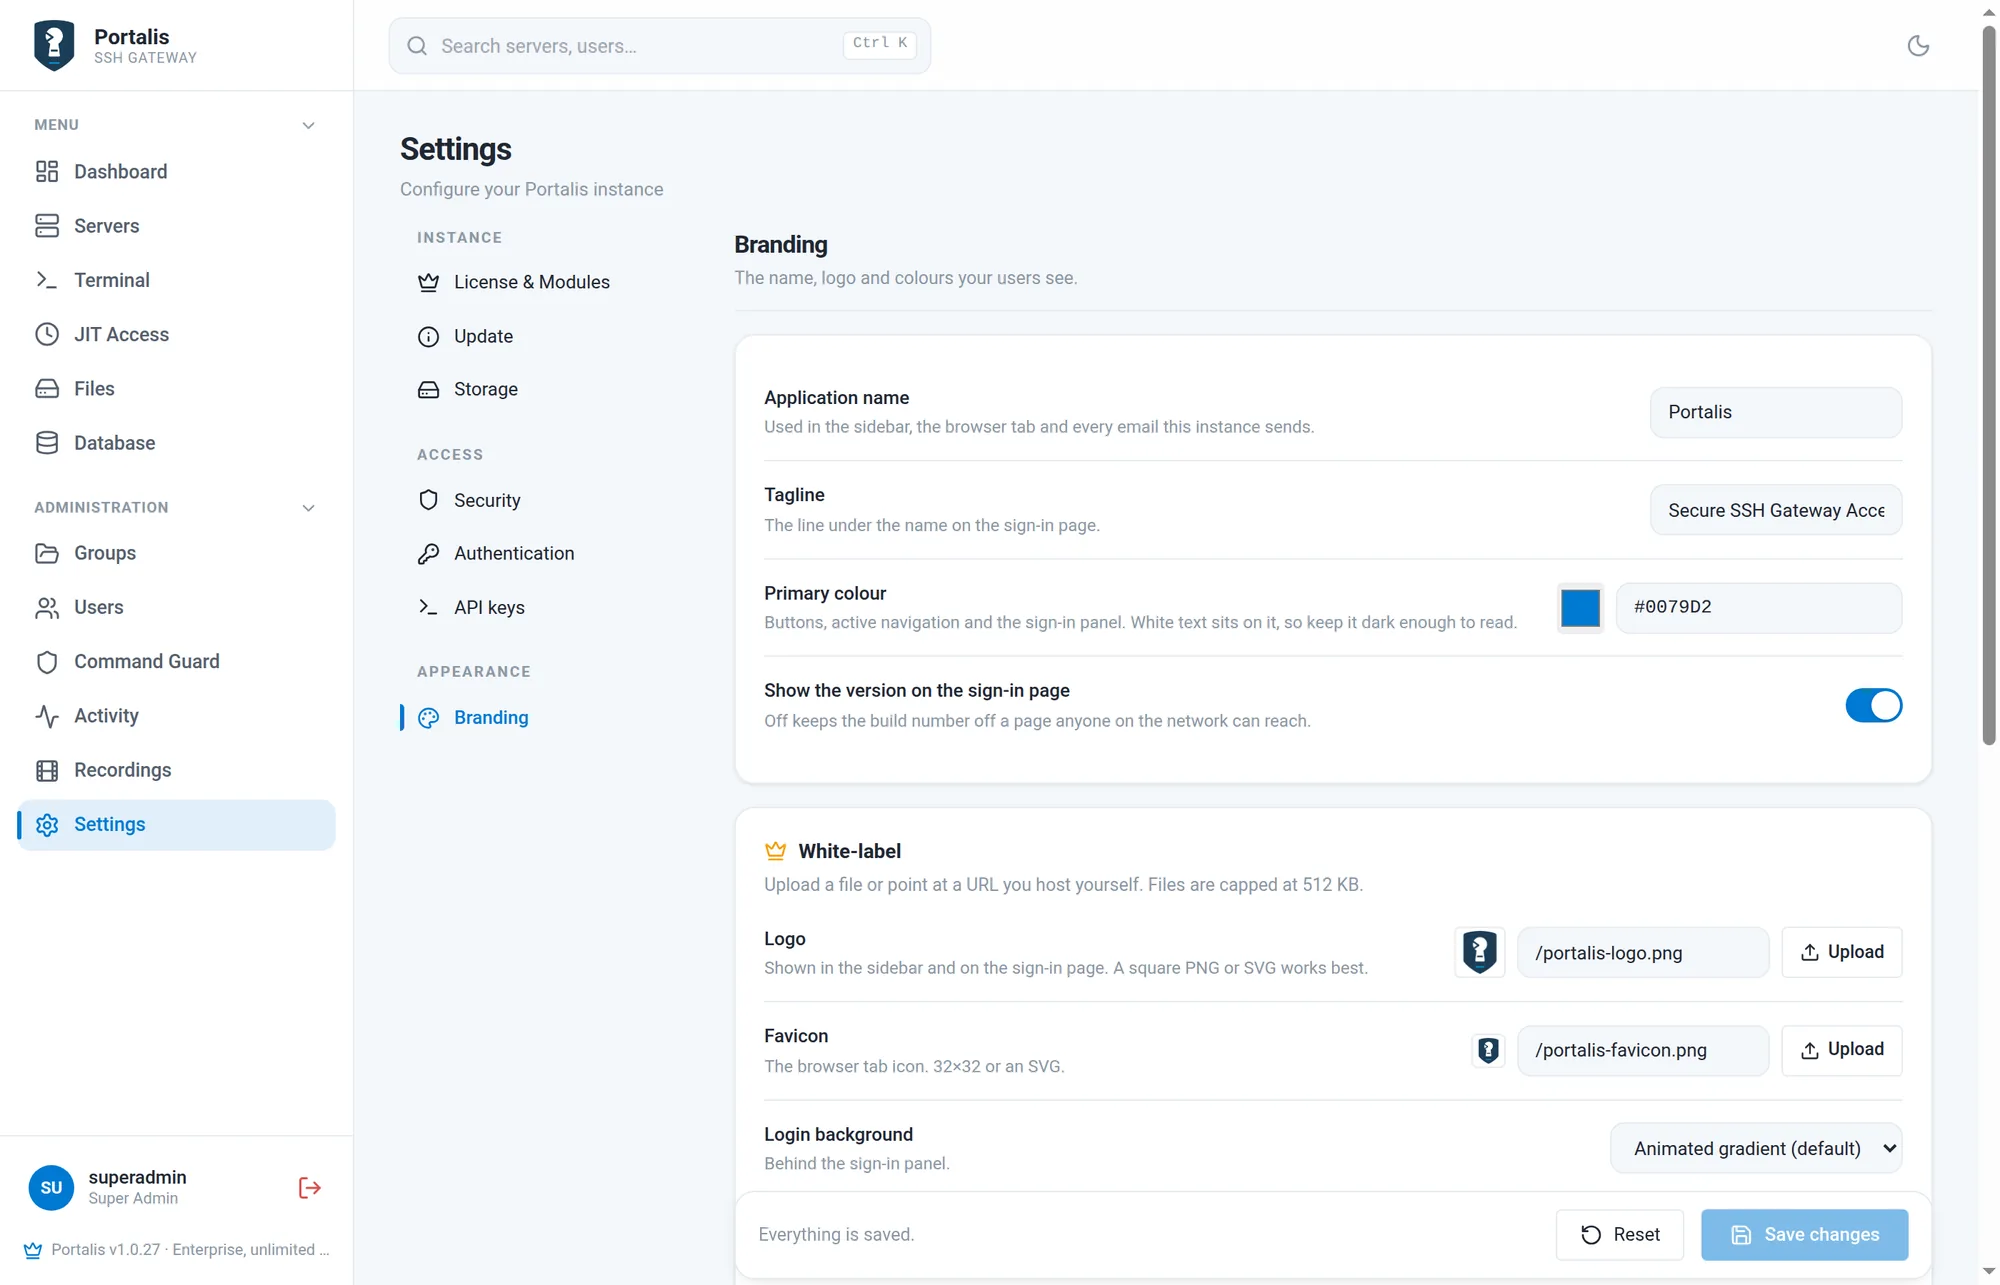
The application name, tagline and accent colour are open to every plan, and a live preview shows the sign-in page as you change them. You can also choose whether the sign-in page shows the build number; off keeps it off a page anyone on the network can reach. The white-label part is Enterprise: your own logo and favicon (a file up to 512 KB, or a URL you host), a sign-in background image and the “Powered by” line, which can be hidden entirely.
Your own profile
Click your name at the bottom of the sidebar. Everything about your own account is on this one page.
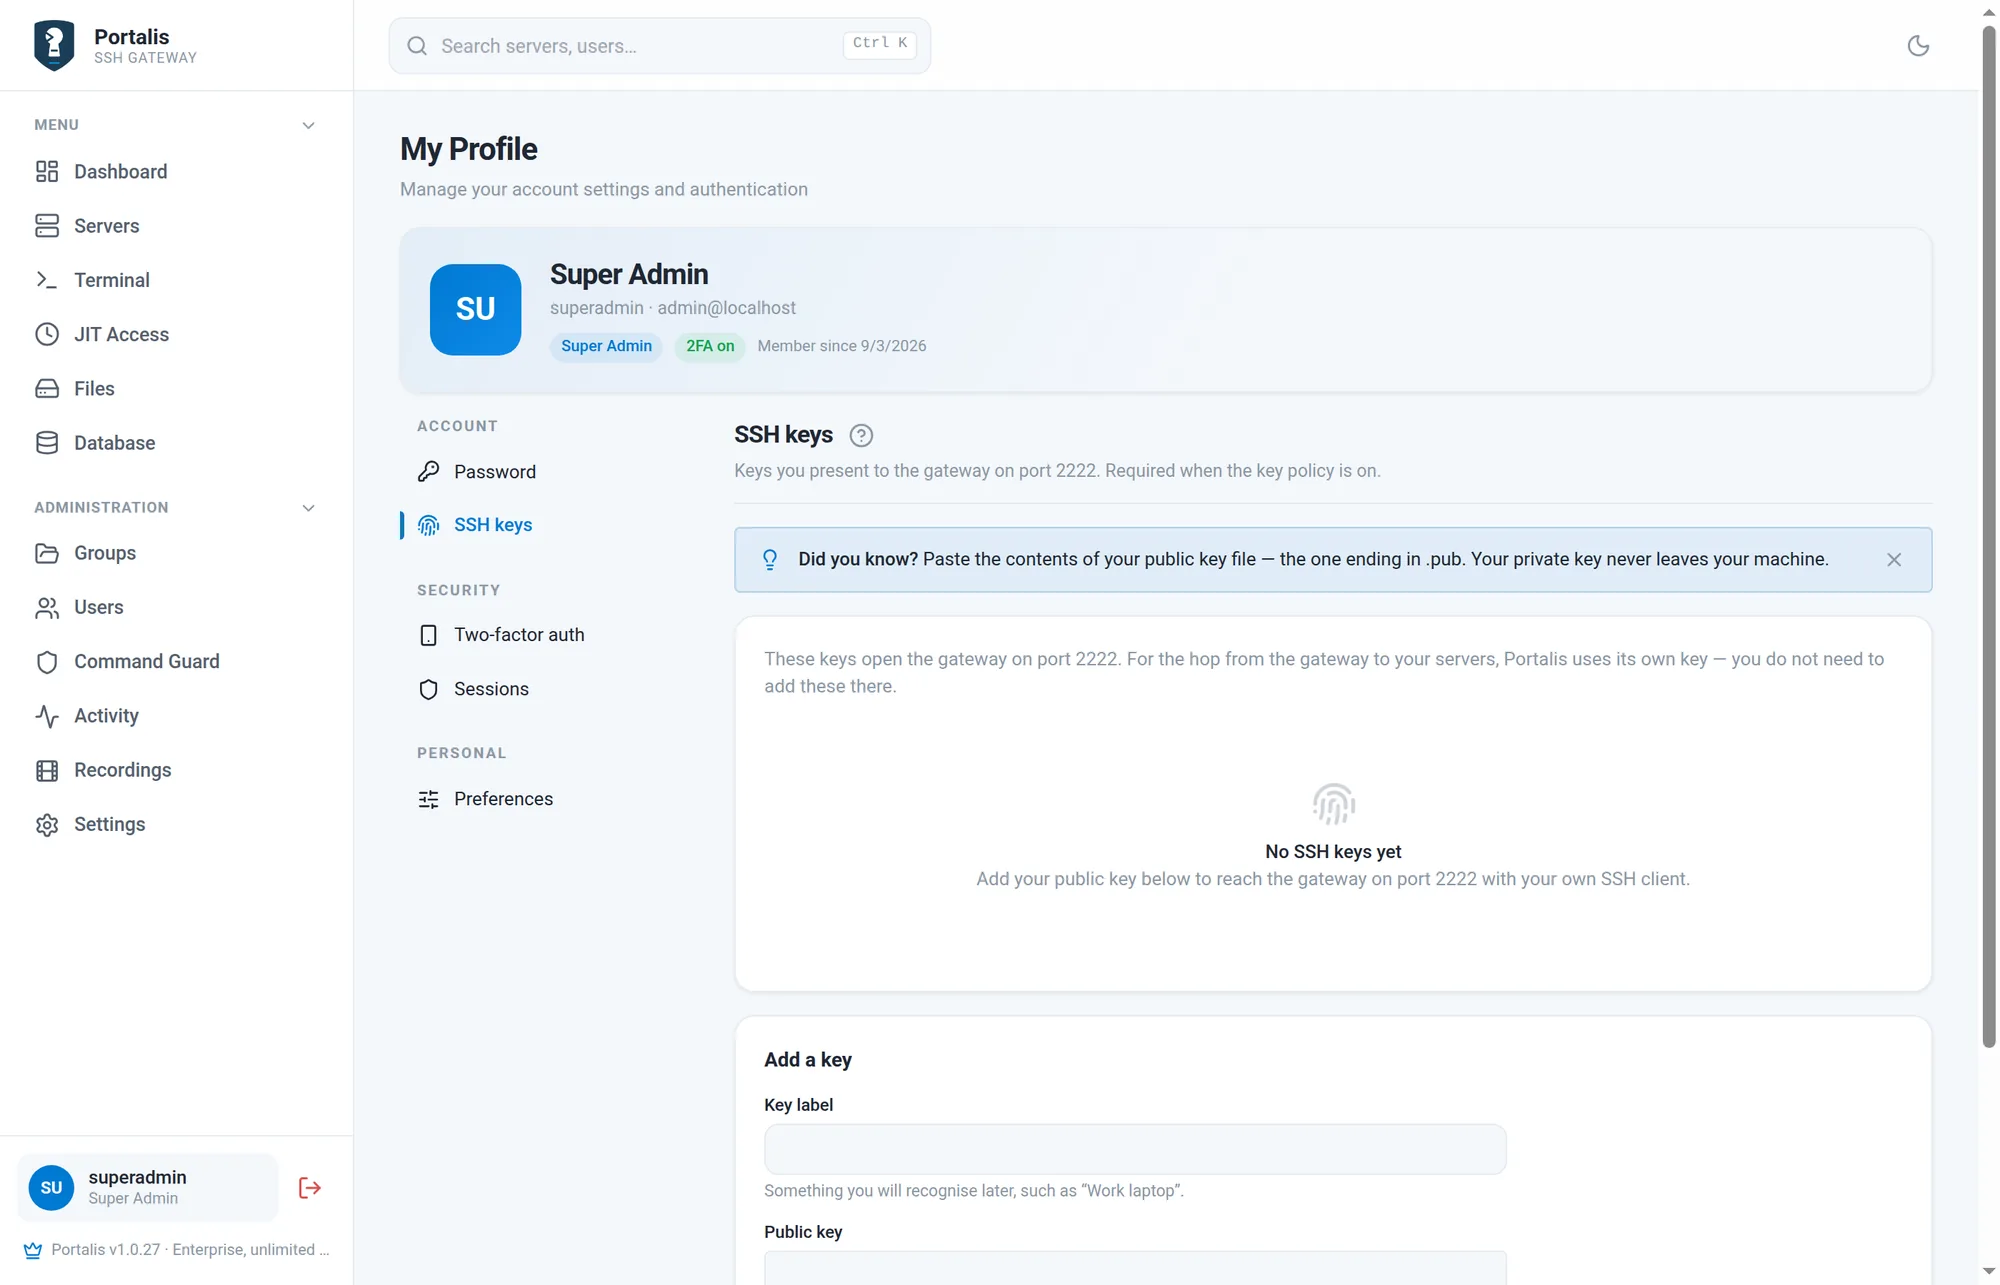
- Two-factor — reconfigure your authenticator and get fresh recovery codes.
- SSH keys — add the public keys you use for port 2222. These are not the keys Portalis uses to reach your servers; that is the gateway key and it is separate.
- Where you are signed in and Recent sign-ins — sign out of one session, or everywhere at once, if you left a browser on a machine you no longer trust.
- Password — change it; the policy above is checked as you type.
- Preferences — light or dark, the terminal font size, and whether the tips appear.
Mail and password reset
Portalis sends email through your own mail server. Nothing is relayed through us: these messages carry reset links, invitations and access notices, so they stay on your infrastructure. Open Settings → Mail and fill in:
| SMTP host and port | Your server, for example smtp.example.com on 587. |
|---|---|
| Encryption | STARTTLS (recommended, usually port 587), TLS (usually 465) or none (25). When STARTTLS is chosen it is required: a server that does not offer it is refused rather than quietly falling back to plaintext. |
| Sign in | Username and password. Leave both empty when your relay authenticates by IP address. The password is stored sealed and is never sent back to the browser. |
| From | The sender address and name. Use an address your server may send as, or the mail is rejected as a forgery. |
| This installation's address | The base URL that links in mail point at, for example https://portalis.example.com. It is read from this field and never from the browser's request, so nobody can post a forged address and have someone else's reset link built against it. |
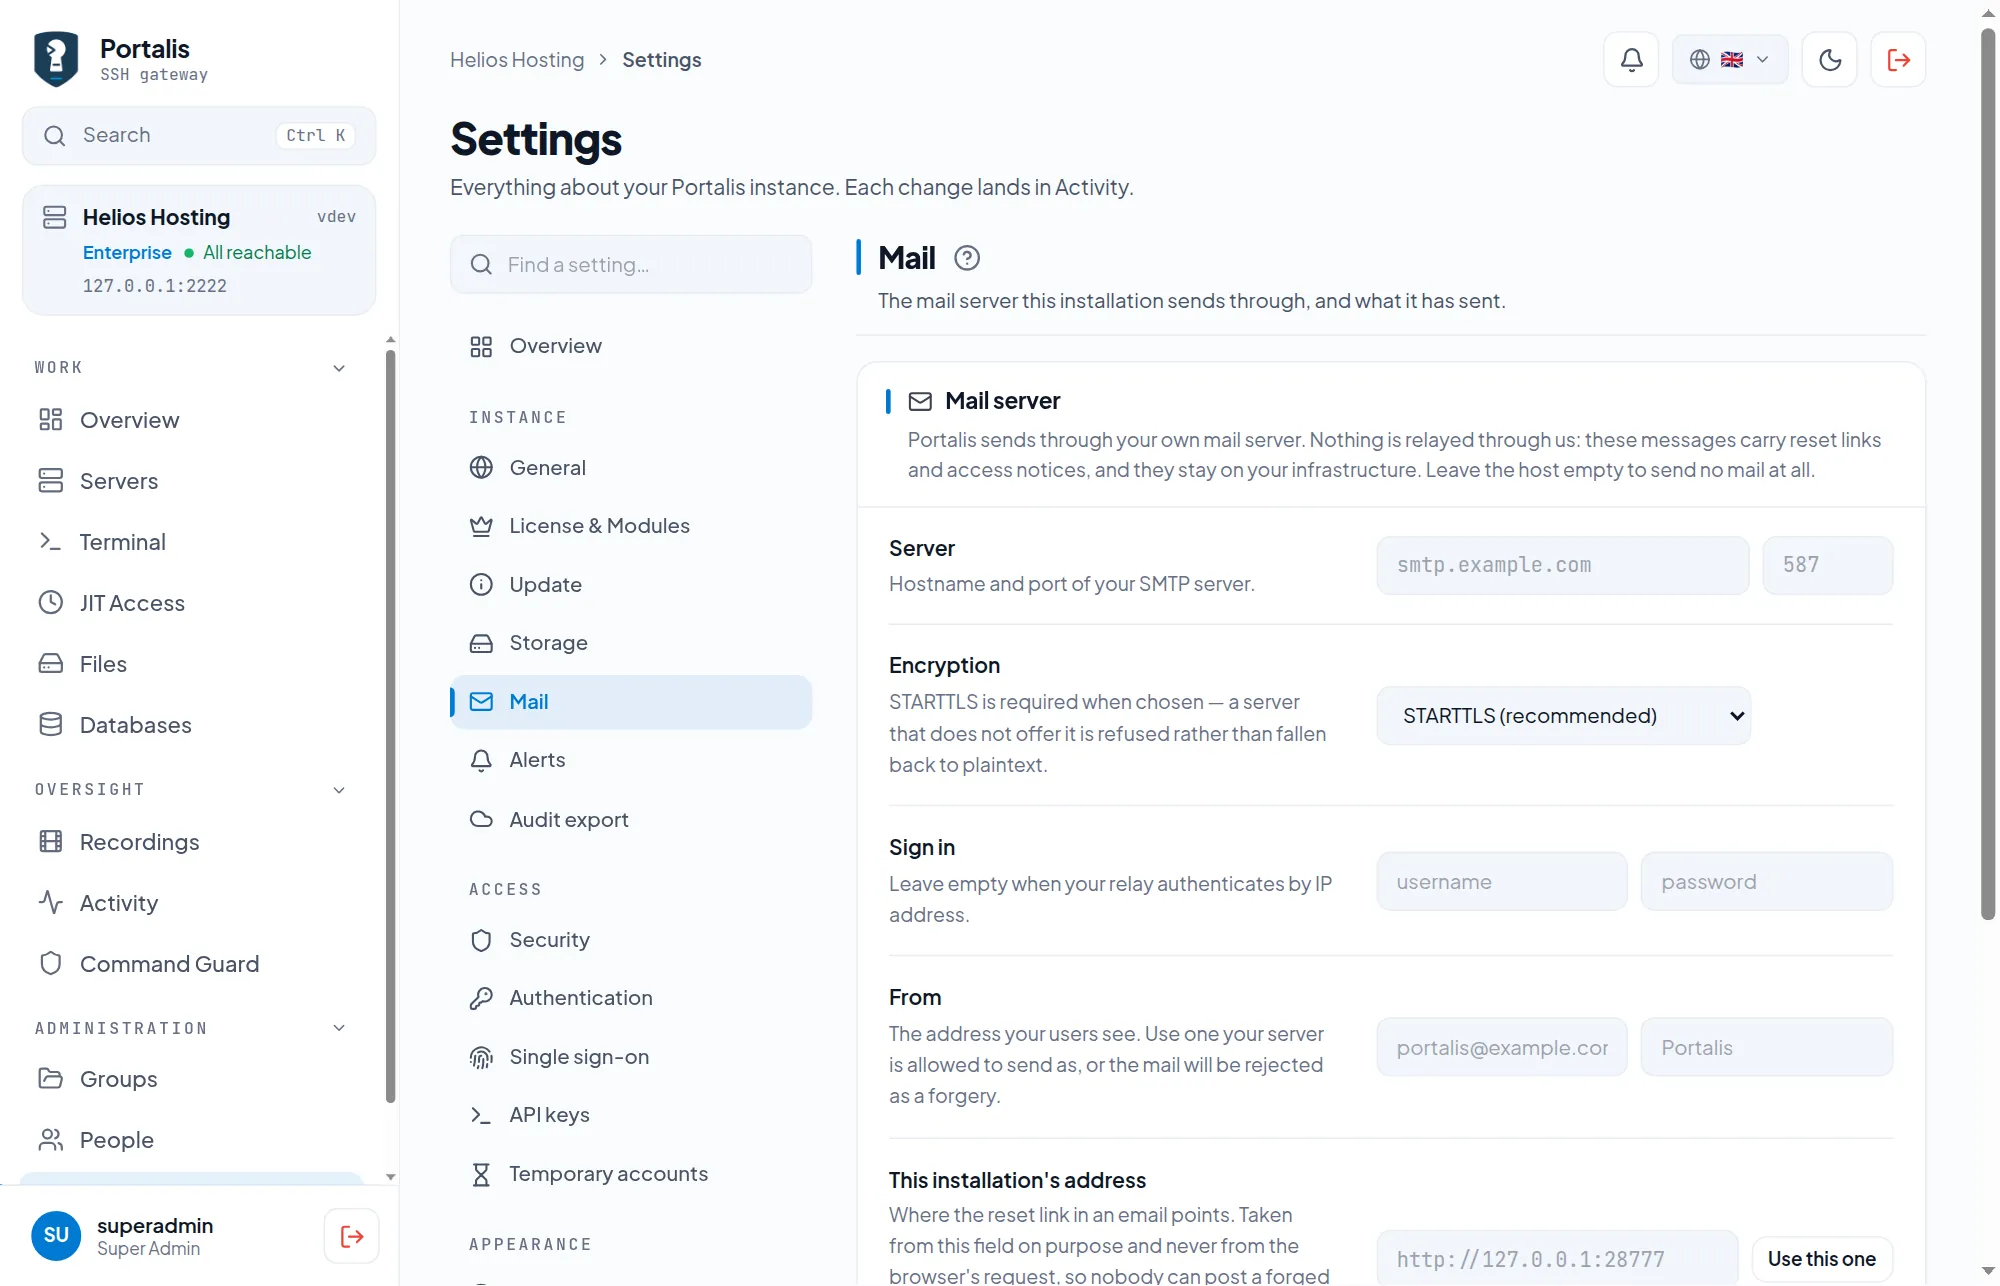
Send a test mails your own address using the stored settings, and Recent deliveries lists what Portalis handed over and what your server answered, for 30 days. Message bodies are not stored.
With mail configured, the sign-in page offers Forgot your password. The link works once and expires after two hours. It is stored only as a hash, the answer is the same whether or not the address belongs to an account, an account can request at most three resets an hour, and completing a reset signs every other session out. It does not skip two-factor: an account with an authenticator is still asked for a code afterwards. With no mail server set the link is hidden, and an administrator sets a one-time password under People instead.
Alerts and audit export
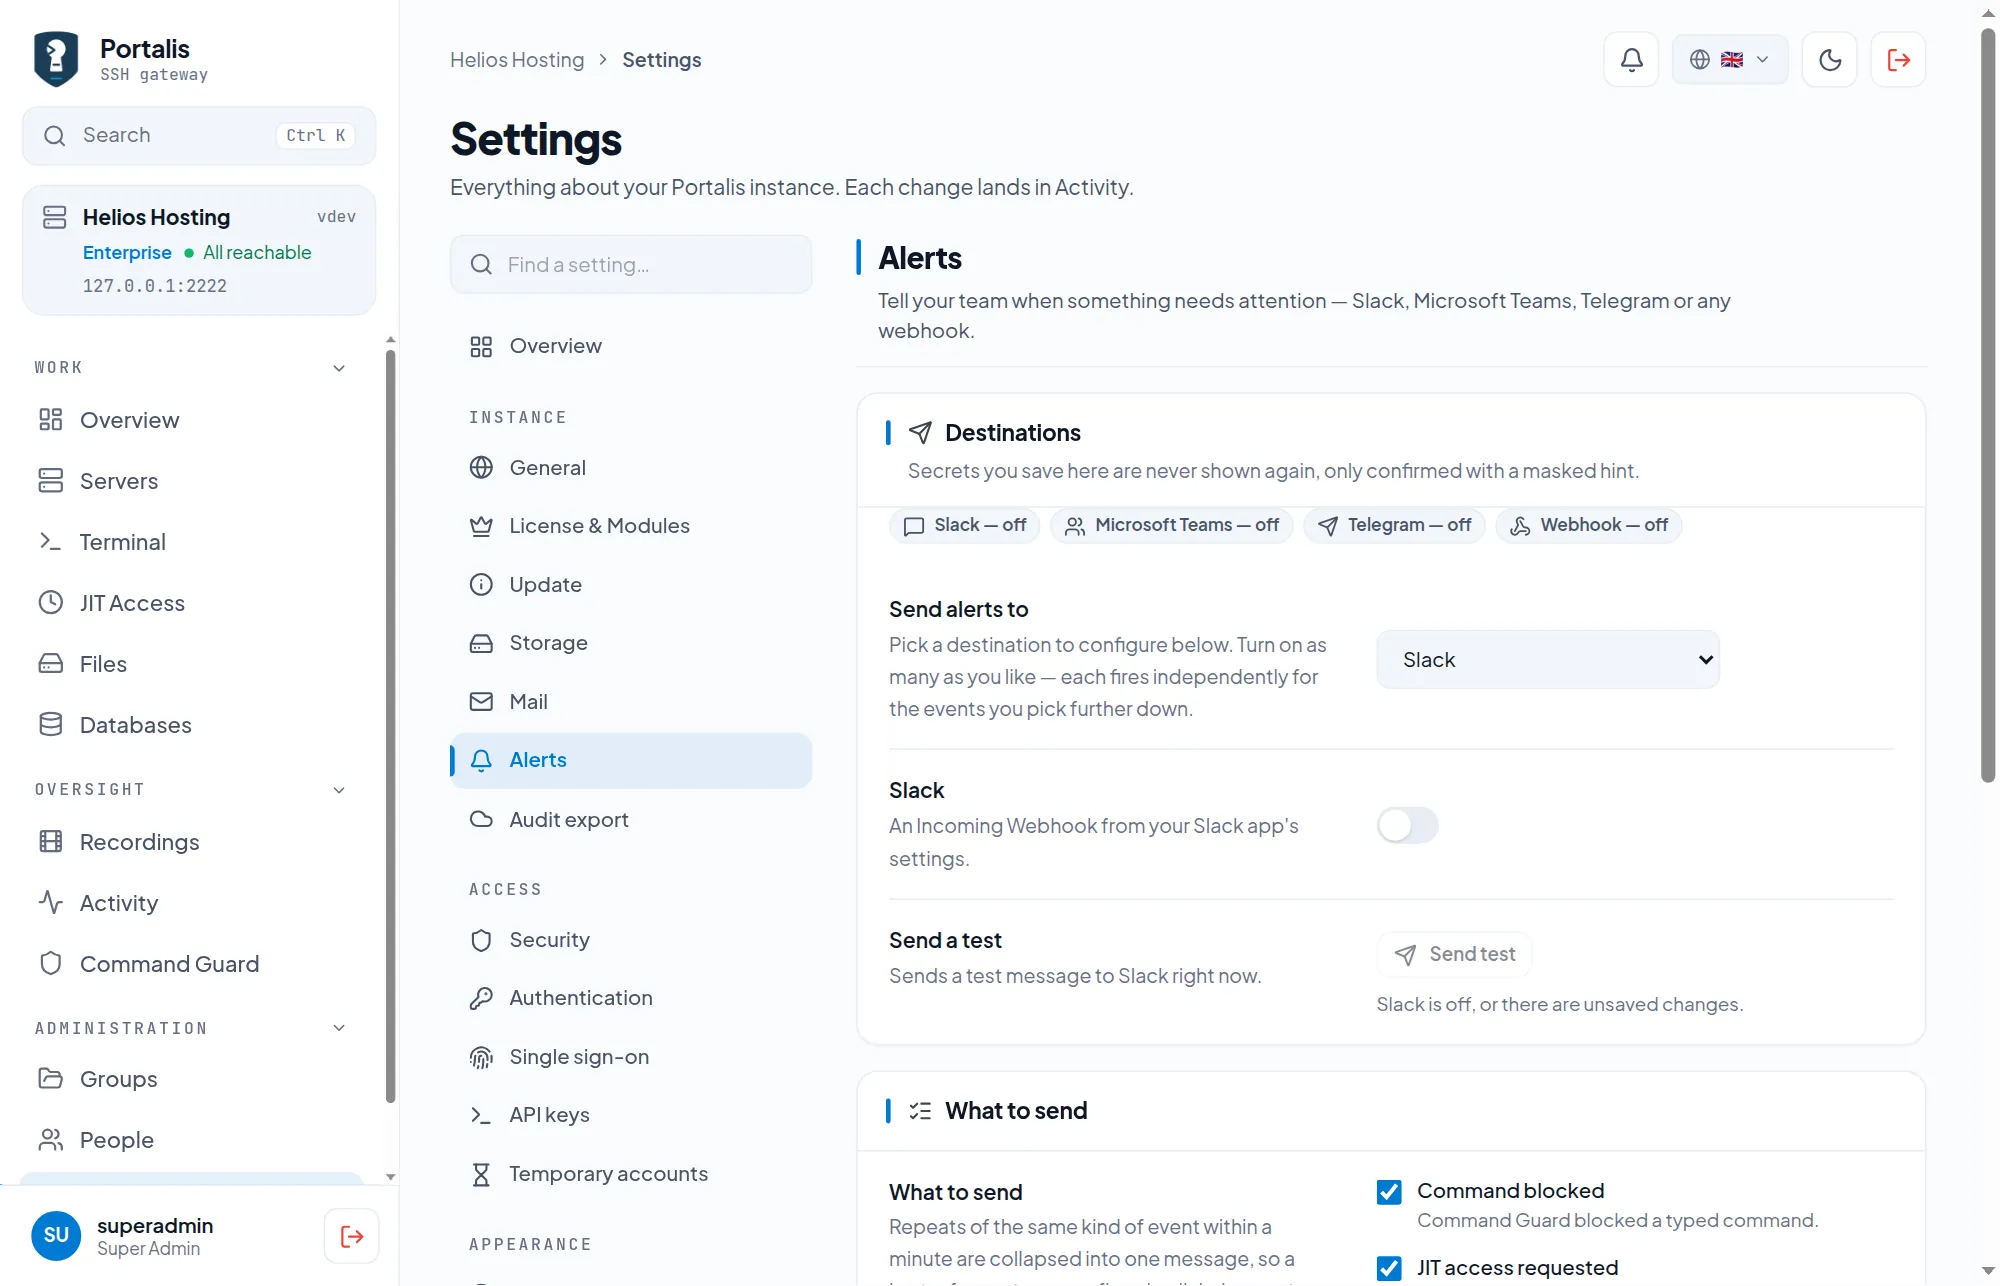
Settings → Alerts tells your team when something needs attention. Pick a destination — Slack (Incoming Webhook), Microsoft Teams (webhook or Power Automate URL), Telegram (bot token and chat id) or a generic webhook of your own, signed with an HMAC-SHA256 shared secret if you set one (see the X-Portalis-Signature header). Secrets are stored encrypted and never shown again. Then choose what to send: a command blocked by the guard, a JIT request, a JIT decision, a throttled sign-in, a server that stops answering, or an available update. Repeats of the same event within a minute are collapsed into one message, and Send a test checks a destination before you rely on it.
Settings → Audit export streams every event in Activity to a SIEM over syslog as it is written, in JSON, CEF or LEEF, over TLS, TCP or UDP (plain TCP and UDP only on a trusted network). Anything that looks like a password, token or secret is left out. The same tab downloads a one-off export of Activity, capped at 50,000 rows.
Updating
Two ways, same result.
From the interface. Settings → Update → Update now, for super admins. The host pulls the new image, restarts the containers and waits for the web interface to answer; the tab shows the steps as they happen. If the new version does not come back within about a minute, the previous image is put back and the tab says the update failed and was rolled back. Tick Back up the database first and the host writes a pg_dump (mode 0600, checked, the last few kept) before it touches anything; if the dump fails, the update stops.
From the shell. Re-run the installer. It keeps your .env, your database and your recordings, pulls the new image and restarts:
curl -fsSL https://get.portalis.sh | sudo bashRe-running the installer keeps a pinned PORTALIS_VERSION; pass sudo env PORTALIS_VERSION=latest bash after the pipe when you deliberately want to resume tracking latest.
Updates are ordinary Docker image swaps. Database migrations run at start-up and are logged. Skipping versions is fine — migrations from any earlier version run in order. The image is pulled from the registry over HTTPS; Portalis compares image digests to see whether something newer exists, but it does not verify a separate signature on the release, and a rollback only restores the previous image, not the database. If a migration has already run, going back means restoring your backup.
Take a backup before every update: tick Back up the database first, or run pg_dump yourself as shown under Backups. It takes seconds and turns a bad afternoon into a five-minute rollback.
Backups
Keep these four components together in a protected backup set:
| The database | Users, servers, groups, grants, the audit log, settings. Everything except the recordings and the gateway key. |
|---|---|
/opt/portalis/.env | The secrets. Without it the encrypted fields in a restored database cannot be decrypted: the stored server passwords, TOTP secrets and alert webhooks are encrypted with keys that live here. |
| The gateway key | Lives in /var/lib/ezssh/keys inside the container, on its own Docker volume. It is the identity your servers trust. Lose it and you install a new key on every server. |
| The recordings | /var/lib/ezssh/recordings inside the container, also its own volume, only if you must keep session replays. It is the big one. |
# run in bash on the Portalis host, with access to Docker and .env
(
  set -euo pipefail
  umask 077
  cd /opt/portalis
  mkdir -p backups
  backup_dir="backups/manual-$(date -u +%Y%m%dT%H%M%SZ)"
  mkdir -m 700 "$backup_dir"
  docker compose exec -T db pg_dump -U portalis portalis | gzip > "$backup_dir/database.sql.gz"
  gzip -t "$backup_dir/database.sql.gz"
  cp .env "$backup_dir/env"
  docker compose exec -T portalis tar czf - -C /var/lib/ezssh/keys . > "$backup_dir/keys.tgz"
  tar -tzf "$backup_dir/keys.tgz" > /dev/null
)
The command above backs up the database, secrets and key volume; it does not copy recordings. If you need replays, also archive /var/lib/ezssh/recordings, preferably while the application is stopped so active recordings are complete. Copy the backup set to encrypted storage away from this host, verify the copy, and practise restoring on an isolated host. If any command fails, treat that set as incomplete.
For a restore, stop the application first. Restore .env with mode 0600, start only the database, and load database.sql.gz into a fresh portalis database using psql -v ON_ERROR_STOP=1 -U portalis portalis. Restore keys.tgz into the application's key volume before starting it; restore the recordings volume too if you backed it up. Start the application only after these steps, using the image version that produced the backup. Never test a restore against the production database.
Keep .env as safe as the database itself. It holds the keys that decrypt stored credentials, and a copy of both together is a copy of everything.
API and keys
Everything the interface does goes through a REST API at /api/v1, and an API key reaches the same endpoints. Create one under Settings → API keys (admins only) and send it as a bearer token. Keys start with ezk_:
curl -H "Authorization: Bearer ezk_..." \
     https://portalis.example.com/api/v1/servers
A key acts as the admin who created it, with that admin's role, and it stops working when that account is deactivated or the key expires. It has one of two scopes:
full | Everything its owner can do, reads and writes. |
|---|---|
read | Plain GET requests only. Anything else is refused with 403 and “this api key is read-only” before it reaches the handler, so a leaked monitoring token cannot delete a server. |
Both scopes are subject to the IP allowlist. Actions taken with a key appear in Activity under the owning account; the key's own name is not recorded on each event. The key list shows each key's scope, last use and expiry, so check the scope there after creating a read key.
Uninstalling
# stop and remove the containers and units, keep the data
curl -fsSL https://get.portalis.sh | sudo bash -s -- uninstall

# the same, and delete the database and the recordings too
curl -fsSL https://get.portalis.sh | sudo bash -s -- uninstall --purge
Without --purge your data stays in place — /opt/portalis and the Docker volumes — and re-running the installer picks it up again. With it, everything goes: the containers, the database, the gateway key, the host keys, the recordings and the install directory. Nothing has to be removed from the servers you connected to except the gateway key line in authorized_keys, if you want it gone.
Security model
What Portalis does with your credentials, and what it expects from you.
What is stored, and how
| Server credentials | Encrypted with a key in /opt/portalis/.env. A stolen database without that file is not enough to reach your servers. |
|---|---|
| User passwords | Hashed with Argon2id. They are never stored or logged in a readable form, and Portalis cannot show them to anyone, including you. |
| The gateway key | A private key in a Docker volume on the Portalis host (/var/lib/ezssh/keys in the container). This is the crown jewel: whoever holds it can reach every server that trusts it. |
| Recordings | Plain files on disk under /var/lib/ezssh/recordings. They contain what the screen showed, so treat them as sensitive. |
| Two-factor secrets | In the database, sealed with a key from .env. Recovery codes are single-use and consumed when used. |
What guards the doors
- Mandatory local two-factor. Password accounts must enrol before using the application or gateway. Regular users signing in with SSO rely on the identity provider's MFA policy instead.
- Three authentication checks on port 2222 by default: registered key, password, code.
- Gateway per-IP backoff. After five failed SSH attempts the source address is banned for a minute, and the ban doubles with each further failure up to an hour, so a password is not worth guessing at. Web sign-ins have a separate per-IP rate limit and account lockout policy (Settings → Authentication).
- Host key pinning. A server whose key changed is refused until an administrator clears the pin.
- Audit trail. Sign-ins, failures, sessions, queries and access changes; file-transfer events depend on the Storage setting.
What is on you
- Put HTTPS in front of the web interface. Portalis does not terminate TLS itself.
- Keep the host patched and its Docker socket private. Root on the host is root on the gateway key.
- Back up
.envseparately from the database, and keep both away from the people whose access you are limiting. - Review User access now and then. The single-server grants are the ones that outlive their reason.
Troubleshooting
The installer stops on Docker
Docker or Compose v2 is missing and there is no terminal to ask in. Re-run with PORTALIS_INSTALL_DOCKER=1, or install Docker yourself and run the installer again.
A server shows Unreachable
Reachability is a TCP check every five minutes; Check now tests it immediately. Unreachable means Portalis could not open the port: wrong address, firewall, or the machine is down. Portalis has to reach the server, never the other way round.
"Permission denied (publickey,keyboard-interactive)" on port 2222
First complete the password change and authenticator enrolment in the web interface. Check the username, register your public key under Profile → SSH keys, and make sure your client presents that key (for example with ssh -i ~/.ssh/id_ed25519 -o IdentitiesOnly=yes -l you portalis.example.com -p 2222). The gateway requires keyboard-interactive authentication for the password and authenticator code. Read Activity for the precise rejection; changing the key policy affects everyone and should be a deliberate administrator choice.
The gateway closes while I am typing the code
You have two minutes from connecting to finish all the prompts. Load your key into the agent with ssh-add first, and have the authenticator open. A cut-off attempt is logged as gateway.challenge_aborted, not as a wrong code.
Adding a server fails on authentication
The gateway key is not in the target account's authorized_keys, or it is on the wrong account. Copy the key from Settings → Security again, and check you are appending it for the same user you typed in SSH username. Adding the server with a password once lets Portalis install the key for you.
Someone cannot see a server you granted
Open Groups → User access → Effective access and pick them. If the server is not listed, no rule grants it. If it is listed but they still cannot connect, check whether their account has the browser terminal switched off, and whether the server is enabled.
"Forgot your password" is missing from the sign-in page
No mail server is set. Configure Settings → Mail and send a test message; the link appears once mail works. Until then an administrator sets a one-time password under People.
Mail is not arriving
Settings → Mail → Recent deliveries shows what Portalis handed to your server and what it answered. The usual causes are a From address your server may not send as, STARTTLS chosen against a server that does not offer it (Portalis refuses rather than fall back to plaintext), and a wrong port for the chosen encryption.
An API key gets 403 on a write
The key has the read scope, which only allows GET. Create a key with the full scope for automation that changes things.
The Databases page is empty
Database access uses its own connections, not your servers. An administrator adds a connection under Databases → New connection, and a team is granted its group under Groups → User groups. Without both, the page has nothing to show.
Paid features stopped working
The licence check-in has not reached the licence server for over a week. Check the host's outbound connectivity to my.portalis.sh. The Settings → License & Modules says when the last successful check-in was.
Reading the logs
cd /opt/portalis
docker compose logs -f portalis     # the application
docker compose logs db              # database service messages
cat /var/log/portalis-install.log  # what the installer did
FAQ
Does anything have to be installed on the servers?
No. Portalis connects over SSH like any client. The only change on a server is one line in authorized_keys.
What happens to open sessions when I revoke access?
Removing or denying access triggers an immediate recheck of open browser and SSH shells. A shell closes when no remaining role or grant permits that server. Time-based expiry, including JIT and temporary accounts, is checked every 30 seconds. A different standing grant can keep a shell authorised after one grant is removed. Every new connection checks the current account, expiry, role, server and grants before dialing. Deactivating an account closes all its shells.
Can two people work on the same server at once?
Yes, each in their own session, each recorded separately when recording is enabled.
Are keystrokes recorded?
No. Recordings hold what the screen showed. Commands appear when the shell echoes them; a password at a hidden prompt normally does not. Any secret echoed or printed by a program is included. Guard matches may also write the submitted command to Activity.
Can I use my own SSH key to reach the servers?
Your key gets you into the gateway. From the gateway onwards Portalis uses its own key to reach the servers — that is what keeps the servers' credentials out of everyone's hands.
Does Portalis work with a bastion I already have?
It is one. Point it at the servers behind your bastion, or replace the bastion with it. What it will not do yet is chain through another jump host to reach a target.
Is there a limit on users?
No. Plans count servers, not seats. Adding the whole team costs nothing extra.
What happens if the Portalis host dies?
Nobody can reach the servers through it until it is back, which is the trade a gateway makes. Restore from your backup onto a new host, or keep a break-glass account on the critical servers for exactly that day.
Can I run it air-gapped?
Contact us for an Enterprise offline deployment. It needs the offline licence and matching check-in configuration, plus local copies of all container images (Portalis, PostgreSQL and Redis). A normal paid key still expects online validation, and updates must be transferred manually.
Where do I report a problem?
Through your account at my.portalis.sh, or the contact form on portalis.sh. For anything security-related, say so in the subject and we will handle it privately.